Getting Started
Intro to LogyXps One
Welcome to the Logyxps One platform. Whether you sell online via your website or on e-commerce marketplaces like Amazon, Flipkart, or offline via WhatsApp, Instagram Store, or even phone orders, we will simplify and automate your order fulfillment and shipping journey.
Logyxps One allows businesses of different sizes, individuals, or sellers who ship ten orders a day to Enterprise brands shipping thousands of orders per day to manage sale orders & customer returns from a single easy-to-use panel. Shippers can opt-in for
- Supply chain services – Domestic & International Shipping and Warehousing solutions
- Value-Added Services – Order Management, Channel Integrations, NDR Verification
You can follow the step-by-step guide for creating an account with Logyxps to complete your onboarding journey and shipping orders from Logyxps One.
Setting up your account
The recommended steps to set up your account are:
1. Create your account
You can start by creating an account from here by filling in your Email, Phone Number, Password. Accept the terms & conditions. Click Create Account
Note : Email ID can not be changed later. Please enter it carefully.
2. Add KYC and Business Address
- Enter your GST Number and upload your GST document. If you don’t have a GST Number, enter your PAN and Aadhaar details
- Enter business information like First Name, Last Name, Business Name, Phone number, Business Address, Pincode. Click Save & Proceed
- Verify Email Address by entering the OTP received on your registered email address.
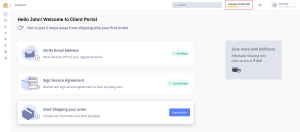
3. Signup Service Agreement
- Navigate > Dashboard > Sign Service Agreement > Review & Sign
- After reviewing the agreement Click Agree & Start Shipping
In case, of any modifications required in the agreement, feel free to reach our support helpdesk.
4. Add your pickup locations
Pickup locations are the physical locations that hold the inventory. Logyxps agents will pick up the shipments from these pickup locations. Learn more on how to Add Pickup Locations.
Navigate to Main Menu > Settings > Pickup Location > Add a New Pickup Location
5. Recharge your wallet
Wallet Recharge is required to ship your orders. Learn how to Recharge your wallet.
Note
A minimum wallet balance of INR 500/- is required to ship domestic orders and INR 2000/- for international orders.
Navigate to Main Menu > Finances > Wallet > Recharge Wallet
You can start shipping your orders now!
Orders
Overview
An order is the term used to define when your customer places a request to buy the products you sell. It contains the SKUs ordered, their corresponding quantities, prices, and discounts as applicable.In this section, you will learn about
Pickup Request
Pickup Request Lifecycle
| Status Type | Description |
|---|
| Scheduled | Newly created Pickup Request |
| Out for Pickup | Logyxps agent is out to pickup the shipment |
| Picked | Shipment is picked by Logyxps agent |
| Cancelled | Scheduled pickup is cancelled |
In this section
This article talk in depth about how to
1. Create Pickup Request
There are two ways to create pickup requests from the panel, lets learn both the ways –
Steps to create pick up request from Orders page
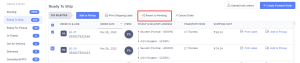
- Navigate – Main Menu > Orders > Forward Orders > Ready to Ship
- Select shipment(s) and click Add Pickup
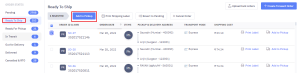
The pickup location will be the default pickup location selected during the sale channel configuration. Select preferred date & time slot for pickup. Click Add Pickup
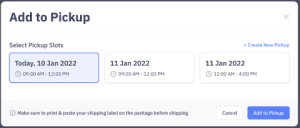
During pickup time slot selection, the various pickup points assigned for your orders are visible in case consignments are to be picked up from different locations.

- Select Time slot & click Add Pickup. Pickup request is successfully created.
The orders belonging to the newly created Pickup Request move from “Ready to Ship” to “Ready for Pickup” state.
Second method to create pick up request
- Navigate to Main Menu > Pickup Requests > Create Pickup Request
- Enter pickup location, date & pickup time slot
- Select from the ready to ship orders available at this pickup location. Click Create Pickup request
- Print & Paste the shipping labels on the shipments to be picked up
The orders belonging to the newly created Pickup Request move from “Ready to Ship” to “Ready for Pickup” state.
2. Update Pickup Request
Steps to change pickup location
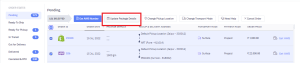
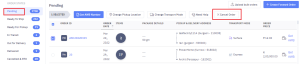
- Navigate to Main Menu > Orders > Forward Orders > Pending
- Select orders & click Change Pickup location
- Select the new pickup location from the dropdown menu, click Change Pickup location
3. Cancel Pickup Request
Steps to cancel scheduled pickups
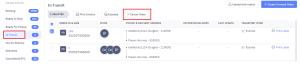
- Navigate to Main Menu > Pickup Requests
- Select Pickup Request(s) & click Cancel Pickup
- Click Yes, cancel pickup
The orders belonging to the Pickup Request move from “Ready for Pickup” to “Ready to Ship” state.
Domestic Order
Overview
Sale order is the term used to define an order your customer places for the products you sell. It contains the SKUs ordered, their corresponding quantities, prices, and discounts as applicable. It contains
- Sale Order: This contains the order number and order date
- Sale Order Items: The items sold in the order include the SKU Code, SKU name, price, quantity, applicable discount, and the associated taxes.
- Customer: Each order belongs to a customer having a Mobile Number and Address.
- Shipment: An order gets shipped in one or multiple shipments on account of being shipped from various physical locations or shipped at different times.
- Pickup Location: Each shipment belongs to a unique Pickup Location.
- Invoice: An invoice is an official document created after a shipment creation informing that the seller has made the sale to the buyer.
Sale Order Lifecycle
| Status Type | Description |
|---|
| Pending | Newly Created Order request (applicable only for order management mode) |
| Ready to Ship | Manifestation is done and AWB number is generated |
| Ready for Pickup | Pickup Request is created |
| In Transit | Shipment is picked up from Client warehouse; enroute to Customer |
| Out for Delivery | Shipment is out for delivery |
| Delivered | Shipment is delivered successfully to Customer |
| In Transit RTO | Shipment is returned by Customer; enroute to Client warehouse |
| Returned RTO | Shipment is returned successfully to Client Warehouse |
Create Forward Order
Overview
You can create sale orders in two ways.
Note : UCP has two modes: Direct Manifestation & Order Management Mode. Below order creation process is applicable only for Order Management mode. These orders are first created in pending state i.e not direct manifested.
Create a Single Order
Steps to create a Sale order
Navigate – Main Menu > Orders > Forward Orders > Create Forward Order
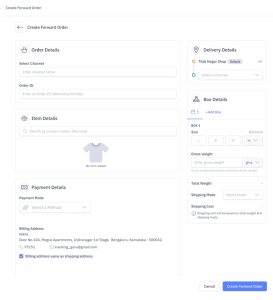
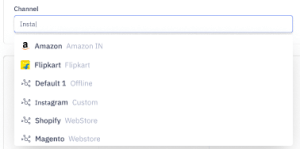
1. Select Channel
Select the Channel. Learn more about adding channels from here.
2. Add Items
Next, you can add items to the Sale Order.
- You can type the name of the item you want to add to the Sale Order. If present, the item details will populate in the drop-down list; else, create a new item.
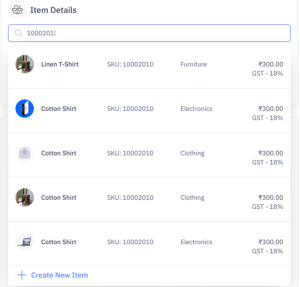
- Add more items as required
- Select “My package contains fragile items” to provide specific handling instructions during transit.

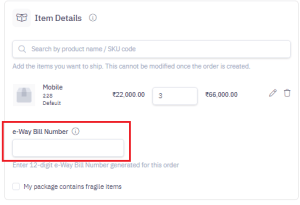
E-waybill Number
If your order value is more than Rs 50,000 then you need to mandatory mention a valid E-waybill umber in the item details.
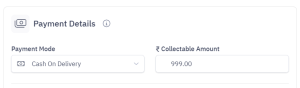
3. Payment Method
You can add the payment method
- Prepaid – Consignee has already paid the Invoice amount at the time of placing the order
- Cash on Delivery (COD) – Cash needs to be collected from Consignee at the time of delivering the order. The collection amount can be equal to or less than the order Invoice value
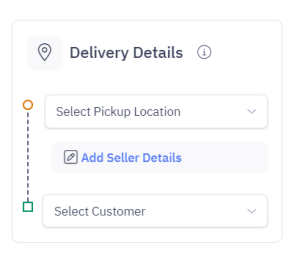
4. Add Pickup Location & Seller Details
Select the Pickup Location from where the Delhivery agent will pick up the shipment
- If it’s an existing Pickup Location, you can select it from the drop-down.
- Else create a new Pickup Location while creating a Sale order.
Adding Seller Details
You can also add Seller details (optional). The entered details (Name, GST Number, Address) shall be printed and visible on the Shipping Label. If no seller details are added, then the company details will be printed on Shipping label.
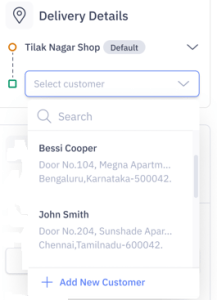
5. Add Customer
- Select the Customer to whom the shipment needs to be delivered. If it’s an existing Customer, you can select it from Drop Down or create new Customers while creating a Sale order.
- If the Billing and Shipping address is the same for a Customer, you can checkmark the billing address is same as the shipping address under the payment details section.
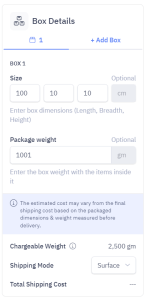
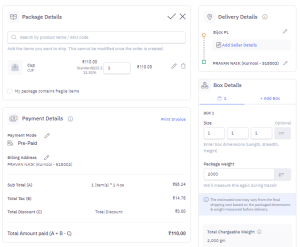
6. Box Dimension / Weight & Shipping Mode
Add the Box Dimensions & Weight & select the Shipping mode (Surface / Express).
You can view the chargeable weight which is higher of the dead or volumetric weight. Conversion of volumetric weight to dead weight is done through a volumetric divisor which will be visible on your agreement.
Shipping MPS Order
If you are shipping a Multi-Piece shipment, you can add upto 5 boxes in an order and enter their box dimensions and weight separately. All boxes in a MPS will be picked and delivered together.
The Sale order will be created in a Pending state and is ready for Manifestation. You can also print the Invoice from this page.
Adding Bulk Orders
If you are a business that ships more than ten orders a day, adding bulk orders will be a more optimal way to create orders.
Steps to add Bulk Orders
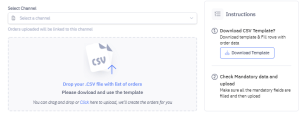
- Navigate to Main Menu > Orders > Forward Orders > Upload Bulk Orders
- Select the Channel that orders belong to
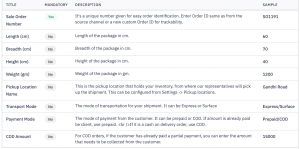
- Download the sample CSV template, fill in the mandatory Information and Upload file. Mandatory fields will have an * (asterik symbol) before the field name.
- If you ship COD orders, you need to mention the COD Amount properly to avoid payment disputes
- If you want to add multiple product SKU to the same order, please follow these steps:-
- Use the same order ID in the different rows as per your total number of products. Eg: If you have 3 products, fill 3 rows with the same order ID.
- In each row enter the different Product SKU Code, SKU Name, Quantity, and Price corresponding to each product.
- All the other mandatory fields remain the same

- Once uploaded, orders are created in pending state.
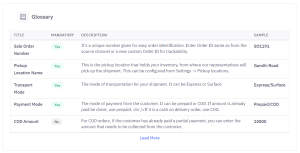
You can refer to the glossary for the required fields for Sale order upload
Ship Forward Order
Overview
You will learn about a step-by-step guide to process single and bulk orders. This article includes
Processing a single order
Steps to process an order
Navigate to Main Menu > Orders > Forward Order > Open a pending order
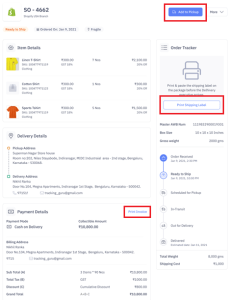
1. Shipment Manifestation
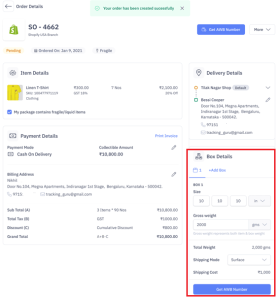
- In Box Details, enter Box Dimensions & Gross Weight (dead weight of the consignment including the box weight), Shipping Mode (Express /Surface)
- Review shipping cost & click Get AWB number. The order state moves from Pending to Ready to Ship.
2. Schedule a Pickup
- Click Add to Pickup to create a new pickup request or add to an existing pickup request. Once you schedule the Pickup, the order state moves from “Ready to Pick” to “Ready for Pickup”
- A Delhivery agent will be assigned for this pickup at a predefined timeslot
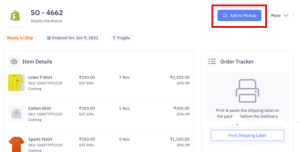
3. Print Shipping Label / Invoice
- Print Shipping label and paste it on the shipment
- If you request to print the same Shipping Label twice, the system will show you a warning message to confirm this
- Also print the invoice
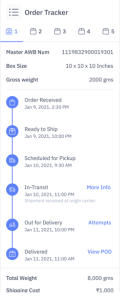
4. Track Order Status
- After the Logyxps agent picks up the Shipment, the order state moves from “Ready for Pickup” to “In Transit”
- On the Order details page, you can track the complete lifecycle of the Shipment in real-time
- In Transit – View Information showing the last location
- Out for Delivery – View number of delivery attempts made and last remarks updated by Logyxps agent
- Delivered – View Proof of Delivery
Processing bulk orders
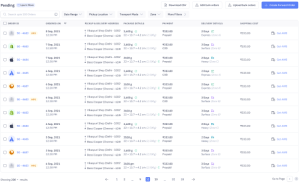
1. Shipment Manifestation
- Navigate to Main Menu > Orders > Forward Orders > Pending
- You can view the Chargeable Weight, Delivery Times and Estimated Shipping Cost before shipping your Pending Orders
- Select order(s) & click Get AWB number
Review Number of orders, Total weight, Shipping mode & Total shipping cost, then click, “Yes, Get AWB for ‘x’ orders.“
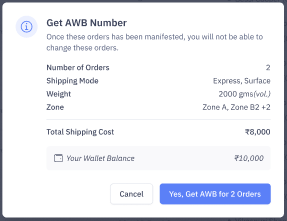
- In case of an insufficient wallet balance, you need to recharge the wallet with the required amount. Select the amount & click Proceed to Payment. Once the wallet balance is updated, continue generating the AWB number.
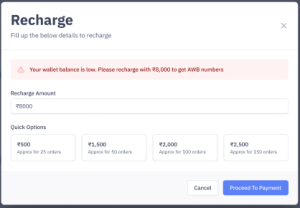
Note: A minimum wallet balance of INR 500/- is required to generate AWB numbers
2. Print Shipping Labels
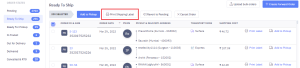
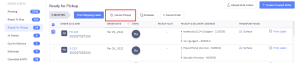
- Navigate to Main Menu > Orders > Forward Orders > Ready to Ship
- Select the order(s) & click Print Shipping Label
3. Print Invoices
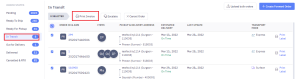
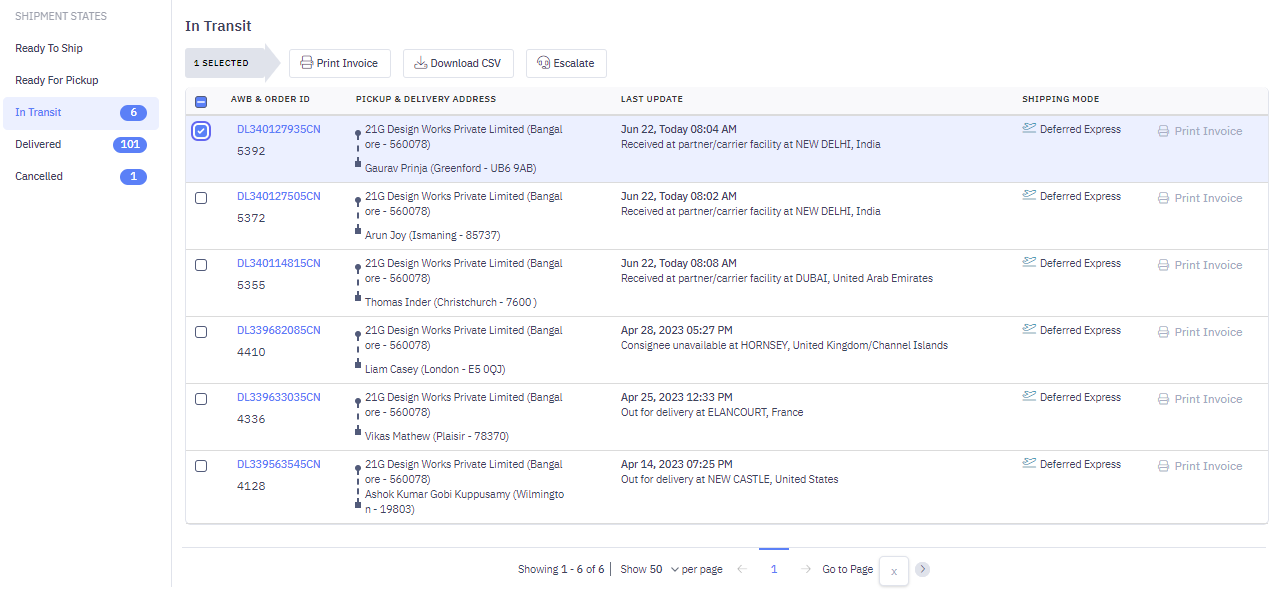
- Navigate to Main Menu > Orders > Forward Orders > In Transit
- Select the order(s) & click Print Invoice
Update Forward Order
Overview
You can update select attributes within an order until the shipment moves to the “In Transit” stage.
Editable Attributes
The following attributes of an order can be edited during the lifecycle of a shipment.
| Order Status | COD Amount | Pickup Location | Billing Address | Shipping Address | Shipping Mode |
|---|
| Pending | Yes | Yes | Yes | Yes | Yes |
| Ready to Ship | No | No | Yes | No | No |
| Ready for Pickup | No | No | Yes | No | No |
| In Transit | No | No | Yes | No | No |
| Out for Delivery | No | No | Yes | No | No |
Single Order Update
Steps to update a single order
- Navigate to Main Menu > Orders > Forward Orders > Pending Stage
- At the Pending stage, you can edit the COD Amount, Pickup Location, Billing & Shipping Address, and Shipping Mode
- You can update the Package Details by adding or removing items to the order, as well as edit the quantity and item attributes like Price, Discount, and Tax details
- Across other order stages, you can only update the Billing Address
Bulk Order Update
Steps to update orders in bulk
- You can update orders in Bulk using the Edit Bulk Orders Button by uploading a CSV with the relevant details
- Inaddition, for upto 5 order update you can select the checkbox against these orders and update the relevant information.
- Navigate – Main Menu > Orders > Forward Orders > Pending > Select Order(s)
- Select the order(s) and update Pickup Location and Shipping Mode in bulk

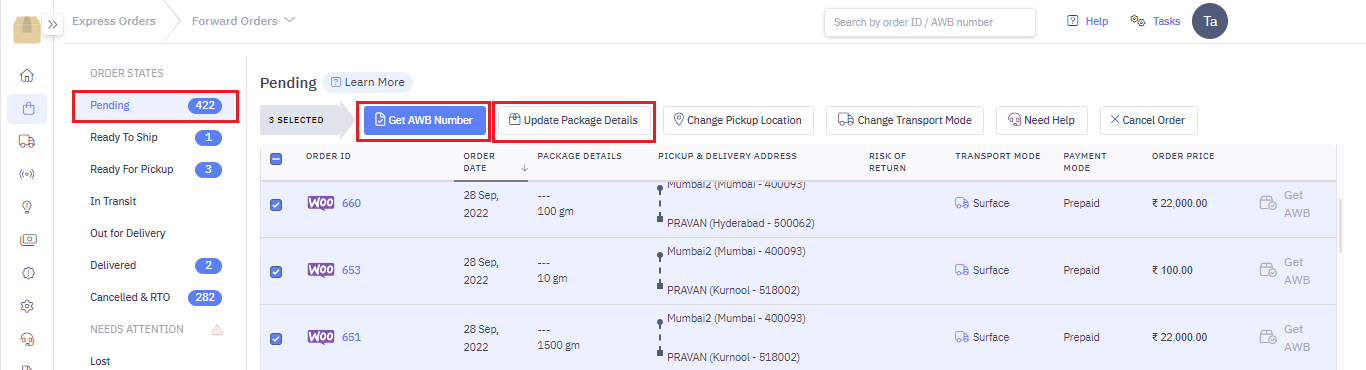
Bulk Package Details update
Steps to update package details
- Navigate – Main Menu > Orders > Forward Orders > Pending > Select Order(s)
- Select the order(s) and Update Package Details
- Update length, breadth, height & weight. Please note this will update dimesnions & weight entered for all selected orders.
Revert Actions
1. Ready to Ship > Pending
You can revert Orders from the Ready to Ship stage back to the Pending stage, which cancels the AWB number generated for this shipment and allows for modification of COD Amount, Pickup Location, Billing & Shipping Address, and Shipping Mode for the Pending order.
Steps to reverse ready to ship order(s)
- Navigate – Main Menu > Orders > Forward Orders > Ready to Ship > Select Order(s)
- Click Reverse to Pending
2. Ready for Pickup > Ready to Ship
You can revert Orders from the Ready for Pickup stage back to the Ready to Ship stage, which cancels the pickup request generated for this shipment and allows you to add the shipment to another Pickup request.
Steps to reverse ready to ship order(s)
- Navigate – Main Menu > Orders > Forward Orders > Ready to Ship > Select Order(s)
- Click Cancel Pickup
Cancel Forward Order
Overview
You can cancel a Sale order based on the below-mentioned scenarios. Then, depending on the shipment’s lifecycle, you get the Freight Amount refund in your Wallet or charged for an RTO (Return to Origin) flow.
| Order Status | Can I cancel the Order? | Will I get refund for Freight Amount? | What Should I do next? |
|---|
| Pending | Yes | Not Applicable | – |
| Ready to Ship | Yes | Immediate Refund | – |
| Ready for Pickup | Yes | Immediate Refund | – |
| In Transit | Yes | No Refund | You will be charged based on RTO movement |
| Out for Delivery | No | Not Applicable | You can ask the Consignee to return during Delivery and will be treated as a RTO movement |
| Delivered | No | Not Applicable | You can raise a Reverse Pickup request i.e. Customer Return |
Single Order Cancel
Steps to cancel a Sale order
- Navigate to Main Menu > Orders > Forward Order
- Open the Order you want to cancel and click on “Cancel Order” on the Order details page

Bulk Order Cancel
1. Pending Orders
Pending orders are newly created but not yet manifested.
- Navigate to Main Menu > Orders > Forward Order > Pending
- Select the order(s) you want to cancel and click on “Cancel Order.”
2. Ready to Ship Orders
Ready to Ship orders are manifested and AWB number is assigned but a Pickup Request is not yet created.
- Navigate to Main Menu > Orders > Forward Order > Ready to Ship
- Select the order(s) you want to cancel and click on “Cancel Order”

3. Ready for Pickup Orders
Ready for Pickup orders are manifested, AWB number is assigned and a Pickup Request is created but Physical pickup is still pending.
- Navigate to Main Menu > Orders > Forward Order > Ready for Pickup
- Select the order(s) you want to cancel and click on “Cancel Order”

4. In Transit Orders
In Transit, orders are enroute to Consignee. However, these orders are not yet shipped from the facility nearest to the Consignee; you can call back such orders.
- Navigate to Main Menu > Orders > Forward Order > In Transit
- Select the order(s) you want to cancel and click on “Cancel Order”
Courier Return/RTO
Overview
Courier Return or Return to Origin (RTO) refers to a Sale order that was undelivered and was returned to the client warehouse. This could be due to either
- Client canceling the order while it was in the “In Transit” stage
- Consignee rejecting the order while it was “Out for Delivery.”
Create a Courier Return/RTO
- Navigate to Main Menu > Orders > Forward orders > In Transit
- Select the order(s) and click “Cancel Order.“

Track Courier Return/RTO
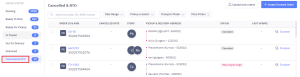
- Navigate to Main Menu > Orders > Forward orders > Canceled & RTO
- Returning to Origin – orders are returned by Customer and en route to Client warehouse
- Returned – orders have been returned successfully to Client Warehouse
Export Orders
Track Orders
Overview
You can track the shipment movement of your orders via Delhivery Client Portal. There are various states an order goes through –
Let’s learn how to track orders in each state.
Navigate > Dashboard > Main Menu > Orders Forward Orders
Pending
Orders that are created in draft state but not yet manifested are in Pending state. While the order is in pending state you can change the pickup location, transport mode.
Ready to Ship
Once a pending state order is manifested, it goes to Ready to Ship state & an AWB number gets assigned to the order. At this stage, you have the option to revert to pending, which cancels the AWB and the order goes back to pending state.
Ready for Pickup
After a manifested order is added to a pickup request it goes to Ready for Pickup state. Make sure you keep the package ready along with shipping label pasted on it at this stage.
In Transit
When Delhivery agent picks up a Ready for Pickup shipment from the pickup location, the order goes to In Transit state. At this state you can track the transit history from the order details page
Out for Delivery
When shipment has reached the destination hub of the customer & is on the way to be delievered to the customer’s address, the order will show under Out for Delivery
Delivered
When shipment is handed over to the customer it gets marked a delivered.
Canceled & RTO
An order that is canceled until its not picked goes in the Canceled stage. Any order which is canceled after its picked but not yet Delivered is marked as RTO.
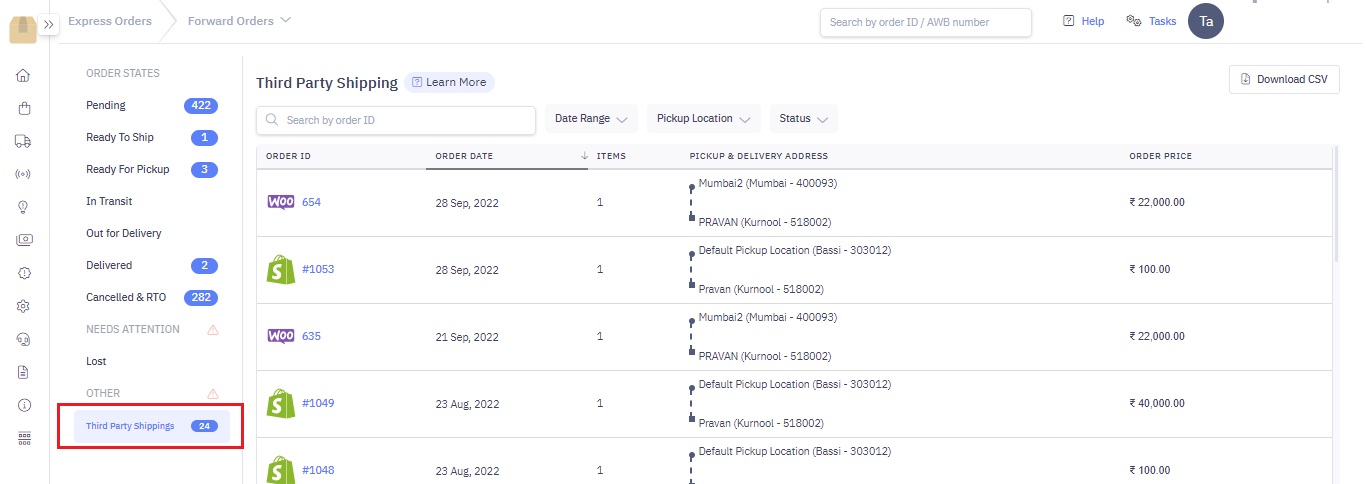
Third Party Shipping
Orders that are fetched in Client Portal via online channels (Shopify, Woocommerce) are created in pending state, but if they are manifested by a 3rd party portal & not the Delhivery Client Portal, these orders go to the Third Party Shipping state.
Lost
Any order thats gets lost in transit gets listed here. The occurence for this scenario is exceptionally low. You will have clear visibility on the same here.
Reverse Orders/DTO
Overview
If a customer wants to return a delivered order, you can create a Reverse Pickup. They are also called Customer Return or Direct-to-Origin (DTO). It contains
Reverse Order Number This contains the reverse order number, order date
Reverse Order Items: The items returned in the order include the SKU Code, SKU name, and quantity
Return Address: Each shipment will have a return address to where it needs to be delivered
Reverse Order Lifecycle
| Order Status | Description |
|---|
| Ready for Pickup | Return request is created and pickup is ready |
| In Transit | Shipment is picked from the customer and enroute to return address |
| Out for Delivery | Shipment is out for delivery to the return address |
| Delivered | Shipment is delivered successfully to the return address |
In this article
This article talk in depth about how to
Steps to create & a Customer Return
Navigate to Main Menu > Orders > Click Create a Reverse Order
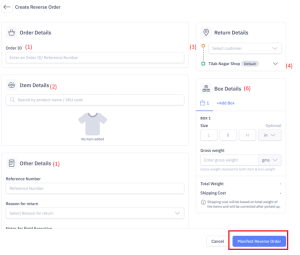
1. Add Order& Other Details
- Enter Order ID (This is source channel sale order number)
- Enter the Reference Number (This can be AWB number of the original shipment if the courier partner was other than Delhivery)
- Reason of Return
- Notes for the Field Executive if any
2. Add Items
Add items to the Reverse Order.
- You can type the name of the item you want to add to the Sale Order. If present, the item details will populate in the drop-down list; else, create a new item.
- Add more items as required
- Select “My package contains fragile/liquid items” to provide specific handling instructions
3. Add Customer details
Select the Customer to whom the shipment needs to be picked from.
4. Add Return Location
Select the Return Location from where the Delhivery agent will return the shipment
5. Box Dimension / Weight & Shipping Mode
Add the Box Dimensions & Weight & select the Shipping mode (Surface / Express). Add box as required.
6. Manifest Return
Click** Manifest Reverse Order**, this will create a return & an AWB number. The status of the return will be Ready for Pickup.
The Order tracker will give you detailed information about your return shipment.
International Orders
Overview
International order refers to Exports wherein the order is picked from a client warehouse within India and is delivered to a customer outside India.
You have to activate Cross Border service on Delhivery Client Portal before creating or shipping an international order. To learn how to activate the service, click here.
International Order Lifecycle
| Status Type | Description |
|---|
| Ready to Ship | Manifestation is done and AWB number is generated |
| Ready for Pickup | Pickup Request is created |
| In Transit | Shipment is picked up from Client warehouse; enroute to Customer |
| Delivered | Shipment is delivered successfully to Customer |
| Cancelled | Shipment is cancelled before pickup |
In this section
Create International Order
Overview
There are two ways to create international orders.
Create a Single Order
- Navigate to Left Panel > Orders > International Order > Create New Order

1. Shipment Type
There are five types of International Export shipments that you can ship.
- Document
- Sample
- Gifts
- Commercial Cargo
- Commercial (Non-document / CSB5)
Compliance for Shipping International Orders
Please note that the declaring the correct shipment type is crucial to ensure that all the necessary compliance details and documents are followed during Shipping.
2. Add Pickup Location & Seller Details
Select the Pickup Location and Seller details from where the Delhivery agent will pick up the shipment.
- If it’s an existing Pickup Location or Seller, you can select it from the drop-down.
- Else create a new Pickup Location or Seller while creating an International order.
Seller KYC is mandatory to ship Orders
You have to submit verified KYC details for the shipper before creating orders. If the submitted KYC are not correct, the shipment will be seized at Delhivery facility and will not be handed over to carrier.
3. Add Customer Details
- Add the customer details by entering the Customer Name, Phone Number, full Address and destination country and postal code
- The list of countries will be a drop down that includes where you can ship your products to
4. Add Items
Based on the shipment type, you’ll have to enter item details.
- For Documents, only Item Description is needed
- For Sample & Gifts, Item Description, Category, HSN Code, Quantity and Price is needed
- For Commercial Shipments, Item Description, Category, HSN Code, Quantity, Price, and IGST rate is needed
5. Invoice Details
For all shipment type except Document, you need to mention Invoice details
- INCO Terms
- Invoice Number and Invoice Date
- IGST Payment Status
6. Box Dimensions & Weight & Shipping Mode
Add the Box Dimensions (LBH in cms) & Dead Weight in kgs.
You will be shown multiple shipping modes to choose from.
- Document – used only for shipment type document
- Deferred Express – slower service which is economical
- Express – faster deliveries which costs a little extra
Click Create International Shipment to create the International order.
Adding Bulk Orders
If you are a business that ships more than ten orders a day, adding bulk orders will be a more optimal way to create orders.

Steps to add bulk orders
- Navigate to Left Panel > Orders > International Order > Upload Bulk Shipments
- Download the sample CSV template, fill in the mandatory Information and Upload file. Mandatory fields will have an * (asterik symbol) before the field name.
- Upload the file and your created orders will reflect under “Ready to Ship” tab
Ship International Order
Overview
You will learn about a step-by-step guide to process single and bulk orders. This article includes
1. Schedule a Pickup Request
- Click Add to Pickup to create a new pickup request or add to an existing pickup request. Once you schedule the Pickup, the order state moves from “Ready to Pick” to “Ready for Pickup”
- A Delhivery agent will be assigned for this pickup at a predefined timeslot
2. Print KYC Documents
- To ship International orders, you have to print three documents
- Shipping Label
- Invoice
- Authorization Letter
- You can print these documents for one order at a time or select multiple orders and download all in bulk
- These documents are mandatory to be handed over at the time of pickup of international orders
3. Real-time tracking for orders
- After the Delhivery agent picks up the Shipment, the order state moves from “Ready for Pickup” to “In Transit”
- On the Order details page, you can track the complete lifecycle of the Shipment in real-time
- In Transit – View Information showing the last location
- Delivered – View Proof of Delivery after 24 hours of delivery
Non Delivery Report (NDR)
Overview
NDR stands for Non Delivery Report i.e. orders that were attempted but undelivered.
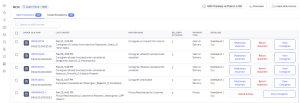
NDR Actions
Navigate – Main Menu > Exceptions & NDR > NDR > Open Exceptions
You need to take an action whenever an NDR is raised. You can view the number of delivery attempts and the last undelivered remark by the Delhivery agent. Following NDR Actions are allowed on Delhivery Client Portal.
- Forward Shipments
- Reattempt delivery
- Return Shipment
- Reverse Shipments
- Reschedule pickup
- Cancel Pickup
- View Consignee Details
1. Reattempt Delivery
You can opt for reattempting delivery for a maximum of three times for a Forward shipment. If the third attempt is also unsuccessful, the status of the Shipment will move from “Out for Delivery” to “RTO”.
2. Return Shipments
You can opt for returning the undelivered shipments back to Origin if the consignee is not willing to accept the delivery.
3. Reschedule Pickup
You can opt for rescheduling a Reverse Pickup for a maximum of three times for a Reverse shipment. If the third attempt is also unsuccessful, the status of the Shipment will move from “Scheduled” to “Cancelled”.
4. Cancel Pickup
You can opt for Cancelling the Reverse Pickup if the consignee does not want to return the Shipment.
5. View/Edit Consignee Details
You can view the Consignee Details (Delivery Address, City, and Pincode). If you want to edit shipment details, you can go to the Shipment details page by clicking on the AWB Number and edit consignee details or payment mode.
Bulk NDR Actions
If you want to take NDR Actions in bulk, you can Select multiple NDR shipments and take one of the NDR Actions.
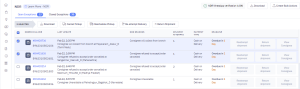
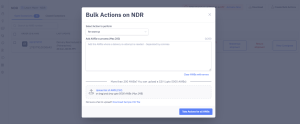
You can also click on “Create Bulk Actions” CTA, select the Action you want to perform. You can either enter maximum of 200 AWB numbers in the below section or choose to upload a list of maximum 5000 AWBs through a CSV file.
This bulk action can take few minutes to complete, you can proceed with other things while the task runs in the background. You can check the summary from the Tasks section once it is completed.
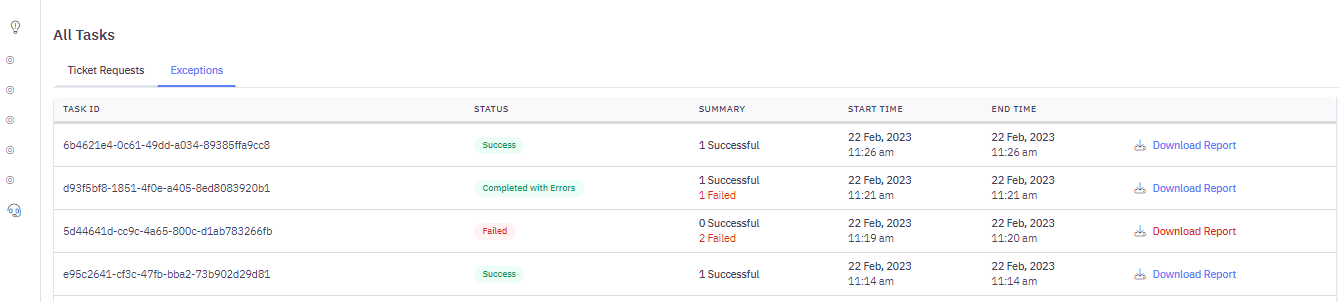
Activity Logs
You can also view all actions (Download NDR, Bulk NDR Action) on the Tasks page along with the Status and Summary, Start Time and End Time of the request, and download the Excel Report of the action taken.
Navigate – Top Banner > Tasks > Exceptions
Shipment Exceptions
Overview
Shipment Exceptions refers to cases where shipments are stuck in transit and need client inputs to be delivered to consignee or returned back to client.
In this article, you will learn about
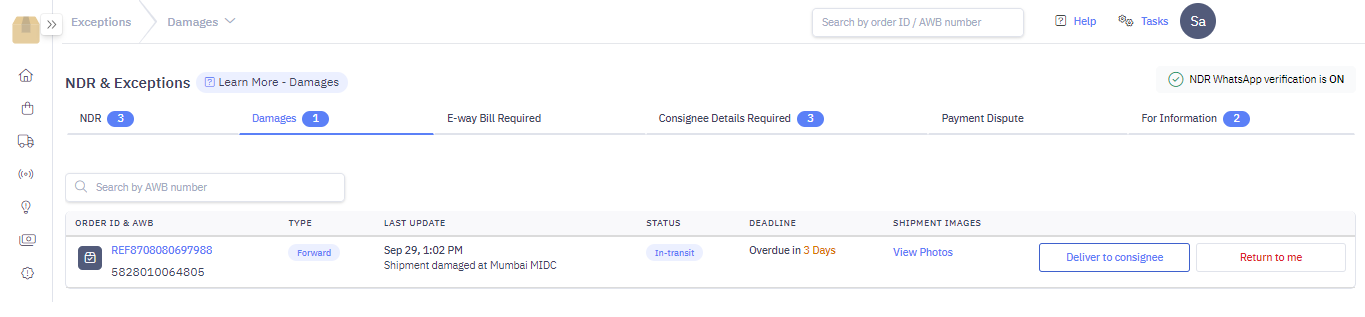
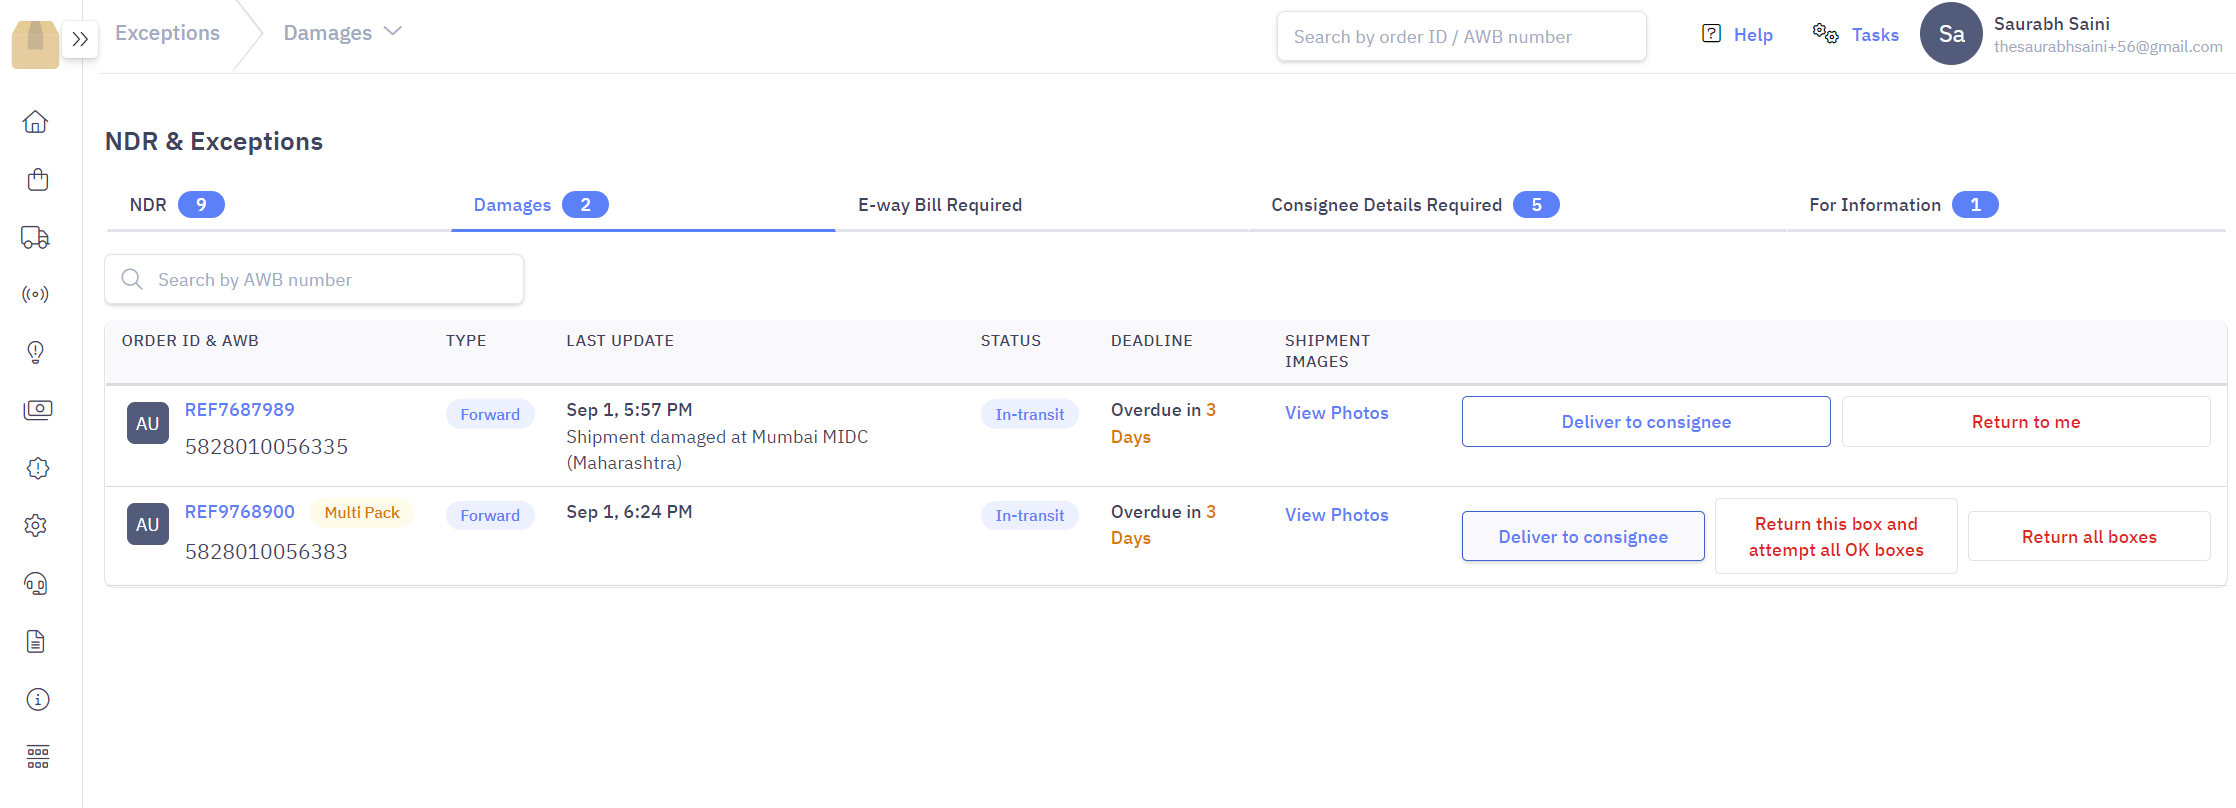
1. Damaged shipments
This exception occurs when shipments are damaged during transit.
For Single box shipment, you can view the waybills that are damaged during transit and view the photos. You can request for more photos if you are not satisfied with the current image.
- You can request Delivery to consignee and we’ll attempt customer delivery, or
- You can request Return to seller and we’ll return the shipment
For Multi piece shipment, you can view the box waybill which is damaged. If you want to return
- You can choose to return the damaged box and deliver all okay boxes, or
- You can return all boxes belonging to the shipment
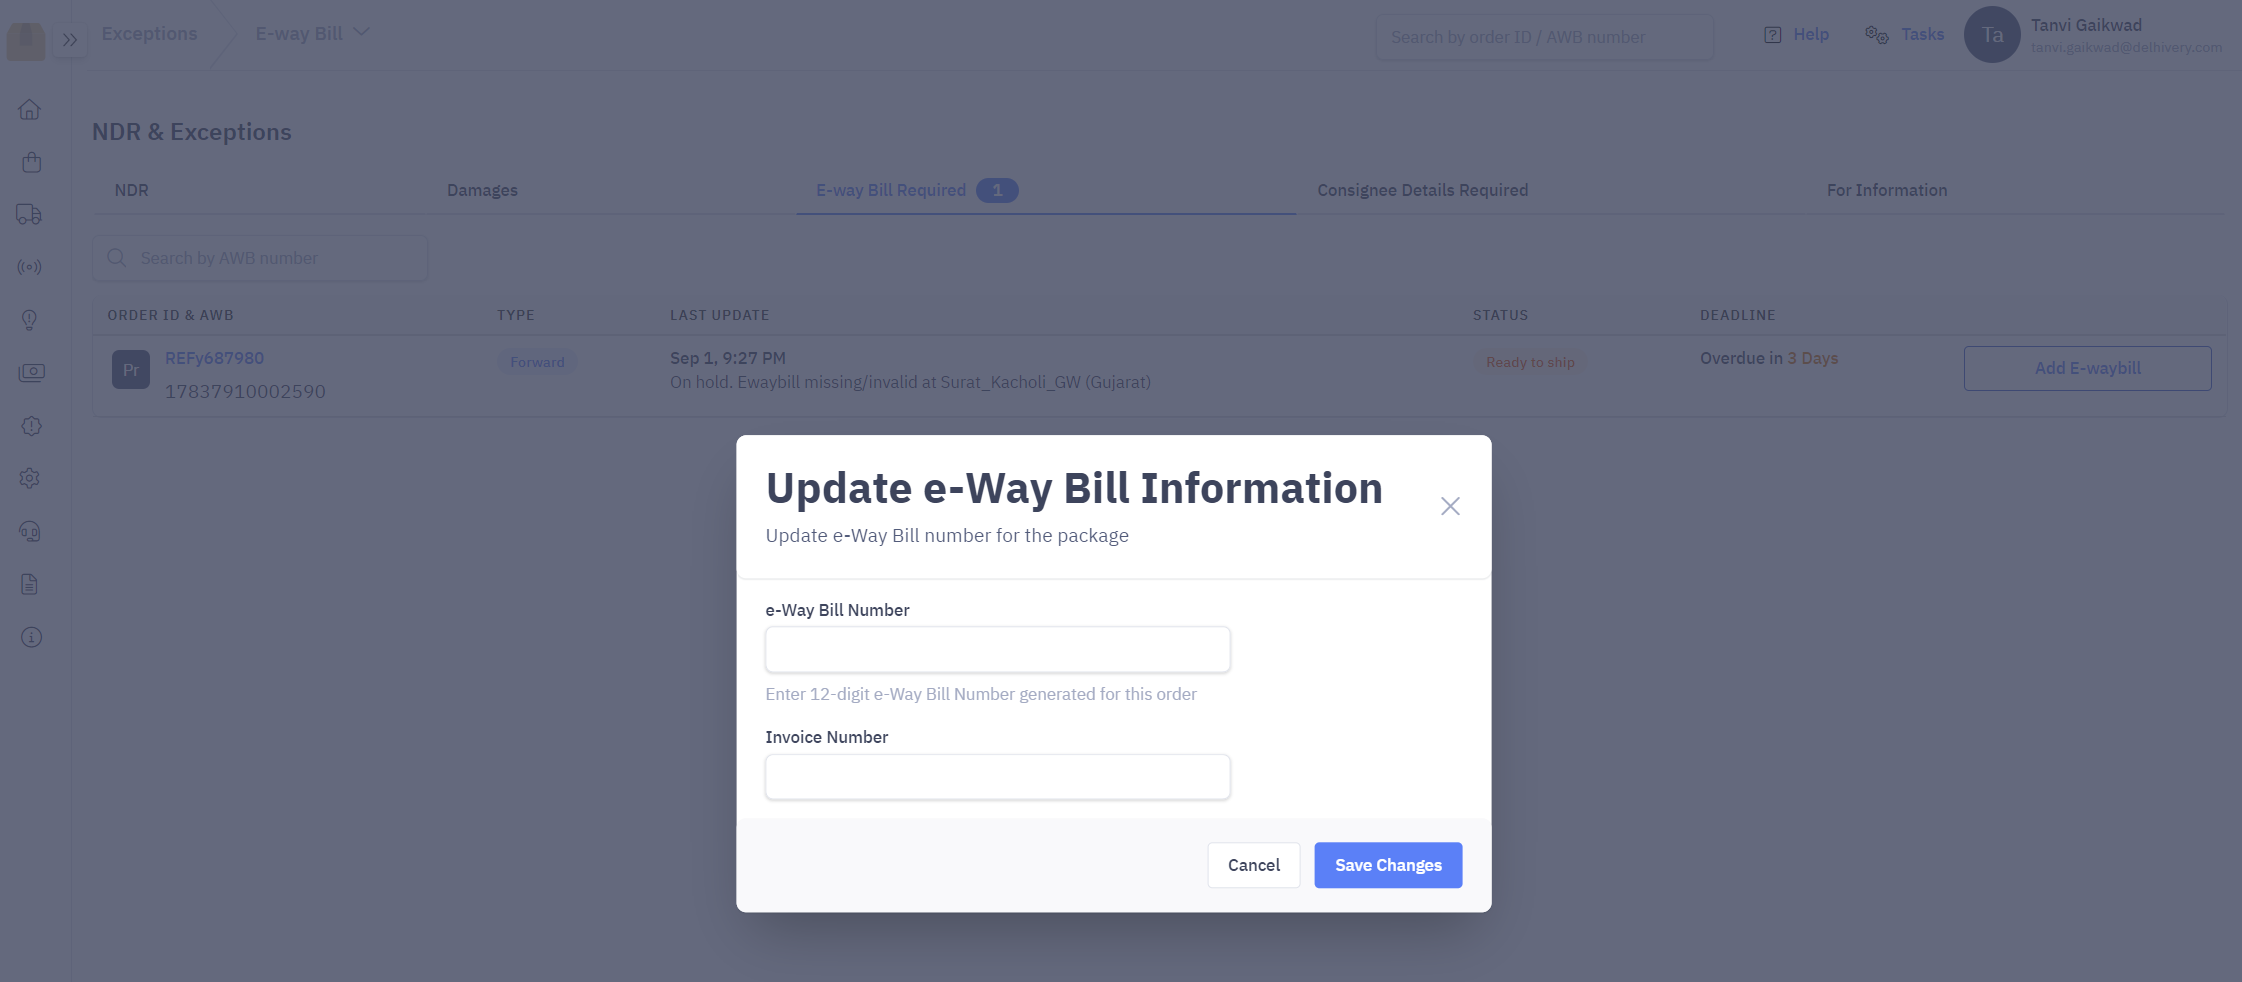
2. E-waybill missing
This exception occurs when E-waybill is missing or has expired during transit. You need to update the E-waybill number and Invoice number. We will validate the E-waybill number and process the request.
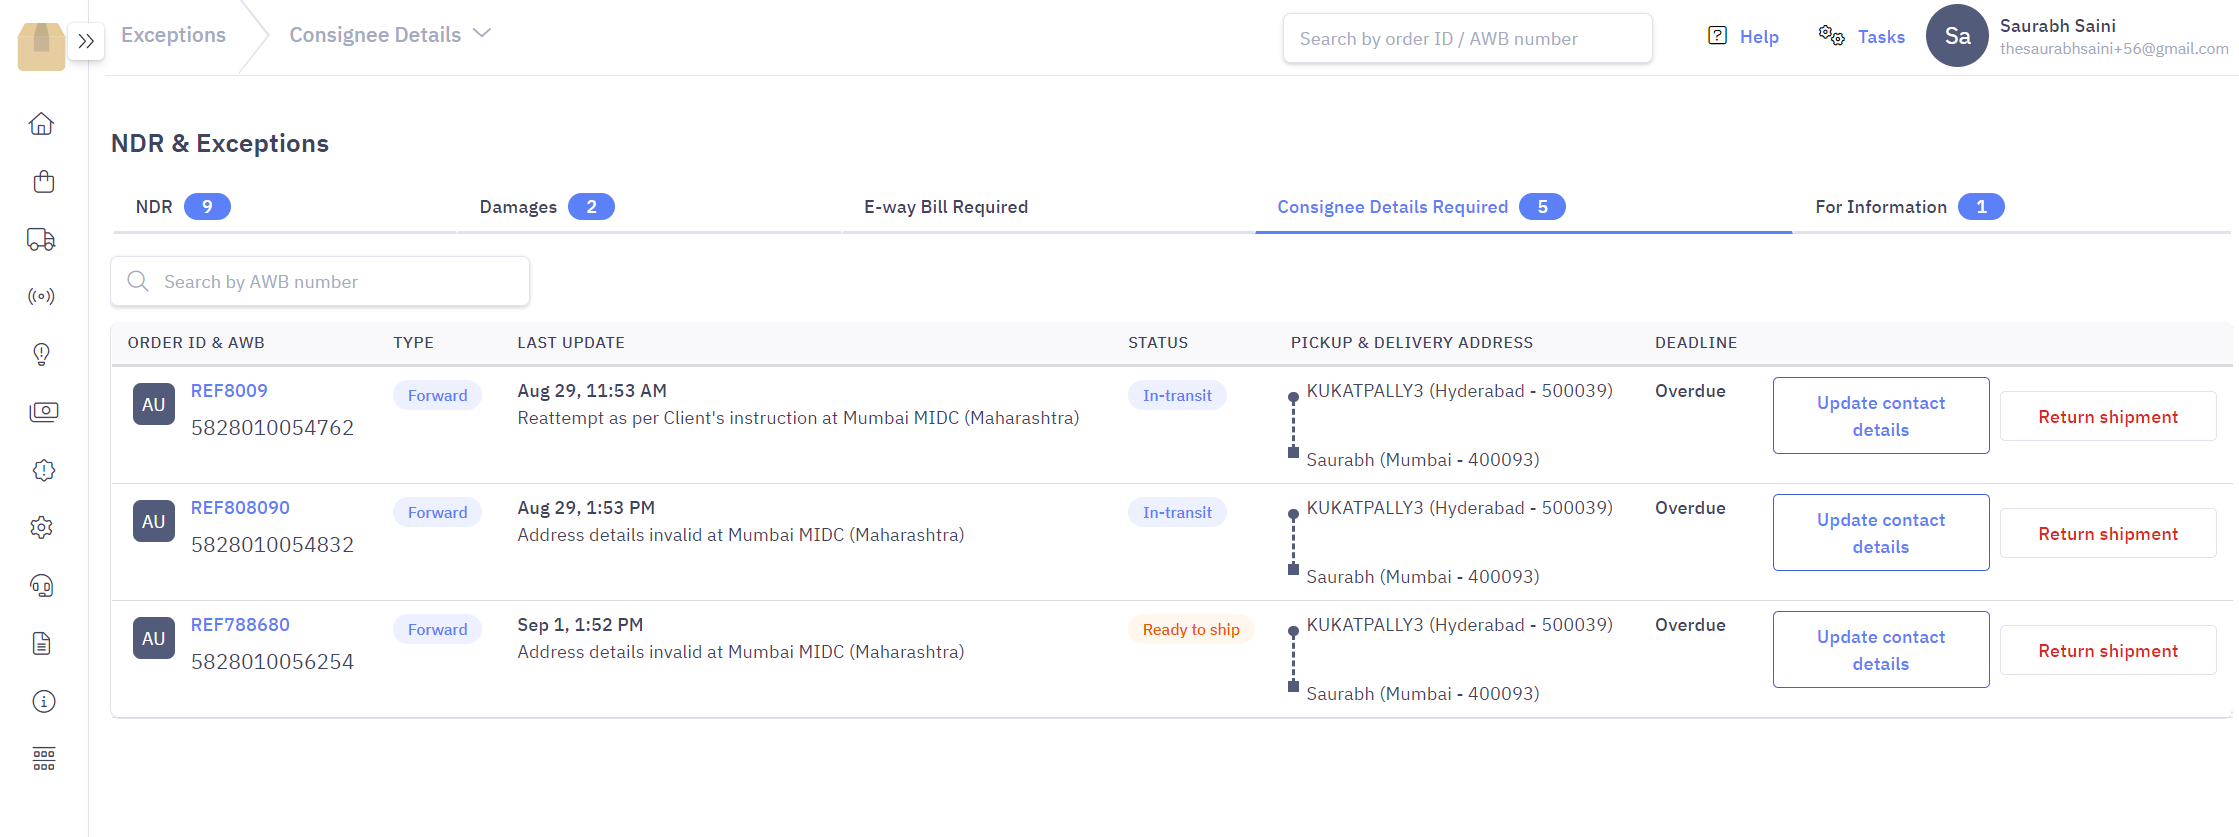
3. Consignee Details Required
This exception occurs when Consignee Details (Phone or Address) is incorrect or is not reachable and needs updation.
- You can request Return to me and we’ll return the shipment
- You can update the consignee phone number, or
- You can also update the consignee address. Note that your new address needs to belong to the same pincode.
For Return DTO shipments, you can either cancel the pickup or update the consignee details.
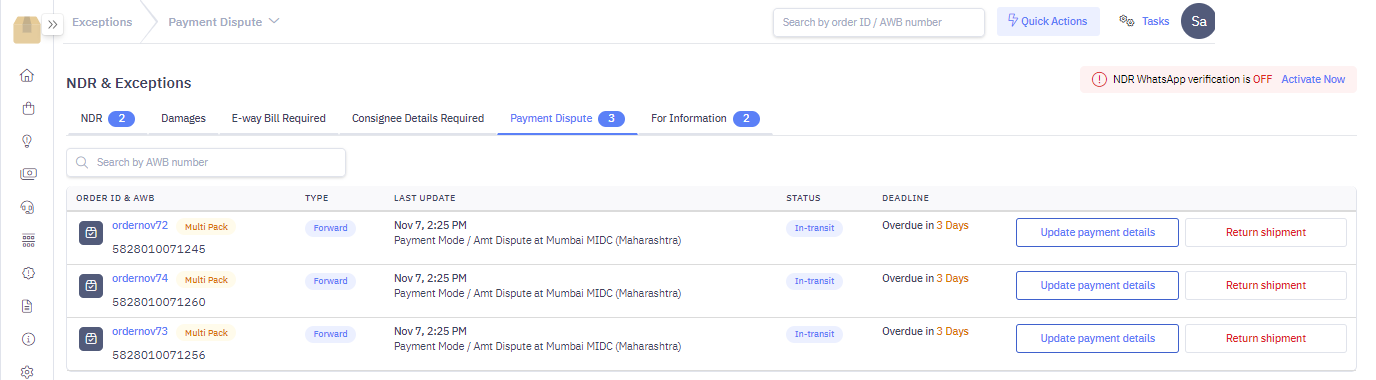
4. Payment Dispute
This occurs when a shipment delivery is on hold due to dispute in the payment mode. Example the shipment was prepaid but the shipping label is COD. You can either –
- Update the payment details
- Return the shipment
Finances (Delhivery Miles Wallet)
Overview
Delhivery Client Panel comes with a Digital Wallet (Delhivery Miles) that allows you to ship orders seamlessly.
If you have opted for Cross Border service for shipping internationally, you account will have two typess of wallets.
- Domestic wallet
- International wallet
You can track three types of transactions via both type of wallets.
Wallet Recharges
Wallet Recharge is required to manifest & generate AWB numbers for orders. This article will guide to recharge your wallet.
Steps to Recharge wallet
- Navigate to Main Menu > Finances > Wallet > Click Recharge Wallet
- Enter the recharge amount & click Proceed to Payment. You can make the payment via a credit / debit card.
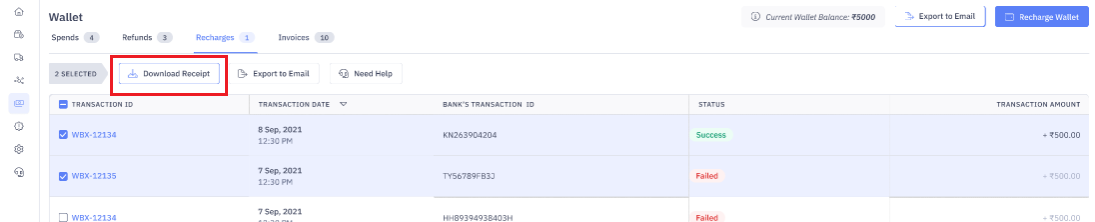
Steps to view Recharge History
- Navigate to Main Menu > Finances > Wallet > Recharges
- This section will give information about the Transaction ID and Date, Amount and Status of the Transaction
- You can also select the Transaction IDs and download payment receipts
Wallet Deductions
AWB number is generated only if the wallet has the minimum account balance of INR 500/- to purchase the shipping labels for domestic shipments & INR 2000/- for international shipments. This section will guide about the wallet deductions made against each AWB number purchase transactions.
- Navigate to Main Menu > Finances > Wallet > Spends
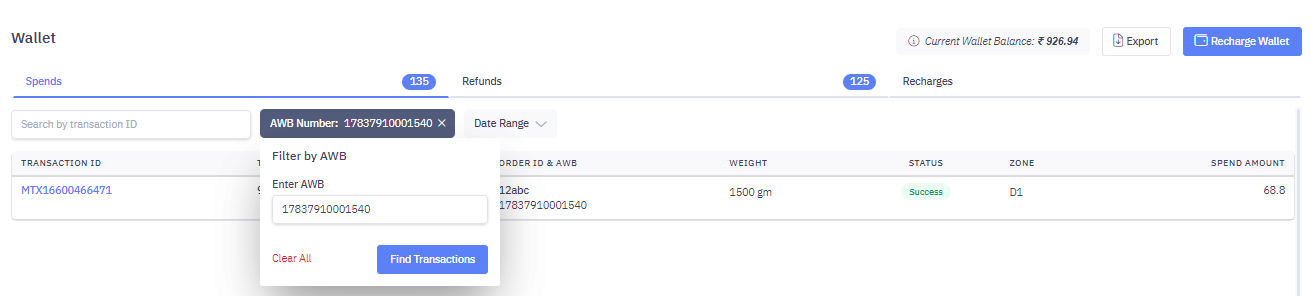
- This page includes key information like Transaction ID and Date, Order ID and AWB Number, Weight and Zone type, and Spend Amount
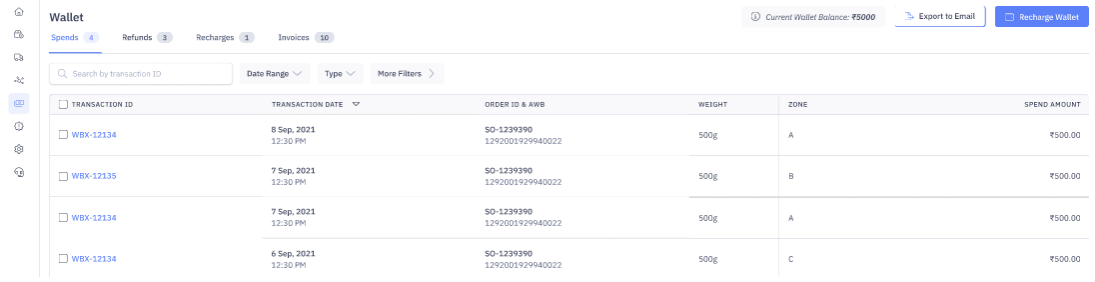
- You can search transactions via an AWB number as well
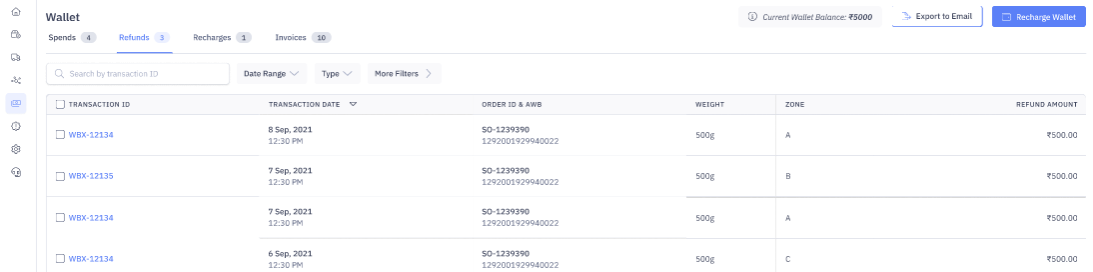
Wallet Refunds
In case of order cancellations or if the shipped orders are lost or damaged In transit, refunds will be processed.
- Navigate to Main Menu > Finances > Wallet > Refunds
- This page includes key information like Transaction ID and Date, Order ID and AWB Number, Weight and Zone type, and Refund Amount
Wallet Export
You can export wallet transactions with the Export feature. The export file consists of consolidated data of deductions, refunds & recharges.

Finances(COD Remittance)
Overview
Cash collected for COD orders are remitted from Logyxps to your Bank Account.
Remittance Cycle
Logyxps remits cash every 48 hours. For example, cash collected from deliveries on Monday will be remitted on Wednesday.
It contains
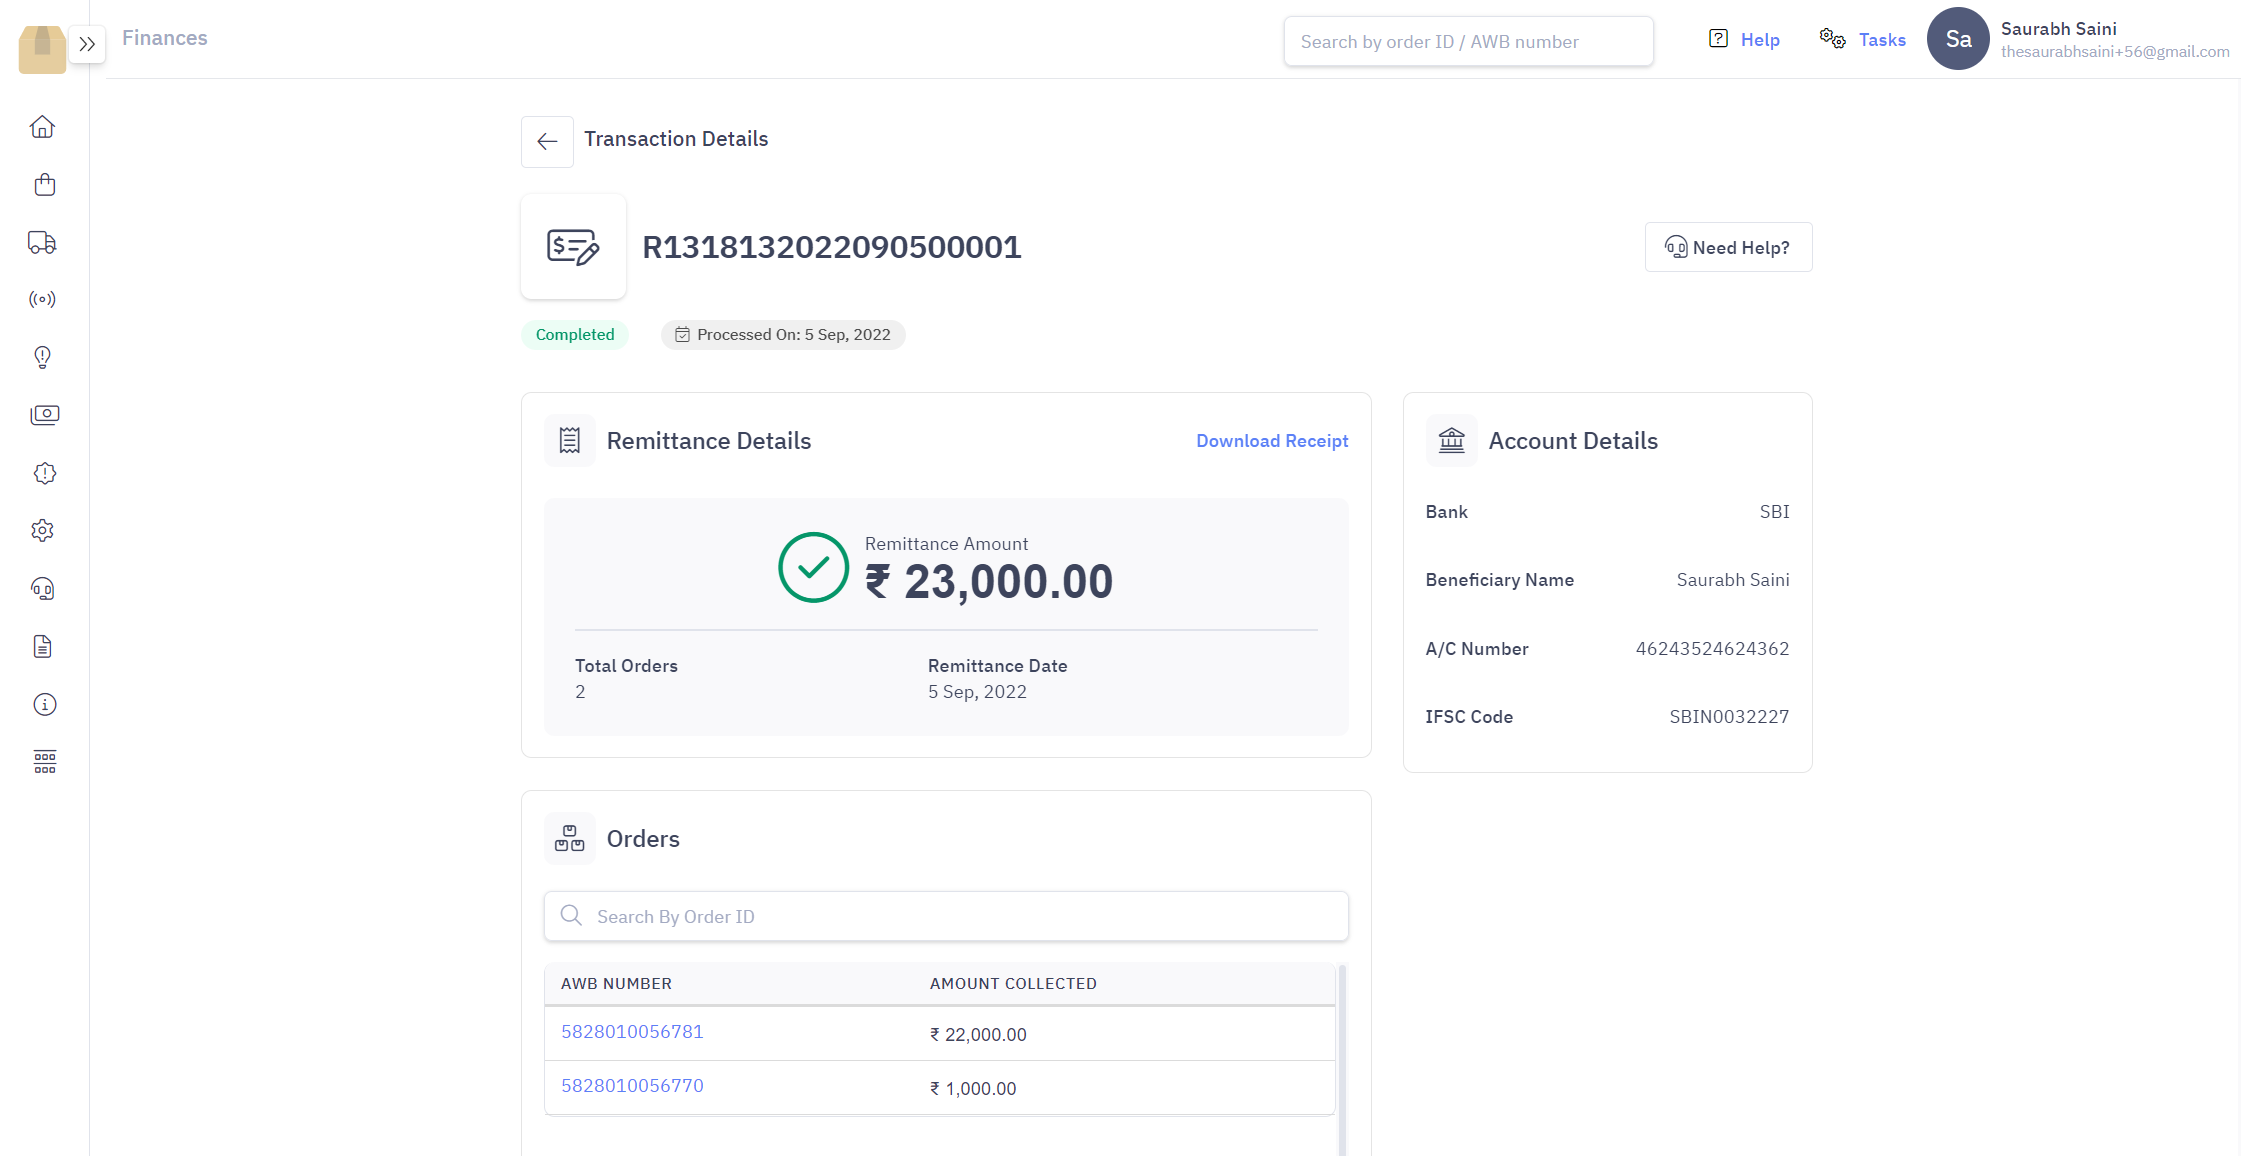
Remittance Details – Remittance number, Processed & Remittance Date, Status
Order Details – Number of orders, Order ID, Items quantity, Amount collected
Steps to view COD Remittance
- Navigate – Main Menu > Finances > Remittance
- You can view list of all COD Remittances that have been successfully remitted to your bank account as well as future scheduled remittances

- You can click on a Remittance number to view details of the AWB numbers and COD amount and download receipt
Remittance Status
| Status Type | Description |
|---|
| Pending | Remittance is yet not completed |
| Completed | Remittance is succesfuly completed |
Reasons for Locked Remittances
If your have negative wallet balance, your COD remittances shall be locked. You can recharge your wallet, and your remittances shall be processed immediately on next working day.
Support Tickets
Overview
Logyxps Client Portal has an easy process to raise tickets, where you can get fast responses for your operational issues as well as product or billing issues.
In this article, you will learn about
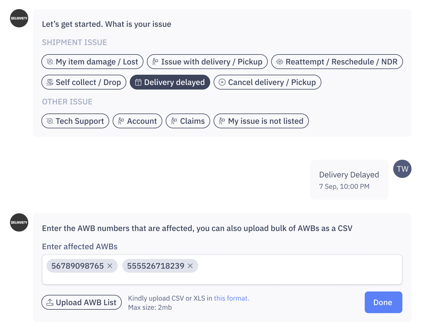
1. Creating support tickets
Navigate – Main Menu > Support > Raise Issue
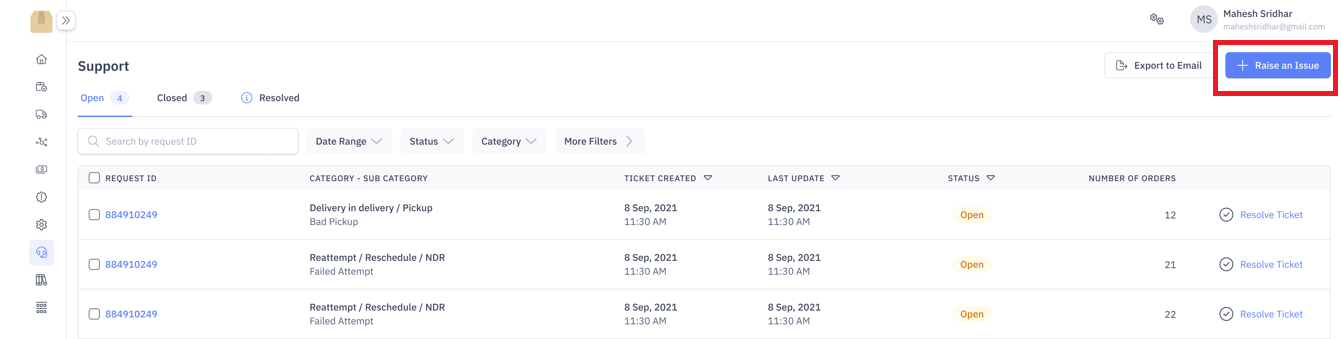
Or Navigate – Main Menu > Orders > Forward or Reverse Orders > Select required order(s) > Click Escalate. You can select orders that at any stage.
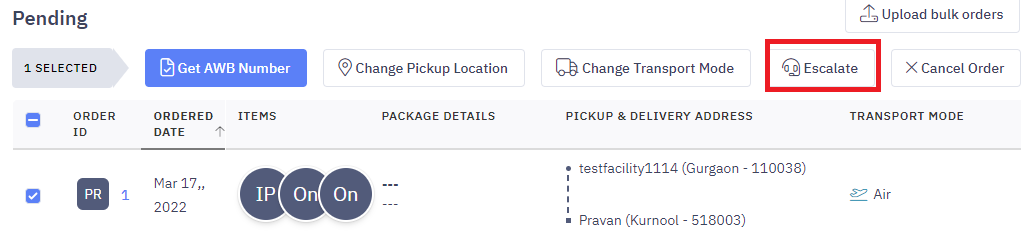
You can select the category and sub-category of your issue and enter the AWB number(s).
Please make sure you enter a valid AWB Number that belongs to your account
You can enter a maximum of 10 AWB numbers in the form or upload a CSV file with a maximum of 200 AWB numbers in a single request
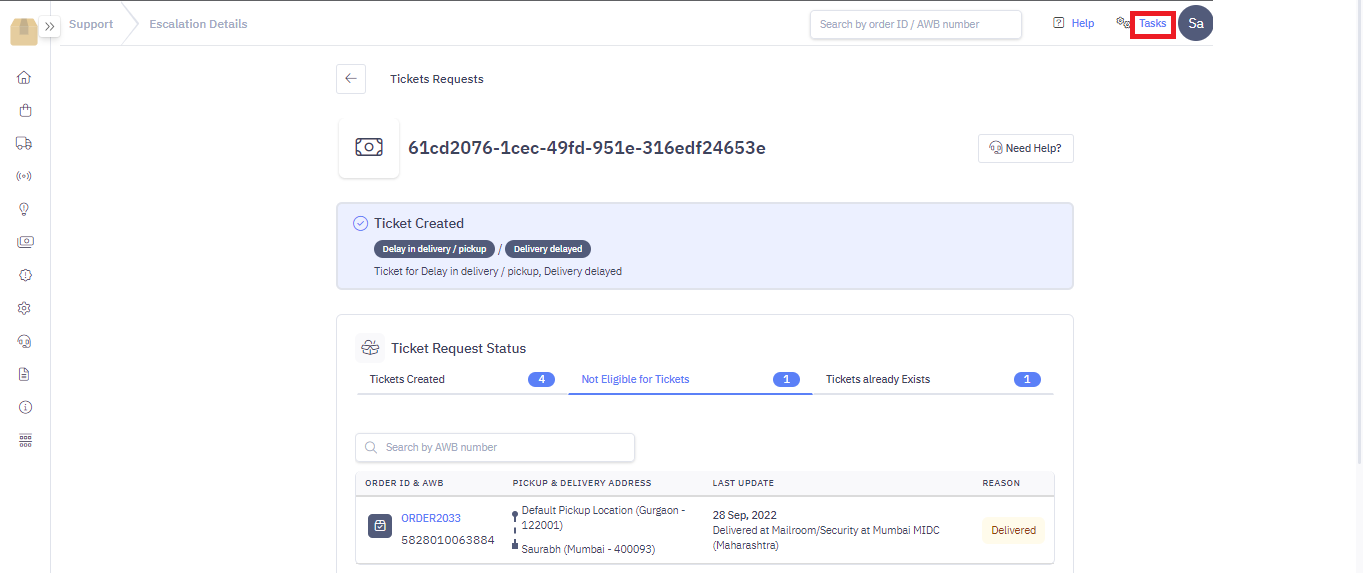
2. Non-actionable tickets
When you raise a Shipment Issue against your AWB Number, there are three scenarios.
- Ticket Already Exists : If there is an existing ticket for this AWB Number, you can see the existing ticket ID and track resolution
- New Ticket Created : If your shipment is delayed and there is no existing ticket. You can see a new ticket ID which will be assigned to a Delhivery help agent for resolution.
- Not Eligible for Ticket Creation :
- If your shipment is on time, you will be shown the estimated date of delivery and will not be allowed to raise a ticket.
- If your shipment is in NDR, then you will be asked to take action on your shipment first. You can click on NDR button and either request for delivery re-attempt or return the shipment.
3. Actionable tickets & statuses
Support tickets are placed in three buckets
3.a Open Tickets
Steps to create an open ticket
Navigate – Main Menu > Support > Raise Ticket
Select the required Category / Sub category
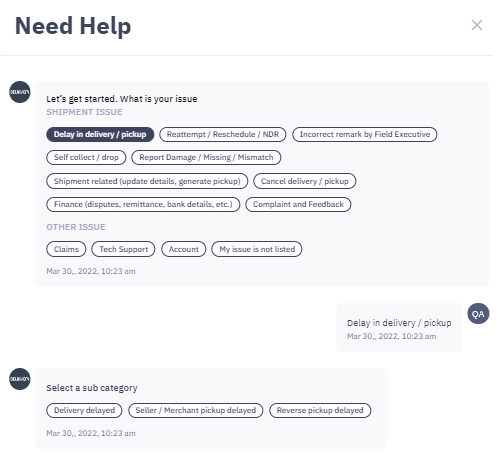
As per the selected category, submit the required information like Order ID / AWB number etc. Click Done
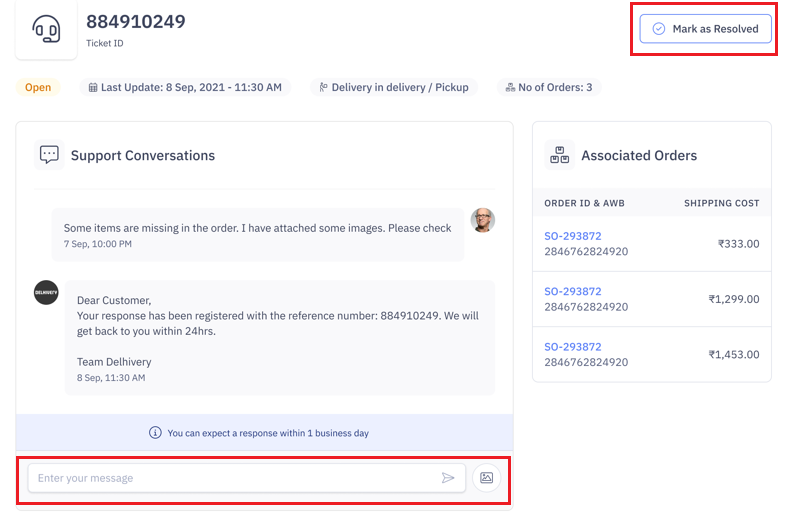
An open ticket gets created with a ticket ID & associated orders. You can converse with the support team from this window
The Delhivery support team responses within 2 hours of an issue raised. You can mark the ticket as resolved once the issue is fixed.
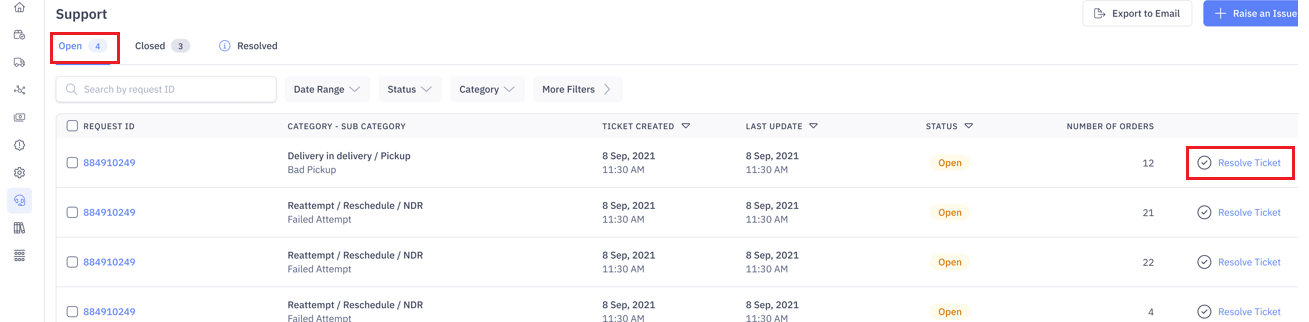
3.b Resolved Tickets
Steps to resolve tickets
- Navigate – Main Menu > Support > Open
- Select Request ID > Resolve Ticket
Note
- When an open ticket is marked as resolved the ticket goes to the Resolved bucket
- You can re-open a resolved ticket within 48 hours, post which the ticket is Closed.
4. Bulk Actions on Support Ticket
The panel offers two actions that can be taken in bulk for support tickets –
- Download support tickets
- Upload comments
Steps to download support tickets & upload comments –
- Navigate to Left Menu > Support > Open Tickets > Click Download Open Tickets
- Go to right top – Tasks > Ticket Requests
- Click Download ticket file for the latest Task Title ‘Download/Export Tickets’. This will download a csv file.
- To upload comments in bulk for these tickets, mention your comments in column “M’ of this csv file. Save this file.
- Go to Support > Open Tickets > Click Bulk Upload Comments
- Upload the csv file from this page.
- Second way to update comments is from Support > Open Tickets
- Select the Open tickets > Add Comment
- Mention your comments in the dialog box that opens. Click Submit Comment
These same actions can be performed for Resolved tickets. For Closed bucket you can download tickets in bulk but cannot update comments.
5. Categories/ sub-categories for support tickets
Learn about the various categories of support related issues handled by Delhivery team.
5.a Domestic Service – Shipment Issues
| Category | Sub Category |
|---|
| Delay in delivery / pickup | Delivery delayed |
| Delay in delivery / pickup | Seller/ Merchant pickup delayed |
| Delay in delivery / pickup | Reverse pickup delayed |
| Reattempt / Reschedule / NDR | – |
| Incorrect remark by Field Executive | Incorrect remark at delivery |
| Incorrect remark by Field Executive | Incorrect remark at pickup |
| Self collect / drop | Self collect |
| Self collect / drop | Self drop |
| Report Damage / Missing / Mismatch | Report damage |
| Report Damage / Missing / Mismatch | Report missing shipment |
| Report Damage / Missing / Mismatch | Report shipment mismatch |
| Shipment related (update details, generate pickup) | Update shipment details |
| Shipment related (update details, generate pickup) | Update documents / EWBs |
| Shipment related (update details, generate pickup) | Generate Pickup requests |
| Cancel delivery / pickup | Cancel delivery |
| Cancel delivery / pickup | Cancel seller / merchant pickup |
| Cancel delivery / pickup | Cancel reverse pickup |
| Finance (disputes, remittance, bank details, etc.) | Weight dispute |
| Finance (disputes, remittance, bank details, etc.) | Billing / Invoice issue |
| Finance (disputes, remittance, bank details, etc.) | COD Remittance |
| Finance (disputes, remittance, bank details, etc.) | Bank account details |
| Complaint and Feedback | POD incorrect / not available |
| Complaint and Feedback | Behavior complaint against staff |
5.b Domestic Service – Other Issues
| Category | Sub Category |
|---|
| Claims | Credit Note or Certificate of Facts (COF) |
| Claims | Refund / Waiver / Discount |
| Tech Support | Unable to manifest shipment/ create order |
| Tech Support | API / Plugin integration |
| Tech Support | Recharge wallet |
| Tech Support | Request Panel training |
| Tech Support | Schedule report / MIS |
| Tech Support | Channel related issue |
| Account | Require additional services |
| Account | Contract related issue |
| My issue is not listed | – |
Cross Border Support Tickets
Overview
Logyxps Client Portal has an easy process to raise tickets, where you can get fast responses for your operational issues as well as product or billing issues.
In this article, you will learn about
1. Creating Cross Border support tickets
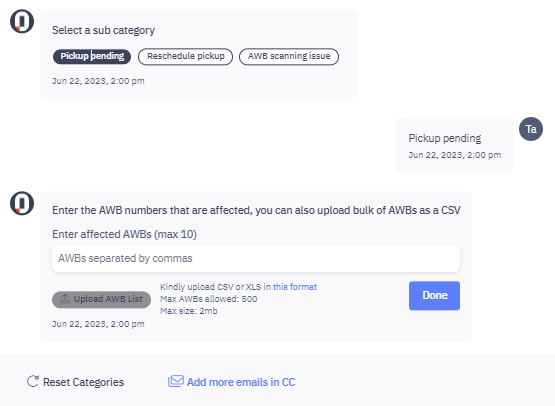
- You can select the category and sub-category of your issue and enter the AWB number(s).
- Please make sure you enter a valid AWB Number that belongs to your account
- You can enter a maximum of 10 AWB numbers in the form or upload a CSV file with a maximum of 200 AWB numbers in a single request
2. Actionable tickets & statuses
Support tickets are placed in three buckets
2.a Open Tickets
Steps to create an open ticket
- Navigate – Main Menu > Support > Raise Ticket
- Select the required Category / Sub category
- As per the selected category, submit the required information like Order ID / AWB number etc. Click Done
An open ticket gets created with a ticket ID & associated orders. You can converse with the support team from this window
The Delhivery support team responses within 2 hours of an issue raised. You can mark the ticket as resolved once the issue is fixed.
2.b Resolved Tickets
Steps to resolve tickets
- Navigate – Main Menu > Support > Open
- Select Request ID > Resolve Ticket
Note
- When an open ticket is marked as resolved the ticket goes to the Resolved bucket
- You can re-open a resolved ticket within 48 hours, post which the ticket is Closed.
3. Categories/ sub-categories for support tickets
Learn about the various categories of support related issues handled by Delhivery team.
3.a Cross Border Service – Shipment Issues
| Category | Sub Category |
|---|
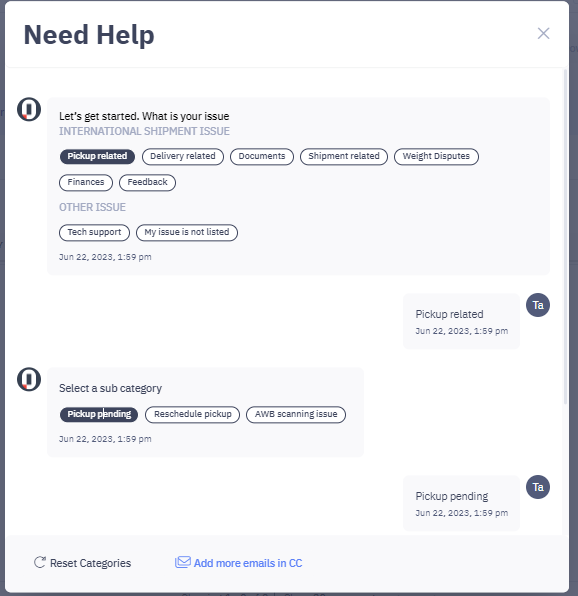
| Pickup related | Pickup pending |
| Pickup related | Reschedule pickup |
| Pickup related | AWB scanning Issue |
| Delivery related | Stop Delivery and Abandon/Destroy |
| Delivery related | Not Uplifted from India |
| Delivery related | Cancel order |
| Delivery related | Self collect |
| Delivery related | Domestic movement delayed |
| Delivery related | Hold shipment for specific time period |
| Delivery related | Urgent Delivery Required |
| Documents | Update Customs Clearance documents |
| Documents | Update EWB |
| Documents | Update exports documents |
| Shipment related | Pay Duties & Taxes |
| Shipment related | Update consignee details |
| Finances | Billing / invoice issue |
| Finances | Credit note not received |
| Weight Disputes | – |
| Feedback | – |
3.b Cross Border Service – Other Issues
| Category | Sub Category |
|---|
| Tech Support | Request Panel training |
| Tech Support | Unable to manifest shipment/ create order |
| Tech Support | Onboarding related issues |
| My issue is not listed | – |
Disputes(Weight Mismatch)
Overview
Weight mismatch is a common occurrence for any business shipping online. At Logyxps , we want to minimize the inconvenience to help our customers. This article will help you understand what is a weight mismatch, how you can reduce it, and how to raise a claim in the event of a weight dispute with us, should the need arise.
Things to know before shipping: How is weight estimated?
This section helps you understand the difference between ‘Volumetric weight’ and ‘Dead weight’ – these two terms are used to determine the chargeable weight of your shipment and are also often the reason for what primarily causes a weight mismatch during shipping.
Deadweight | Volumetric Weight |
Refers to the shipment’s actual weight captured on a weighing machine. | Refers to the shipment’s length, breadth and height, divided by a courier company’s specific constant. |
This is based on the total weight of the item and the shipment box weight in which it is packed. | This is based on the external dimensions of the shipment. |
Eg – A mobile phone packed in a box weighs 400 gms on the machine – becomes the deadweight of the shipment. | Eg – A mobile phone packed in a box of dimensions – 21cm x 10.5 cm x 6.5 cm (Length x Breadth x Height) is multiplied and then divided by the courier constant (4000/5000) to get the final volumetric weight |

| 
|
At Logyxps, we consider the higher of volumetric or dead weight to estimate your pricing. |
How does Logyxps capture dimensions and deadweight?Logyxps has large hubs and sorting centers where your shipment goes through conveyor based sorting machines that automatically capture the weight and also capture the dimensions of the shipment using image scanning technology. Additionally our algorithms work on validating this by using product descriptions provided by you and your past history of shipments with us.
What is a weight mismatch? When does it arise?
Weight mismatch usually happens when the order manifested weight provided by you does not match the weight when measured by Logyxps . This can lead to multiple issues in the shipment journey like being billed extra on the shipping costs while also causing delay in deliveries.
How to prevent weight mismatch?
Weight mismatch can be detrimental to your business processes and customer experience, and hence to avoid it, we recommend the following preventive steps:
- Enter the correct weight AND dimensions (length, breadth and height) of your packages while manifesting (booking) the order on Delhivery’s Client Panel.
- Use packaging material that is proportionate to the size of the package that you are shipping. Else, it may affect the volumetric calculation of the shipment, leading to an increased cost for you.
- Remember to click images of the shipment as a proof in an event of weight mismatch.
- Add accurate product descriptions while manifesting (booking) your shipments with us.
How to raise a claim in case of a weight mismatch?
In the event of a weight mismatch, where you do not agree with Logyxps assessment of the weight, you can always raise a claim on the Logyxps Client Panel for a quick resolution, in two ways:
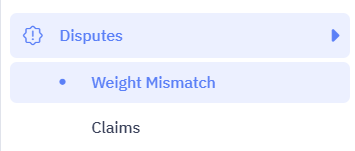
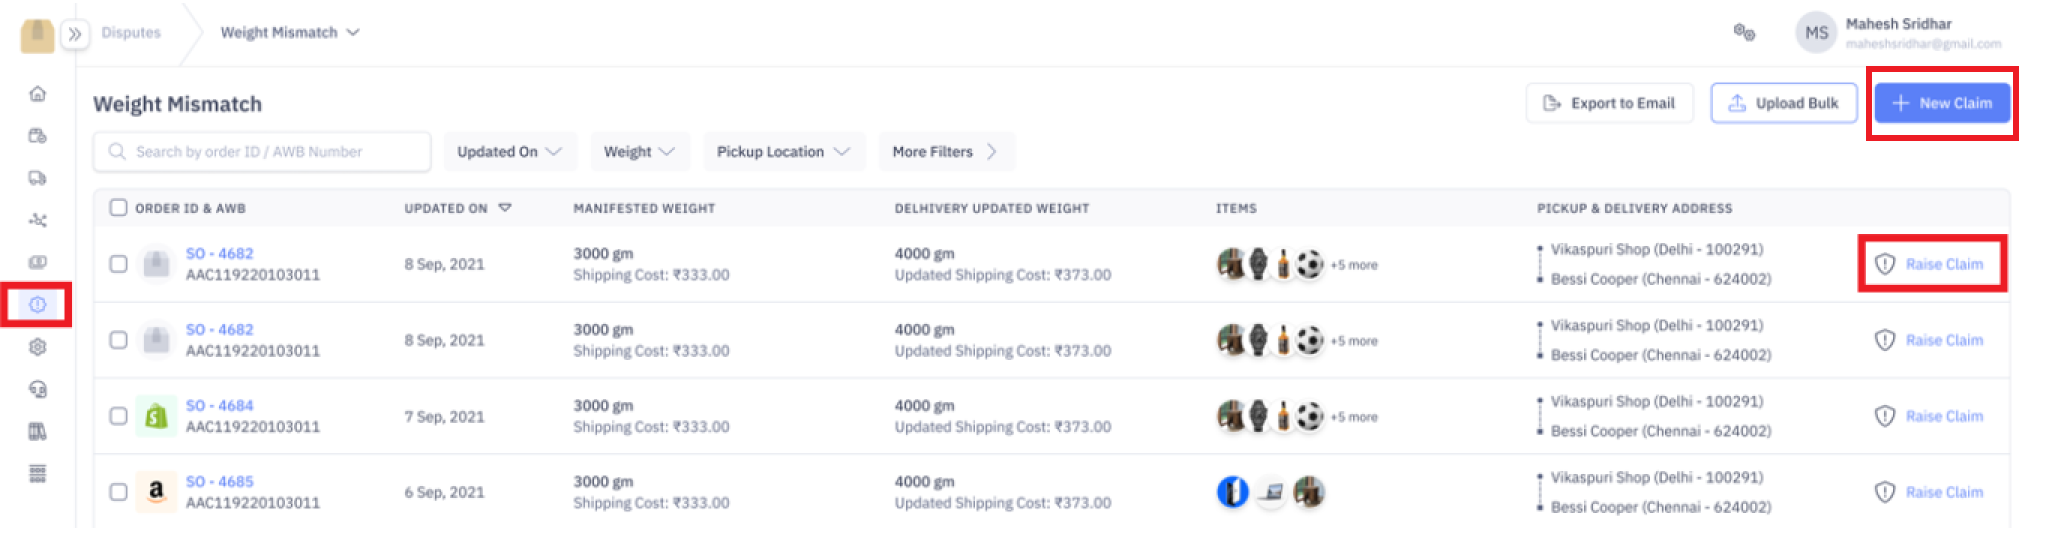
1. Click on Disputes on the left panel on the dashboard and tap on “Weight Mismatch”
2. You’ll see a list of AWBs mentioned on the page. Select the concerned AWB and tap on “Raise a Claim” on the right side.
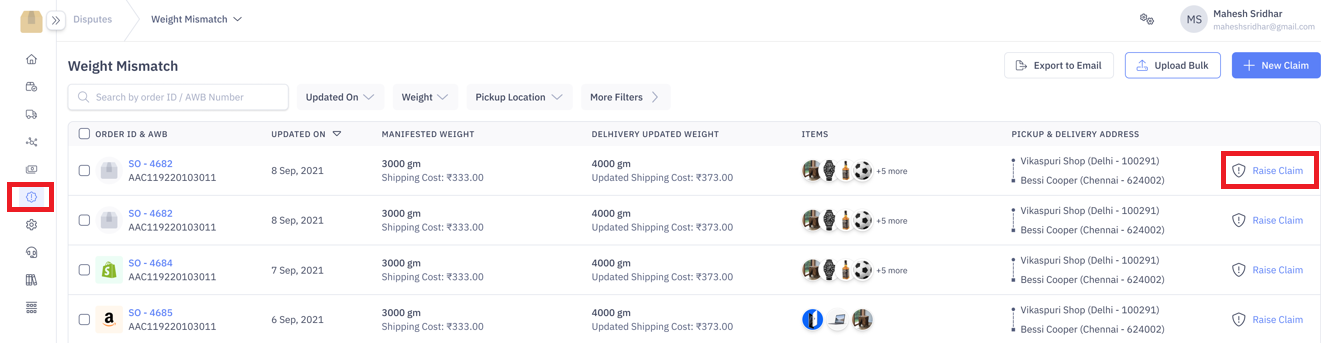 3. Enter the correct weight in gms and submit by clicking on “Create Claim”
 OR, you can:
1. Click on Disputes on the left panel on the dashboard and tap on “Weight Mismatch”
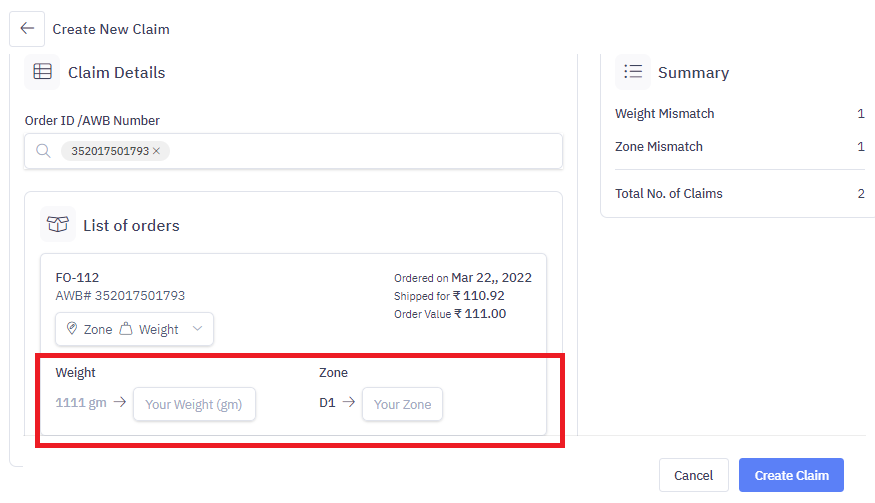
2. Click on “New Claim” on the top right corner of the dashboard
 3. Enter the AWB number of the disputed order and select “Weight” from the drop down menu. Enter the correct weight in gms and submit by clicking on “Create Claim”
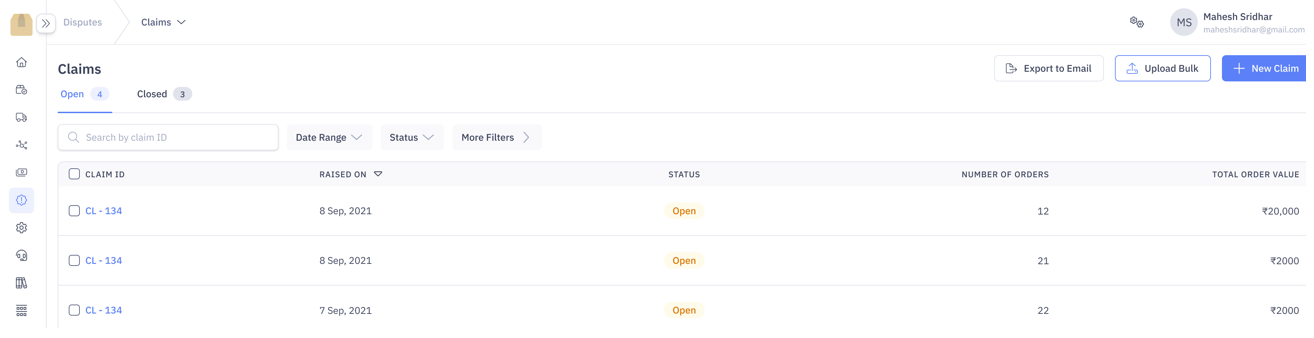
Tracking your claims
After raising your claim on the Delhivery Client Panel, a Claim ID will be generated. You can view the status of each claim by clicking on the CLAIMS options under the Dispute Section.
Open Claims: These claims are sent for reconciliation and are pending for an update.
Closed Claims: These claims are the ones on which the action has already been taken and remarks have been updated.
Disputes(Resolving Claims)
This section talks about how claims resolution process. For example, disputes can arise for weight/zone mismatch or lost/damaged shipments. You can learn to view your & approve claims. Also, check rejected claims & the reason for the same.
Steps to View Claims
Navigate – Main Menu > Claims. This section shows open and closed claims. Each claim has –
- Claim ID
- Claim Raised on
- Status: Open | Closed
- Number of Orders
- Total Order Value
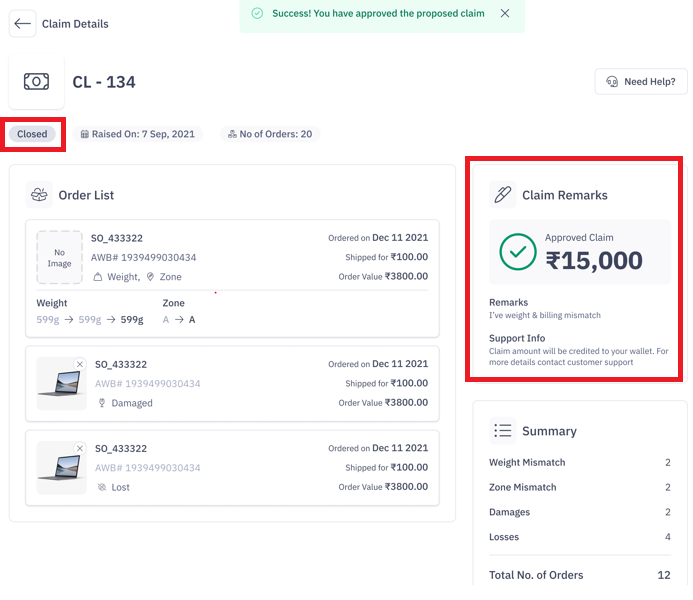
Approving Claims
- Under Open Claims, click the required Claim ID, which needs to be approved
- Check the Claim Remark & Accept the Approved Claim
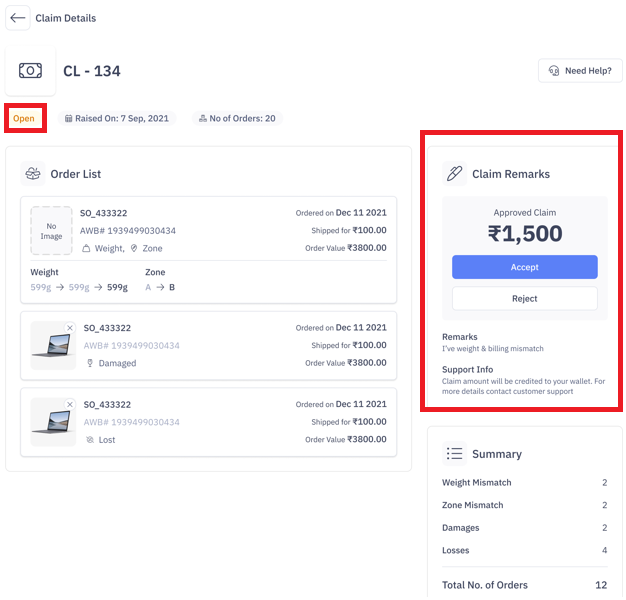
- Once accepted, the claim amount gets credited to your wallet, and the claim gets marked as Closed
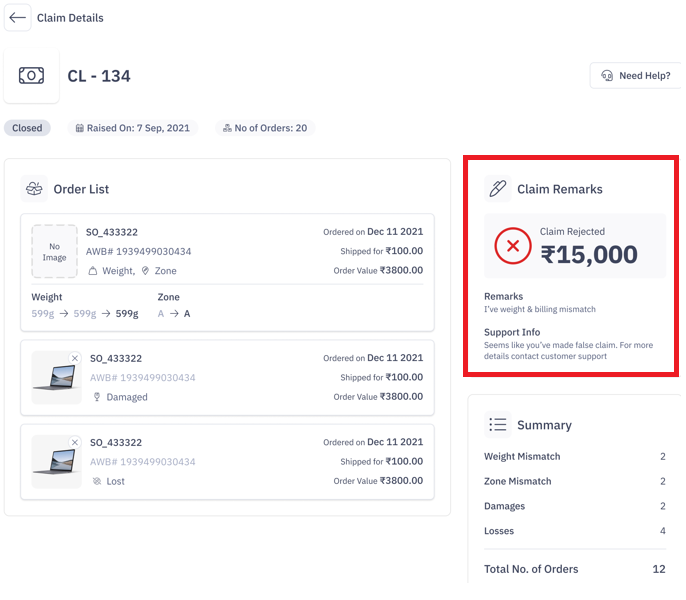
Rejected Claims
If a claim is found false during an investigation, it gets rejected. Such claims get marked as Closed & with the reason of rejection under Remarks.
Disputes(Calculating volumetric weight)
Overview
Let’s learn about the weight terminology used in the logistics business –
Dead-weight – This is the shipment’s actual weight captured by the weighing machine, irrespective of its shape and size. This includes the items & shipment box weight.
Volumetric weight – This is calculated based on the shipment’s dimensions, i.e., length, breadth, the height of the shipment box.
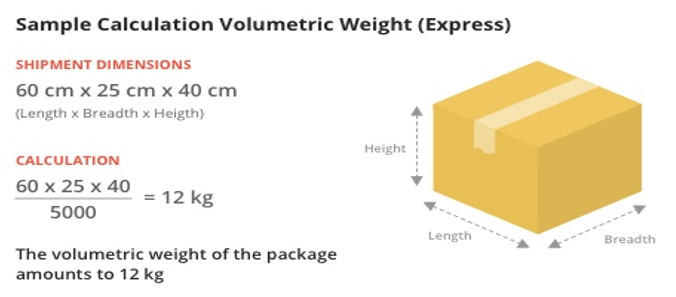
Calculate shipping cost
Let us take a shipment box with dimensions such as Length – 60 cm, Breadth – 25 cm, Height – 40 cm.
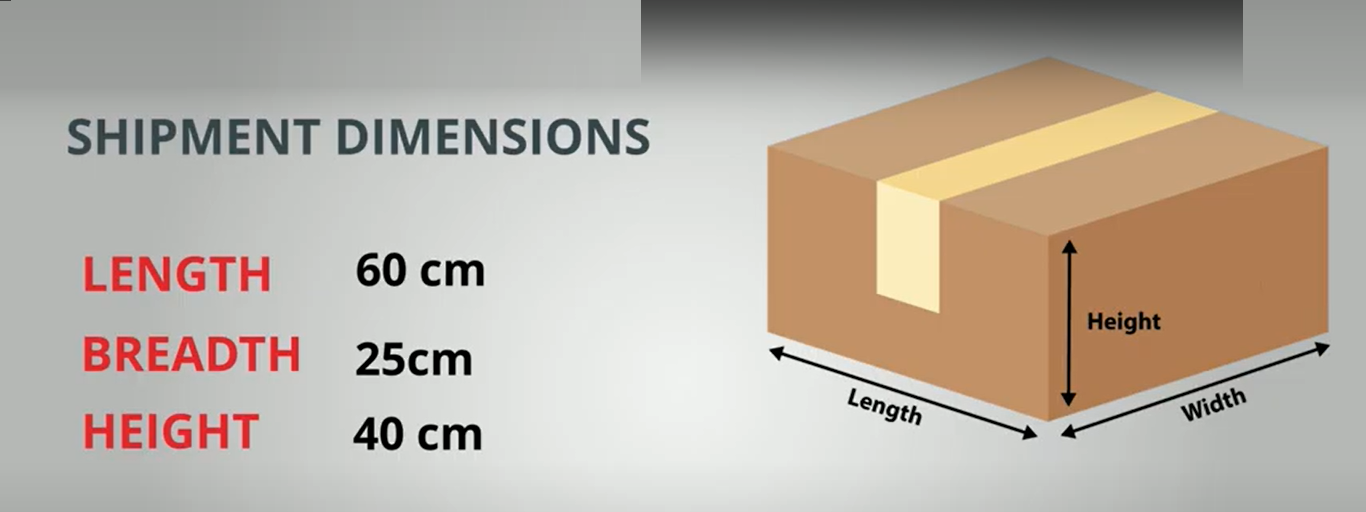
The weight on the weighing machine is 6kg. This is the dead weight of the shipment.
To calculate the volumetric weight in case of –
- Surface delivery, we shall divide the Volume of the box by 4000, i.e. (Length * Breadth * Height) / 4000
- Express delivery, we have to divide the box’s volume by 5000. i.e (Length * Breadth * Height) / 5000
These calculations are per the logistics industry standards.
In the above case, the volumetric weight turns out to be 15kg.
On the Client Portal, we use the maximum of dead / volumetric weight to show the estimated shipping cost. While deductions during manifestations is based on the below logic –
- If dead weight is less than 1 kg, we use dead weight as it is.
- If dead weight is more than 1 kg
– For Surface Delivery, Chargeable weight = max (dead weight,L*B*H/4000)
– For Express Delivery, Chargeable weight = max (dead weight, L*B*H/5000)
For MPS Orders, we apply the below logic
- Estimated shipping cost is showing for all AWBs (Master + Child)
- Manifested deduction will happen only for Master AWB
- Post delivery, Child AWB deduction will be done manually.
Services
Overview
In this section, you will learn about various services offered by Delhivery Client Portal.
- Logistics Services
- Value Added Services
- Channel Integrations
Logistics Services
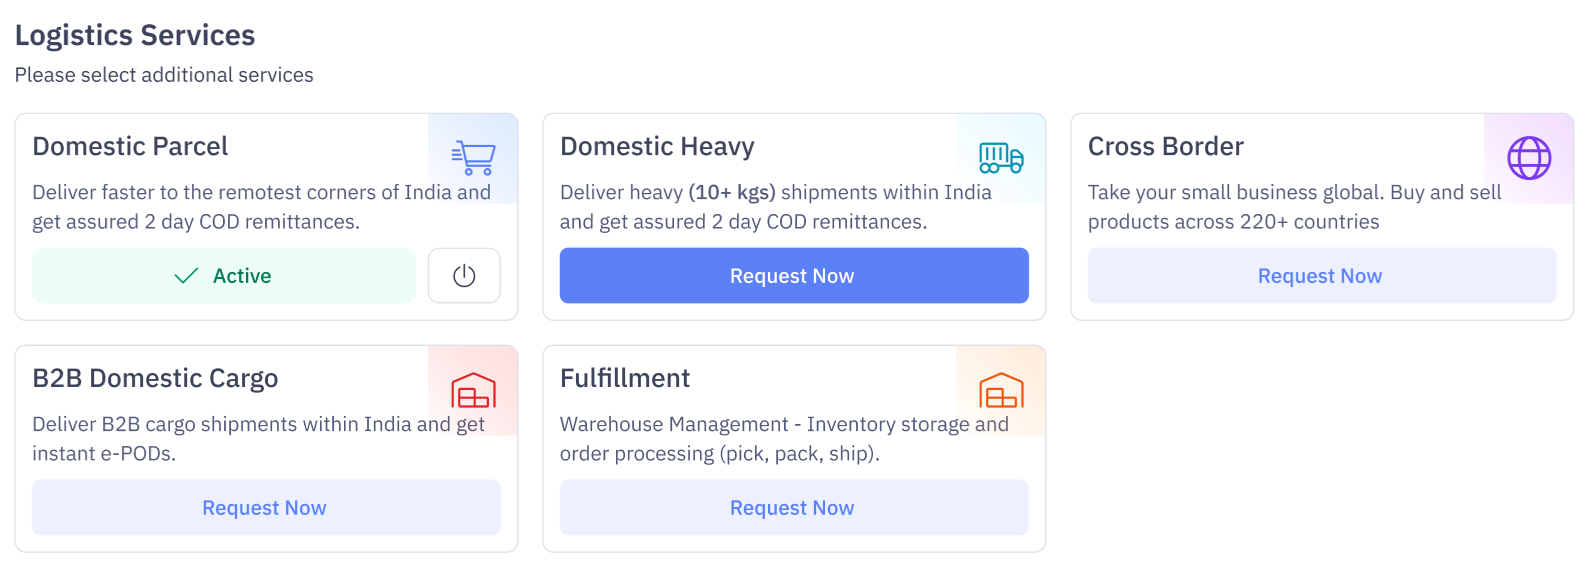
- Domestic Parcel – Default service users get when they sign the Delhivery Services Agreement.
- Cross Border – Users can activate this service if they want to ship international exports.
- Domestic Heavy – Access India’s largest Heavy (10+ kgs) parcel service with attractive rates
- Domestic B2B Cargo – Deliver your B2B shipments with an eCommerce experience.
- Warehousing – Store your inventory with us and we’ll process your orders (pick, pack, and ship).
Value Added Services
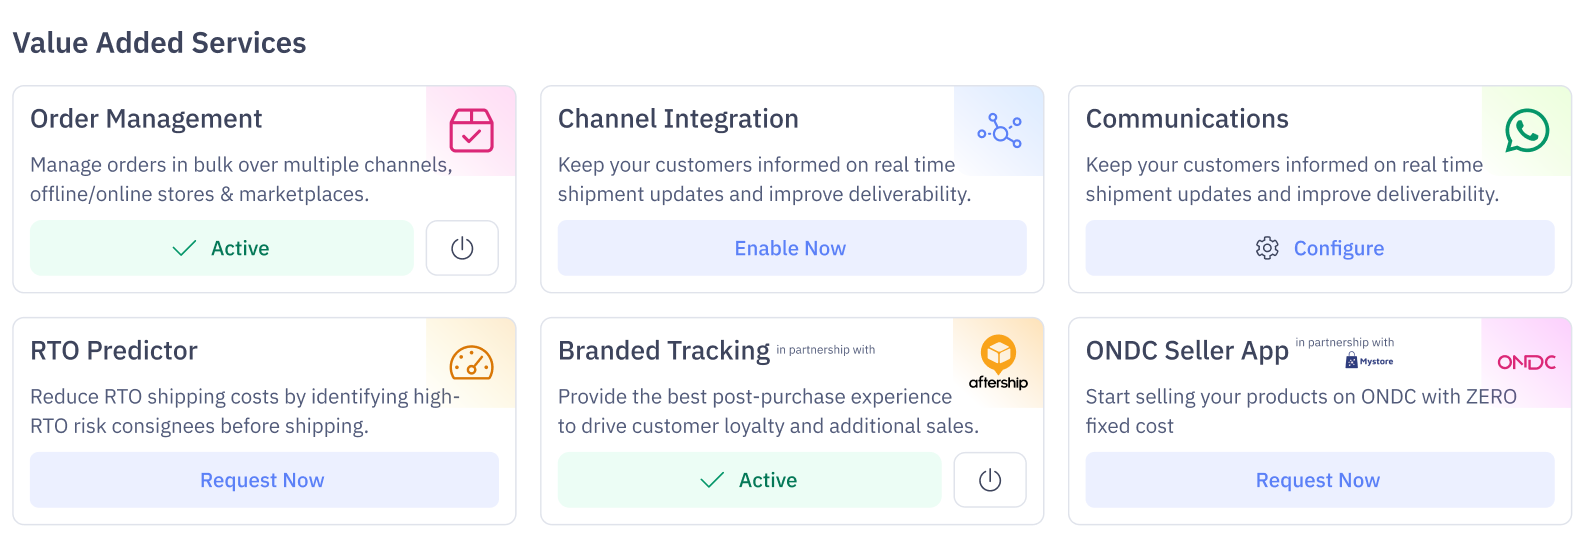
- Order Management – Review orders before manifesting them – this is necessary for online channels.
- Communications – Improve deliverability by informing your customers about real time shipment updates.
- RTO Predictor – Reduce RTO shipping costs by identifying high-RTO risk consignees before shipping.
- Branded Tracking Page – Cross-sell products and improve brand recall with a customised branded tracking page.
- ONDC – Start selling your products on the ONDC network with ZERO fixed cost.
Channel Integrations
- Shopify – Easy Integration to sync locations, catalog, inventory, and orders.
- WooCommerce – Easy Integration to sync locations, catalog, inventory, and orders.
Logistics Services
- Domestic Parcel – Default service users get when they sign the Delhivery Services Agreement.
- Cross Border – Users can activate this service if they want to ship international exports.
- Domestic Heavy – Access India’s largest Heavy (10+ kgs) parcel service with attractive rates
- Domestic B2B Cargo – Deliver your B2B shipments with an eCommerce experience.
- Warehousing – Store your inventory with us and we’ll process your orders (pick, pack, and ship).
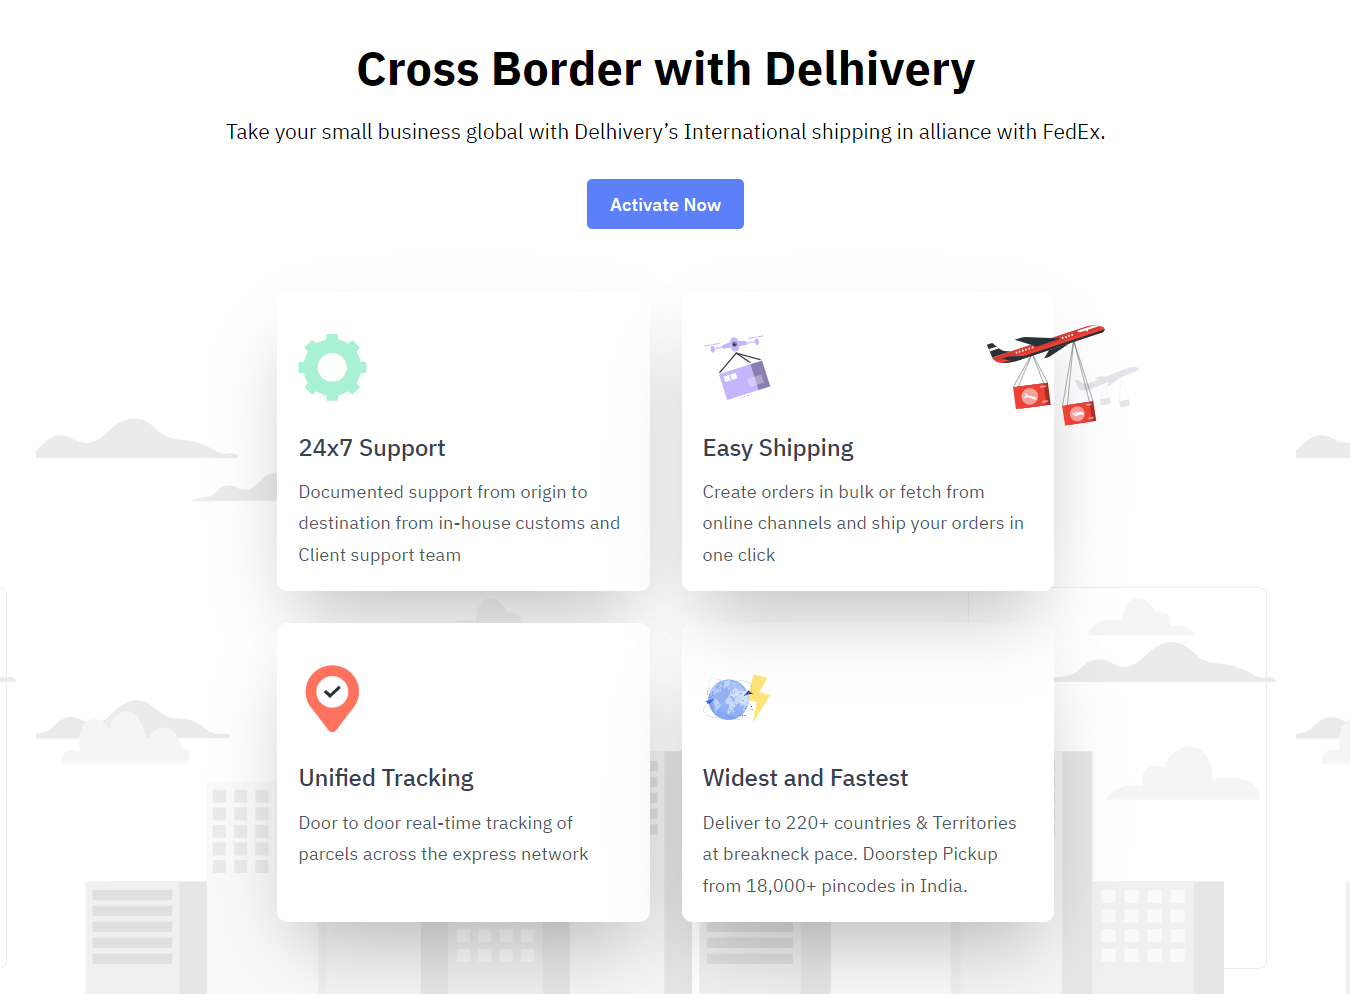
Cross Border
Overview
Cross Border by logyxps offers door-to-door parcel delivery from 18,000+ pincodes in India to 220+ countries across the world.
In this article you will learn
1. Cross Border by Delhivery
To activate Cross Border by Delhivery, you need to
- Navigate to Services Page > Cross Border
- Click on Activate Now
2. KYC Verification
- You need to upload verified IEC and TAN documents
What is IEC (Importer – Exporter Code)?
An Importer -Exporter Code (IEC) is a key business identification number which mandatory for export from India or Import to India. To learn more about registering for IEC, click here
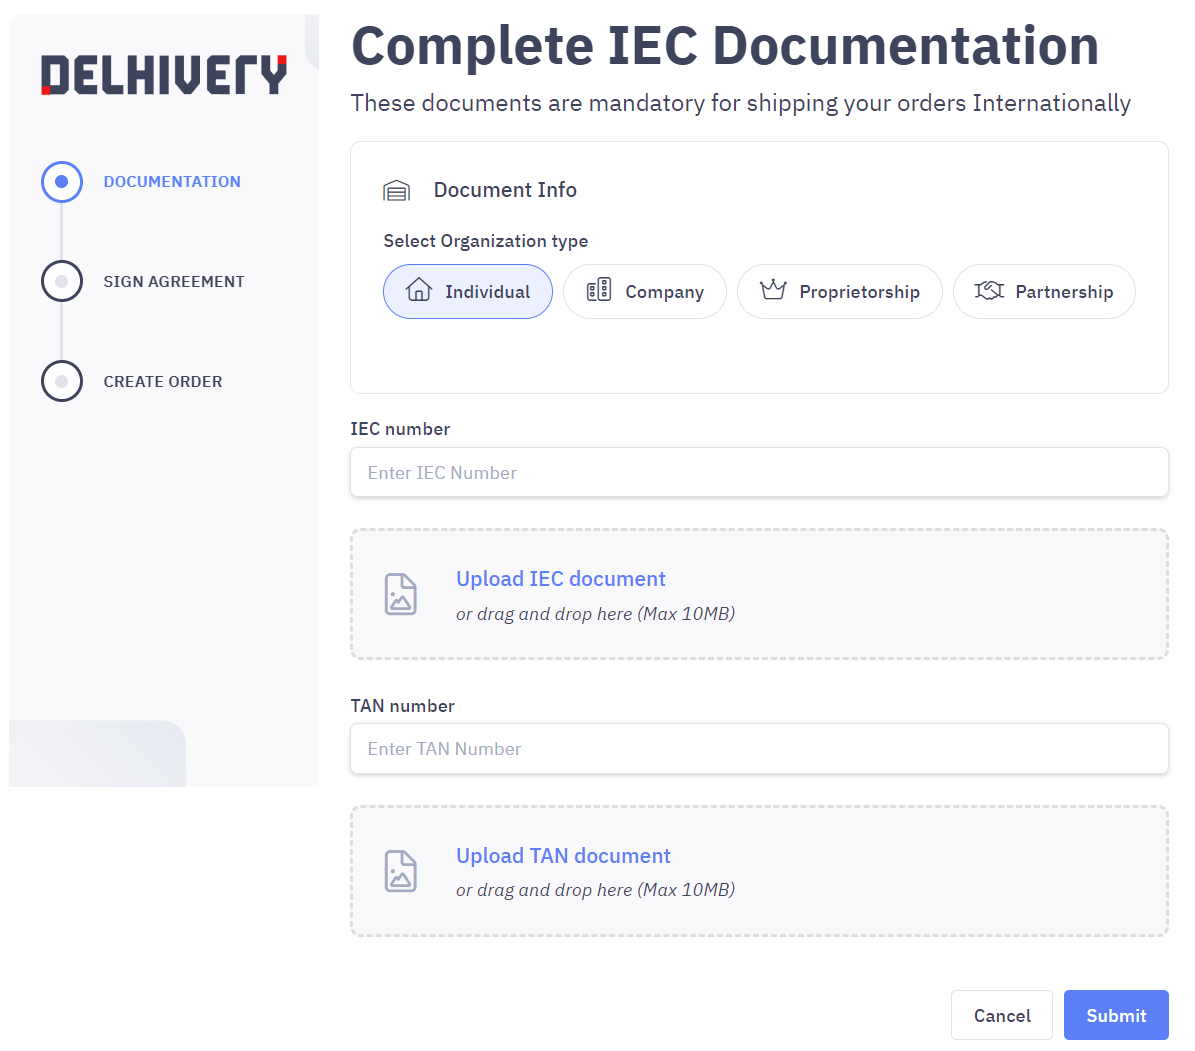
3. Cross Border Service Agreement
- You will need to sign Cross Border Service Agreement and your activation process is complete.
4. Pre-requisite to Shipping International Orders
To start creating and shipping International orders, you will need to
- Create International Pickup Locations
- Create Sellers and complete seller KYC verification
- Recharge your International Wallet
You can start shipping Internationally now!
You can learn more about
- Create International Order
- Ship International Orderlogyxps
Value Added Services
- Order Management – Review orders before manifesting them – this is necessary for online channels.
- Communications – Improve deliverability by informing your customers about real time shipment updates.
- RTO Predictor – Reduce RTO shipping costs by identifying high-RTO risk consignees before shipping.
- Branded Tracking Page – Cross-sell products and improve brand recall with a customised branded tracking page.
- ONDC – Start selling your products on the ONDC network with ZERO fixed cost.
Order Management
Overview
In this article, you will learn about
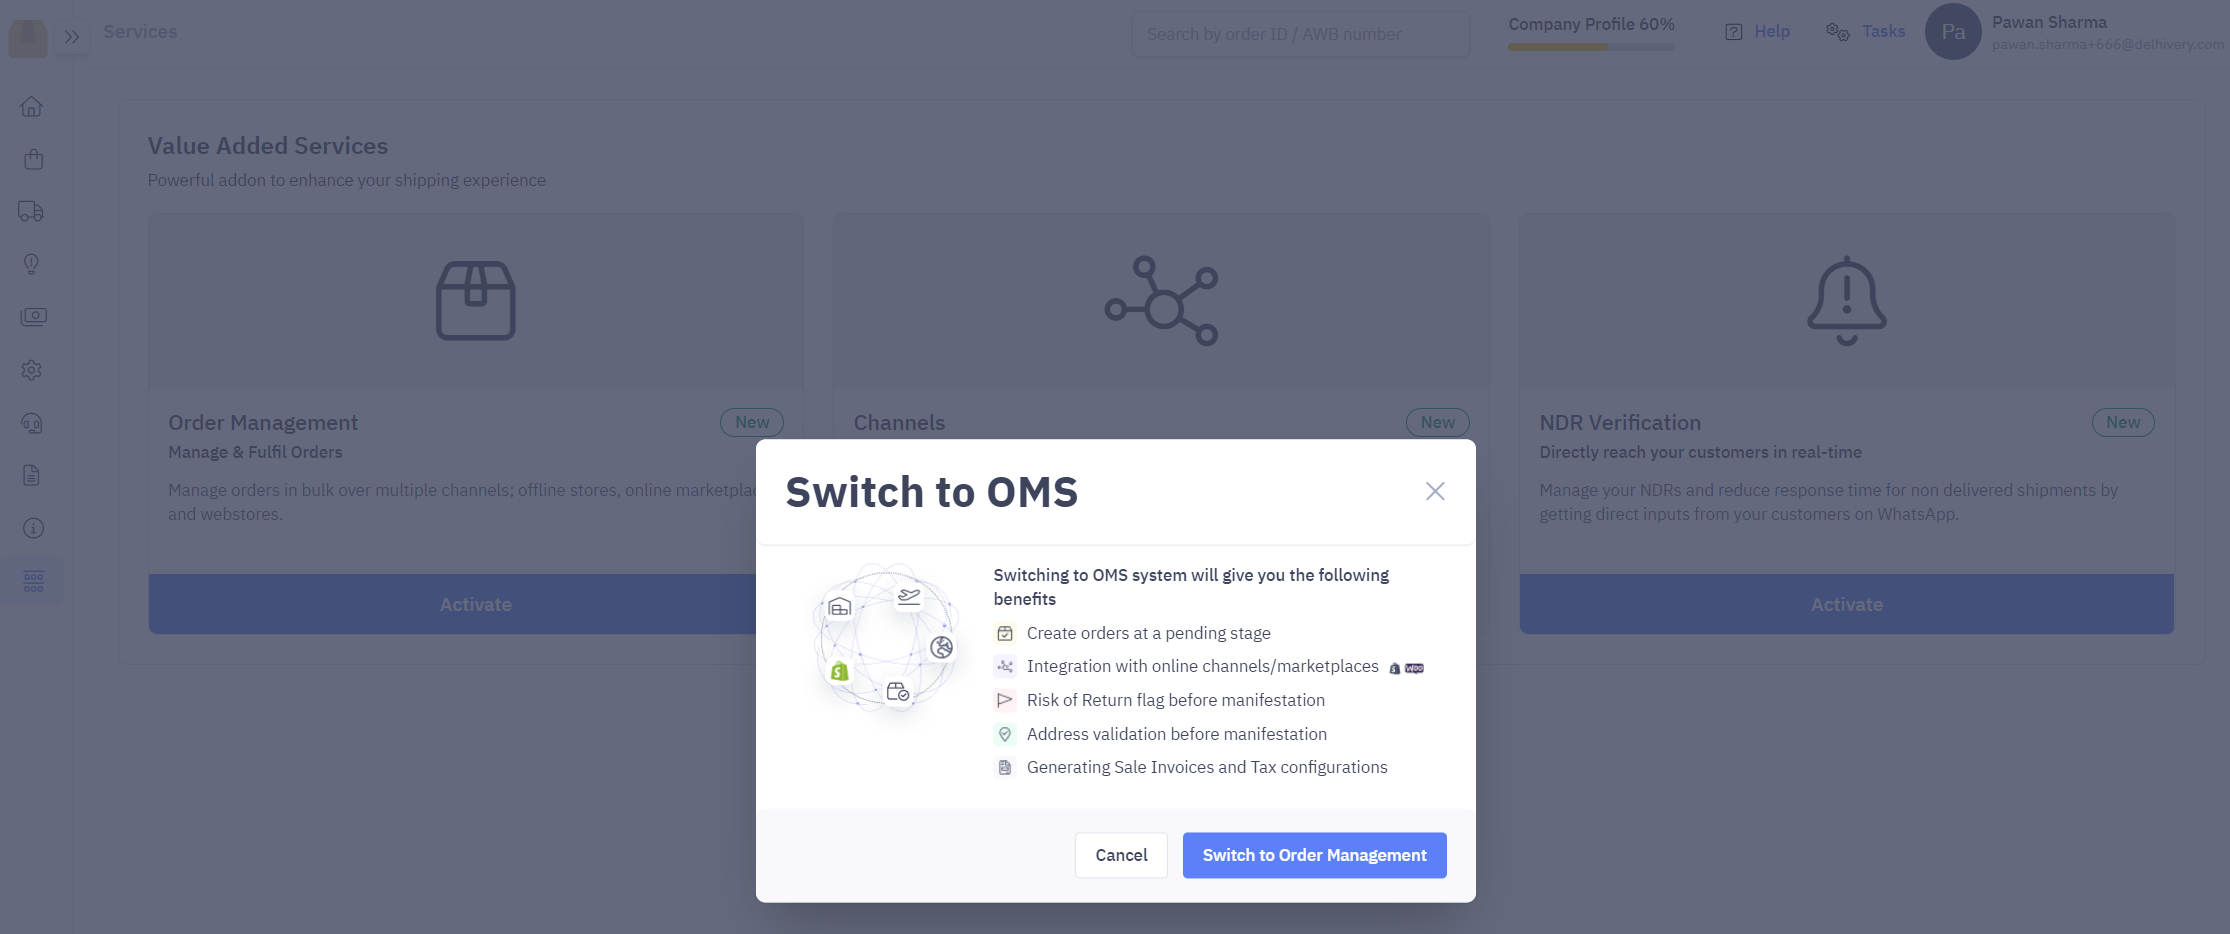
1. What is Order Management?
Delhivery Client Portal has two modes – Order Management and Direct Manifestation.
- In Order Management mode, an Order is created in Pending (i.e. pre-manifestation) stage
- When you manifest, the order is converted into a shipment and moves from Pending to Ready to Ship stage
- When you add the waybills to Pickup request, the shipmentmoves from Ready to ship to Ready for Pickup stage
In Direct Manifestation mode, the shipment is directly manifested into Ready for Pickup stage.
2. Where do you activate this service from?
You can activate this service from Services Page
- Navigate to Services > Value Added Service > Order Management
- You can click on “Activate” CTA and confirm “Switch to Order Management“
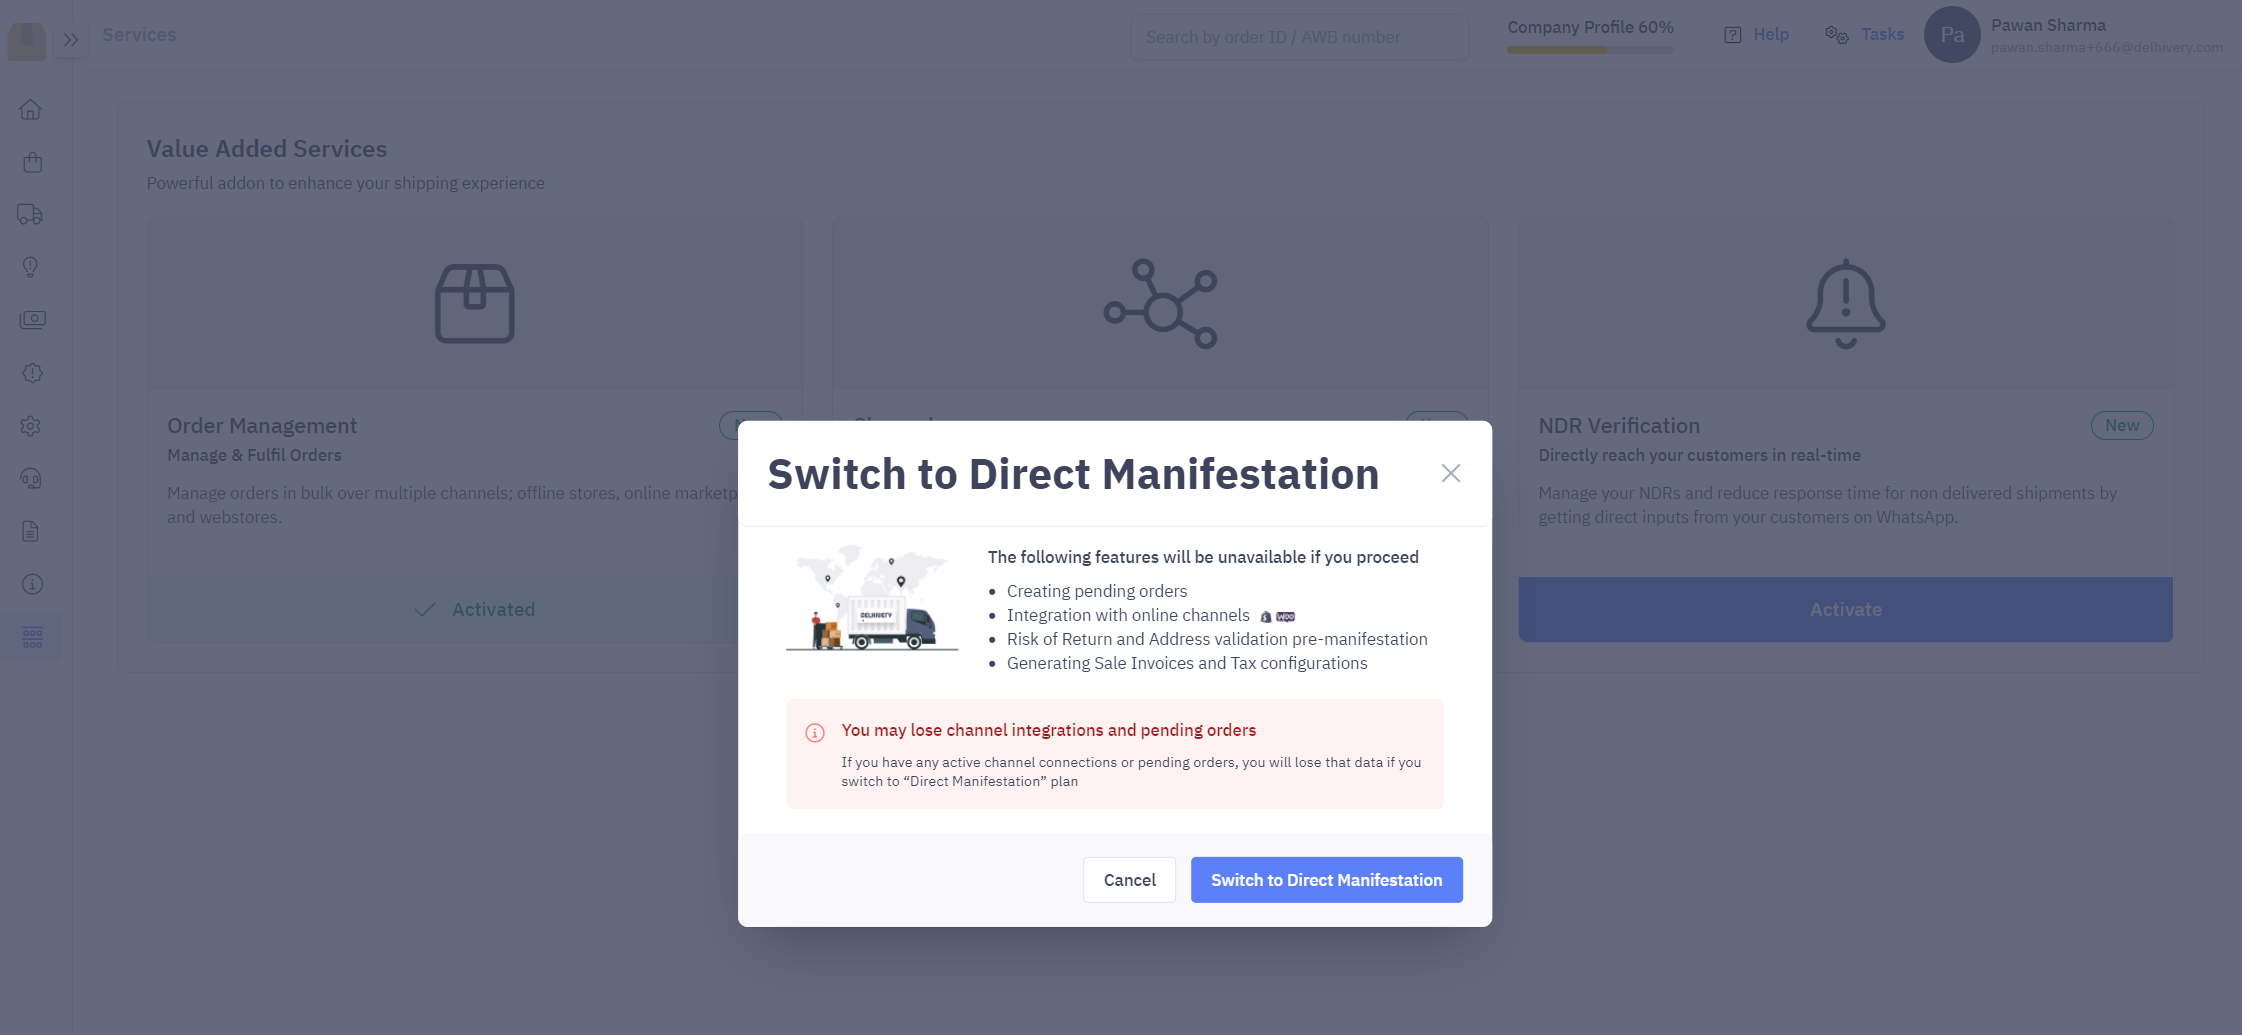
If you want to deactive this service
- You can click on “Deactivate” CTA, and confirm “Switch to Direct Manifestation“
You will lose Pending orders and Channel Integrations
If you have any active channel connections or pending orders, you will lose that data if you switch to “Direct Manifestation” plan.
3. How does Order Management work?
Under Order management, you get the following features.
- Create orders at a pending stage. Learn more about creating orders
- Integration with online channels/marketplaces. Learn about connecting your Shopify or Woocommerce store
- Risk of Return flag before manifestation
- Address validation before manifestation
- Generating Sale Invoices and Tax configurations
Communication
Overview
This value added service helps to –
- Send shipment updates via Whatsapp to your customer
- Real time verification of non delivered orders to improve delivery rate
- Drive brand awareness through enhanced post-purchase experience
In this article you will learn
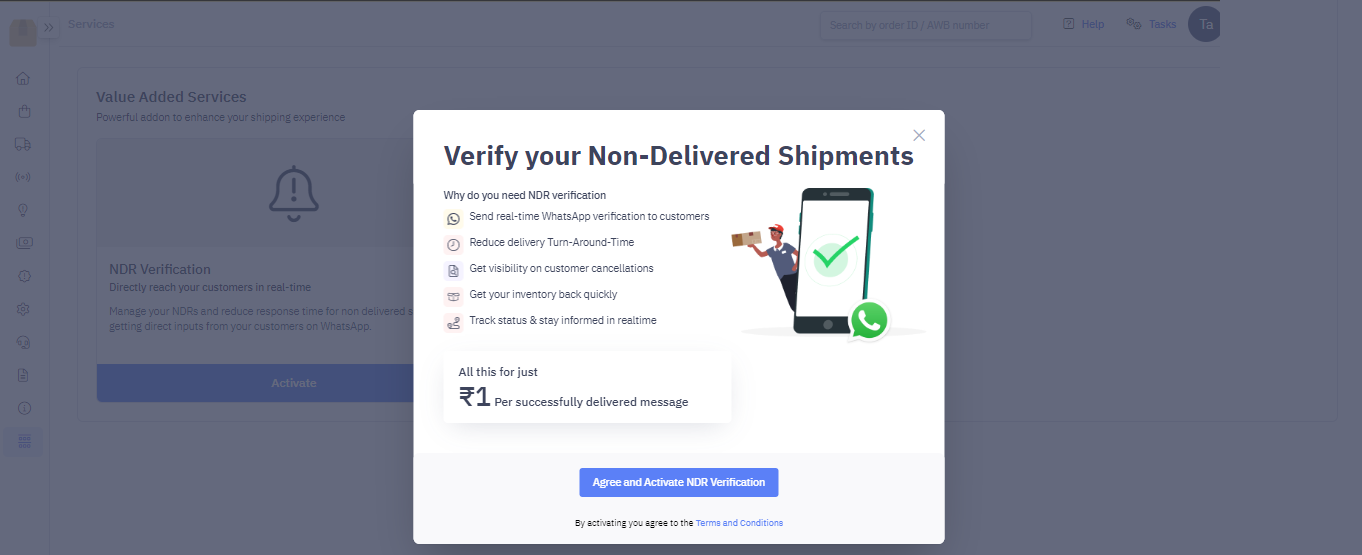
What is Communication VAS?
This is a full stack communcation service that sends real time shipment updates via Whatsapp to your customer at the below occasions:
Shipment is not delivered (NDR Verification) – When a shipment is undelivered during an attempt with NDR a whatsapp message is triggered. Each NDR reason has a different message template and customer responds on the delivery agent’s remark. Based on customer feedback, the shipment is re-attempted or cancelled. This helps in improving the delivery rate.
Shipment is manifested
Shipment is picked up from your location by our delivery agent
Shipment is Out for delivery from the destination hub to customer address
Shipment is delivered successfully to customer
Where can you activate this service from?
Navigate to Services > Value Added Service > Communication. Click Activate.
On next page, click Add for the shipment stage you want to enable this service for.
View the communication template with Preview option.

Read the Terms & Conditions .After choosing the required options, click Update
To deactivate the service, remove all the configured communications from the same page, by clicking on ‘x‘ against all active communication.

Then click Deactivate

Download Communication VAS report
To download Communication VAS report navigate to –
- Main Menu > Reports > Schedule Report
- Select Communication VAS Report
- Enter the required details like Report name, Recipients email IDs & report frequency
- Click Schedule Report
Pricing for Communication VAS
For every successfully delivered message there is a charge of Rs 1. The billing is scheduled every 15 days & the invoice is emailed to your registered email address. For prepaid clients, the billing amount is deducted from wallet balance.
Channel Integrations
Overview
Note : UCP has two modes: Direct Manifestation & Order Management Mode. This feature is available only on Order Management mode.
Channels are the sources of your orders. A customer places an order on one of your channels or you place an order on behalf of your customer on any of the channels. The orders can later be fulfilled, processed, and delivered.
In the Client Panel, you can have both online channels and offline channels. Online orders will be fetched to the panel automatically at a regular interval. Offline orders can be created in the custom channel.
For online orders, the order status will be synced automatically to the online channels once the shipment is manifested & delivered.
Currently, the client panel has integration with Shopify, Woocommerce, soon we should have Amazon, Flipkart and other marketplaces.
Note : For manifesting orders fetched from online channels, dimensions (LBH) is not mandatory.
In this Section
Add Custom Channel
Add Shopify Channel
Add Woocommerce Channel
Shopify
Overview
Delhivery Client Portal integrates with Shopify, enabling you to manage your daily sale order processing from the portal at ease.
Note : UCP has two modes: Direct Manifestation & Order Management Mode. Shopify integration is available only on Order Management Mode. Read this article.
In this article you will learn to –
Capabilities UCP – Shopify integration
| Data Flow | Source (From) | Destination (To) | Shopify Integration Capability |
| Fetch Orders | Shopify | UCP | Yes |
| Detach Order being Completed | Shopify | UCP | Yes |
| Mark Order as Completed | UCP | Shopify | Yes |
| Detect a Cancellation | Shopify | UCP | Yes |
| Cancel Order | UCP | Shopify | Yes |
| Detect Return & Refund | Shopify | UCP | No |
| Push Return Information for Delivered order | UCP | Shopify | No |
| Partial Order Fetch | Shopify | UCP | No |
Add Shopify Channel on Client Portal
Steps to add Shopify Channel:
- Navigate – Services > Value Added Services > Channels > Add Channel
- On the Channels page, choose ‘Shopify’.
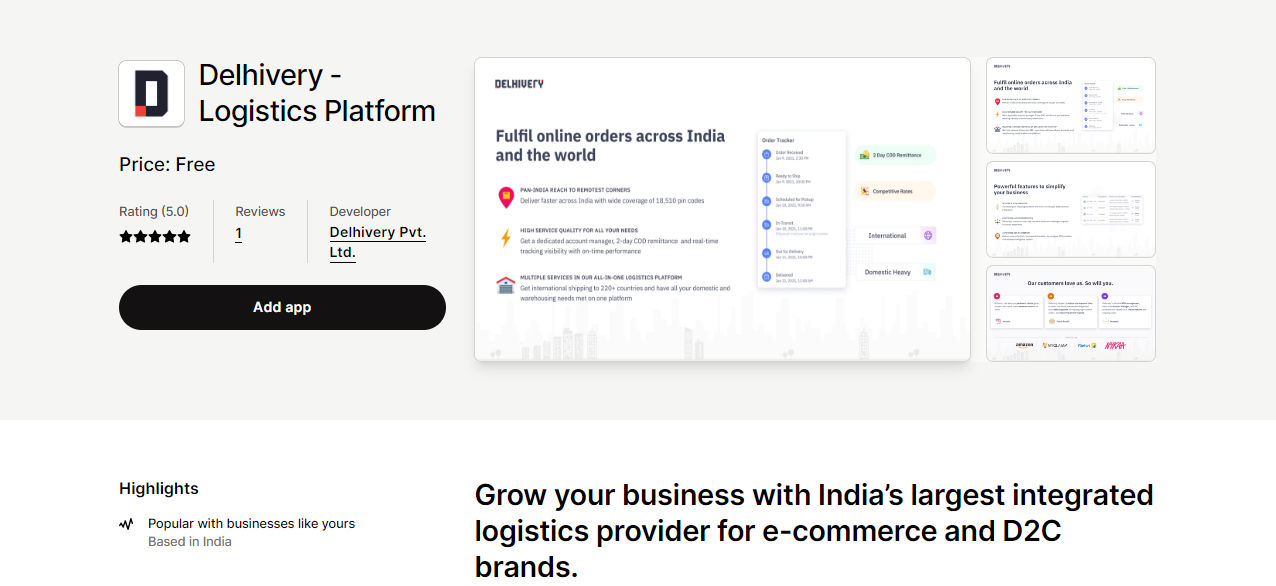
- Click on “Integrate in One Click”. This will redirect the user to Delhivery app on Shopify App Store (https://apps.shopify.com/delhivery-2)
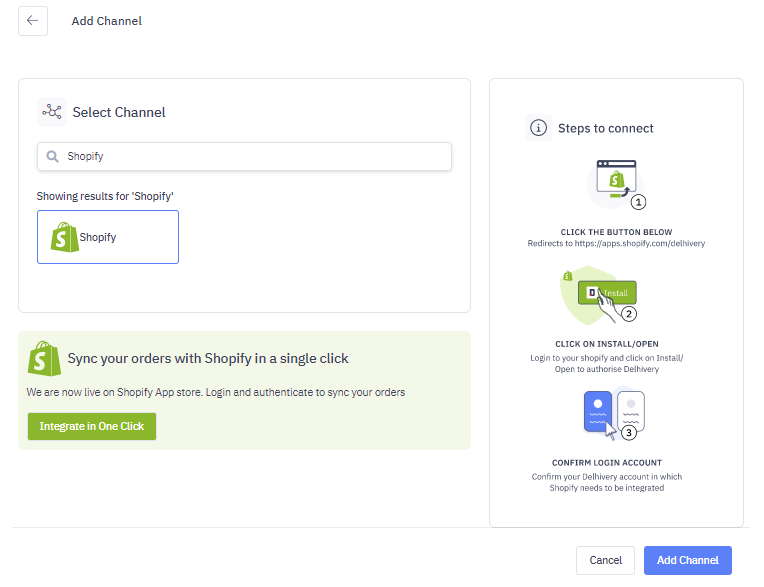
- Users can now connect their Shopify webstore by clicking on “Add app”
- On app installation, user shall be redirected to Delhivery Client Portal where
- Existing users can connect their existing logged in Delhivery account, or
- Existing users can log in to another Delhivery account and connect, or
- New users can sign up on Delhivery and connect their shopify store
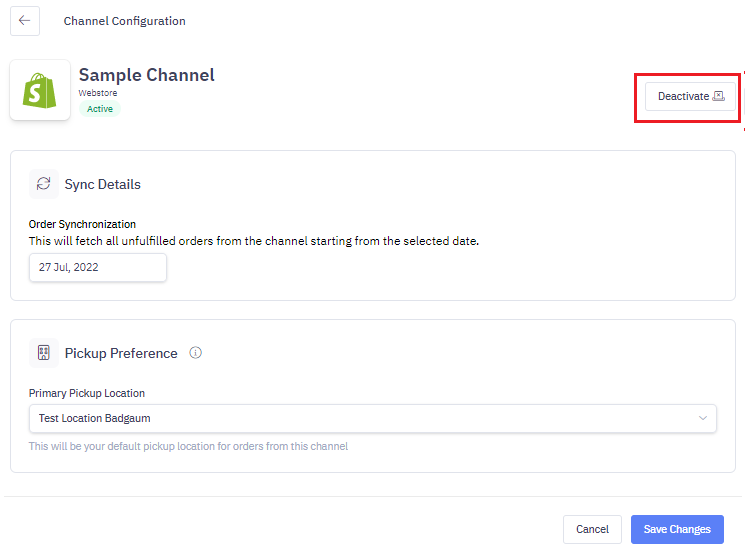
Deactivate Shopify Channel
To deactivate Shopify channel on the Client Portal –
- Navigate Main Menu > Services > Configure Channels
- On the Channel listing page, click Configure on the Channel you want to deactivate

- On Channel configuration page click Deactivate
FAQs
Ques : Which orders are fetched from Shopify?
Ans : Only orders with ‘Unfulfilled‘ fulfillment status from Shopify are fetched. Fulfilled orders are not fetched. If you want to fetch custom order statuses, you can configure them from channel settings. Refer to this article to learn more.

Ques : I tried connecting the Shopify channel but orders are not fetched.
Ans : Order sync usually takes 5 minutes, post this they should reflect under Orders > Domestic Orders > Pending state in the Client Portal. Please check that your shopify store has unfulfilled orders that will be fetched. You should also verify the order sync date. If you have set the order sync date to 1st December 2022. Only unfulfilled orders on your Shopify created from this date onwards will be fetched
Ques : My orders are showing the wrong Payment mode (COD vs Prepaid) in Delhivery Client Portal?
Ans : We identify the Payment mode based on the Financial Status of your shopify order. If Financial Status is Paid, we sync them as Prepaid. If Financial Status is Pending or Partially Paid, we sync them as COD. Else we sync those orders with blank payment mode where you’ll have to assign COD or prepaid before shipping. Refer to this article to learn more.
Woocommerce
Overview
Delhivery Client Portal integrates with Woocommerce, enabling you to manage your daily sale order processing from the portal at ease.
Note: UCP has two modes: Direct Manifestation & Order Management Mode. Woocommerce integration is available only on Order Management Mode. Read this article
In this article, you will learn to –
Capabilities UCP – Woocommerce Integration
| Data Flow | Source (from) | Destination (to) | Woocommerce integration capability |
|---|
| Fetch Orders | Woocommerce | UCP | Yes |
| Detect Order being Completed | Woocommerce | UCP | Yes |
| Mark Order as Completed | UCP | Woocommerce | Yes |
| Detect a cancellation | Woocommerce | UCP | Yes |
| Cancel Order | UCP | Woocomerce | Yes |
| Detect a Return & Refund | Woocommerce | UCP | No |
| Push Return Information for Delivered order | UCP | Woocommerce | No |
Add Woocommerce Channel on Client Portal
On Delhivery Client Portal, navigate – Main menu > Services > Value Added Services > Channels> Add Channel
On the Channels page, choose ‘Woocommerce’.
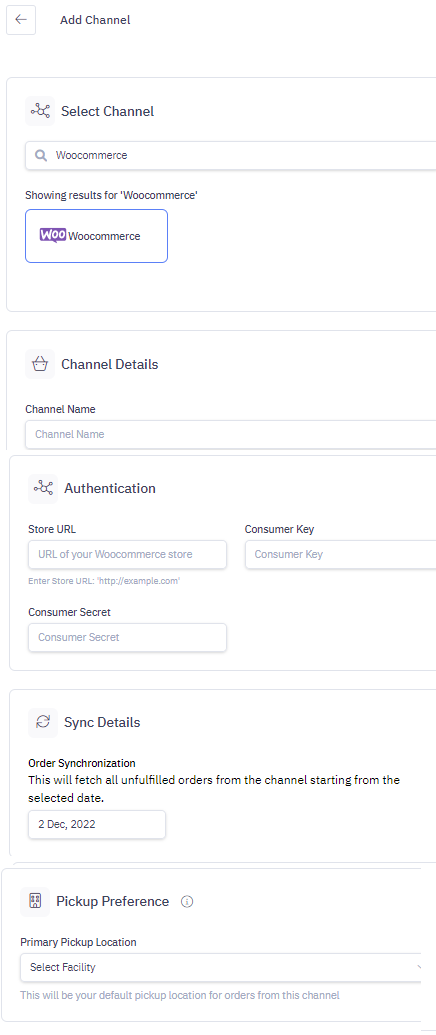
Provide the following information:
- Channel Name: Give a name to your Woocommerce channel. Preferably, the name ‘Woocommerce’ unless you have multiple Woocommerce accounts in which case you can number them accordingly.
- Store URL : Provide your store URL [https://example.com]
- Consumer Key & Consumer Secret: These details are generated from Woocommerce admin panel. Refer to Create App on Woocommerce
- Sync Details: Select from which date you want the orders to sync
- Pickup Preference: This will be your default pickup location for orders from this channel
- Click Add Channel
Create App on Woocommerce
To synchronize your Woocommerce with Delhivery’s Client Portal, you need to generate an API Key on Woocommerce with read & write permissions. For this, please follow these steps:
Login to Woocommerce admin panel
Go to Woocommerce -> Settings
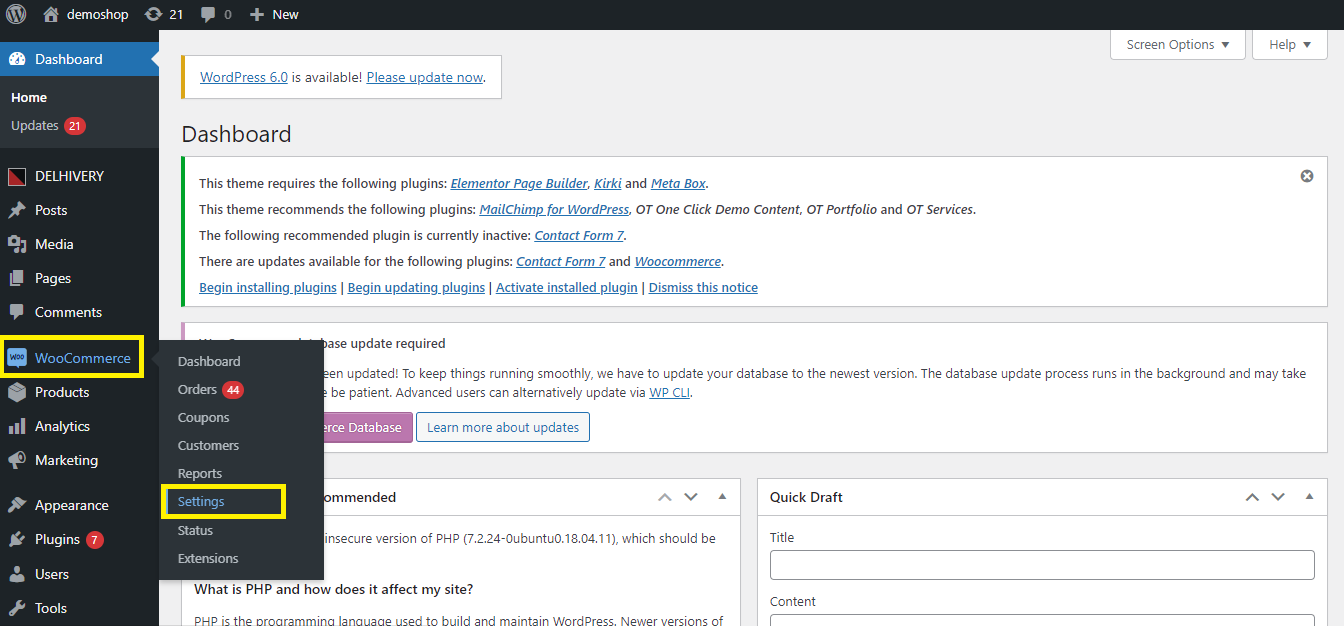
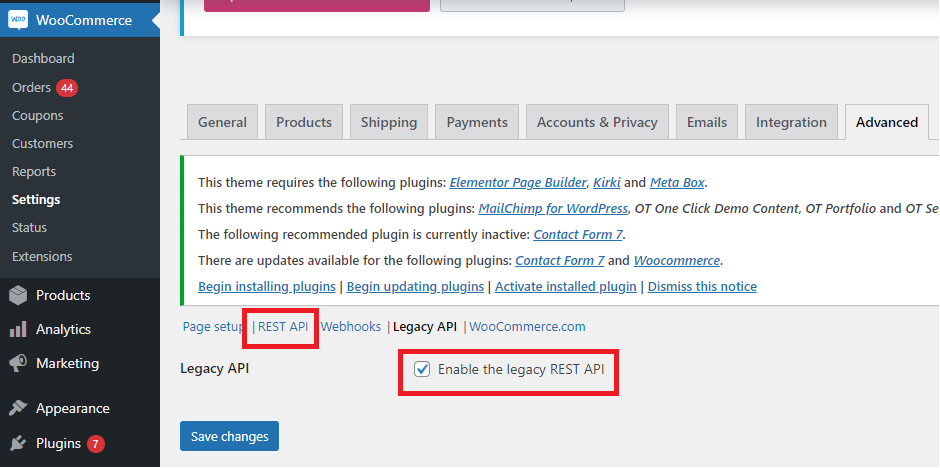
Click Advanced -> Legacy API
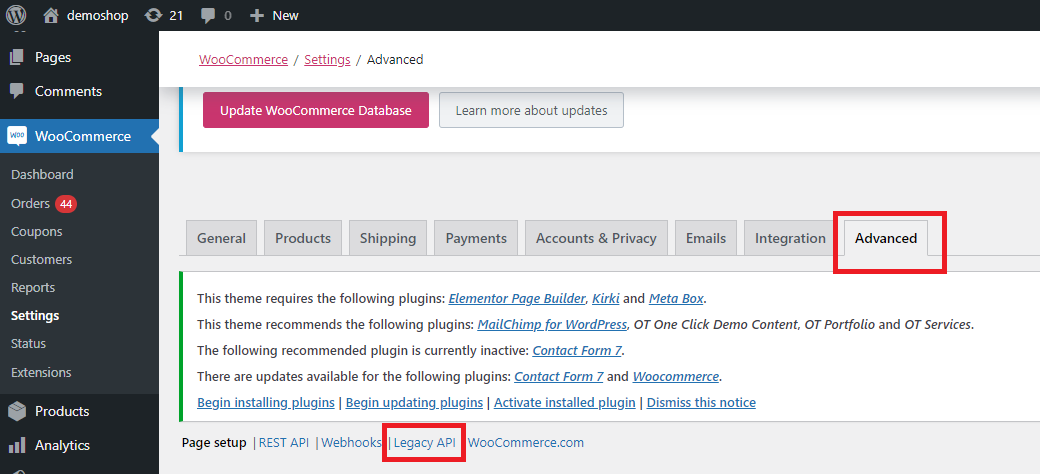
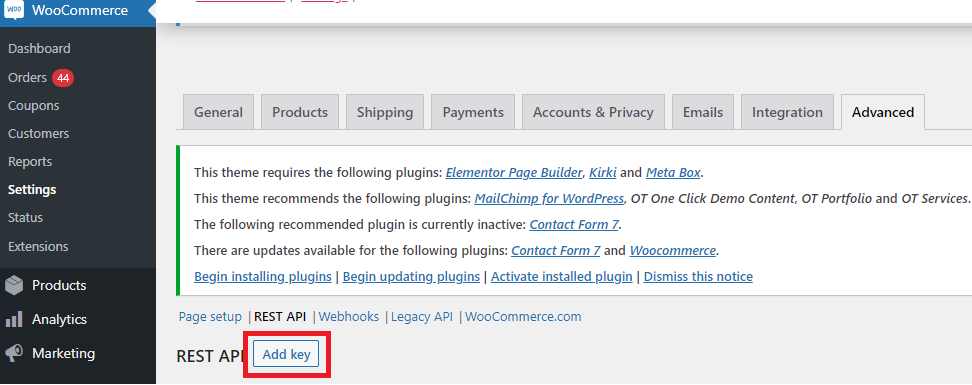
Make sure Enable the legacy REST API is checked. Then Click Rest API
Click Add Key
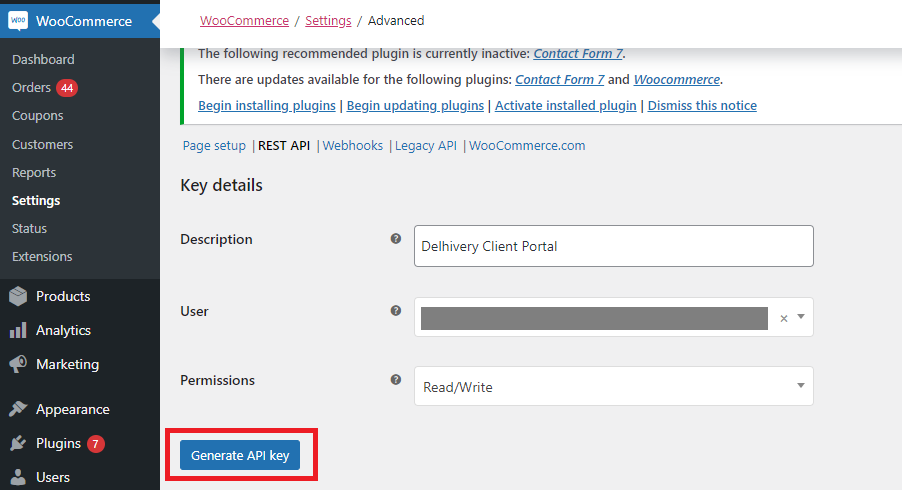
Give an appropriate Description (to recognize the Client Portal integration). In Permissions set as Read/ Write. Click Generate API Key. Make a note of the Consumer Key & Consumer Secret.
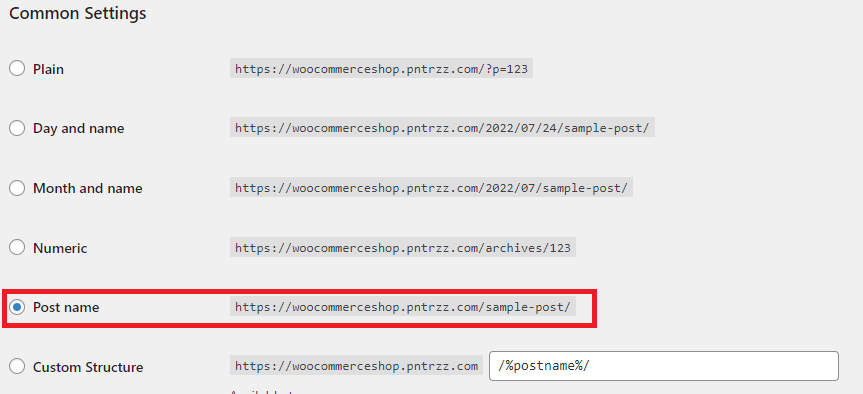
Additional Check – Go To Woocommerce Admin Dashboard > Settings > Permalink
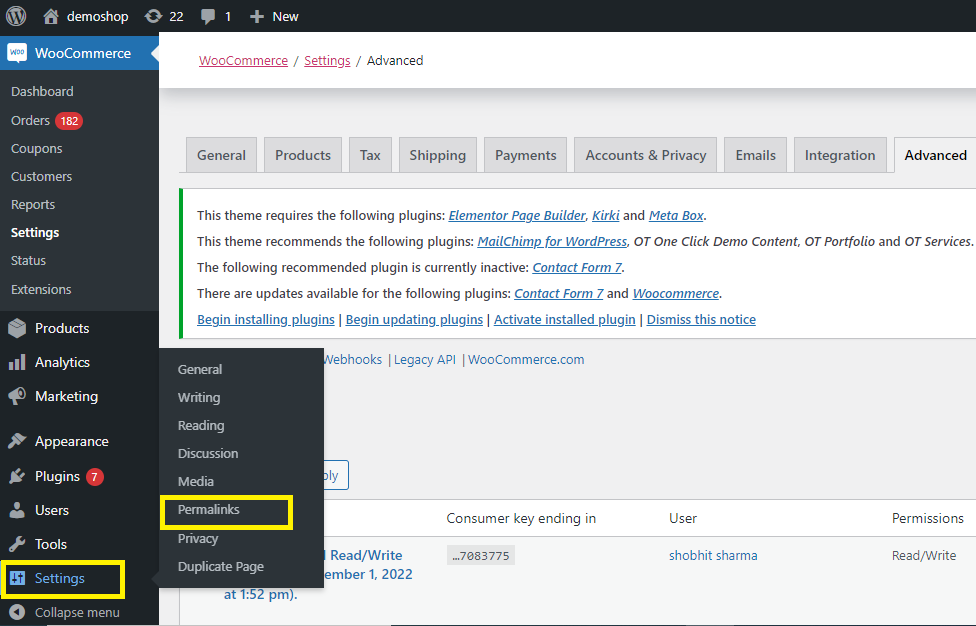
Make sure Common Settings is set to Post name
Follow Add Woocommerce Channel to integrate your Woocommerce store with the Delhivery Client Portal.
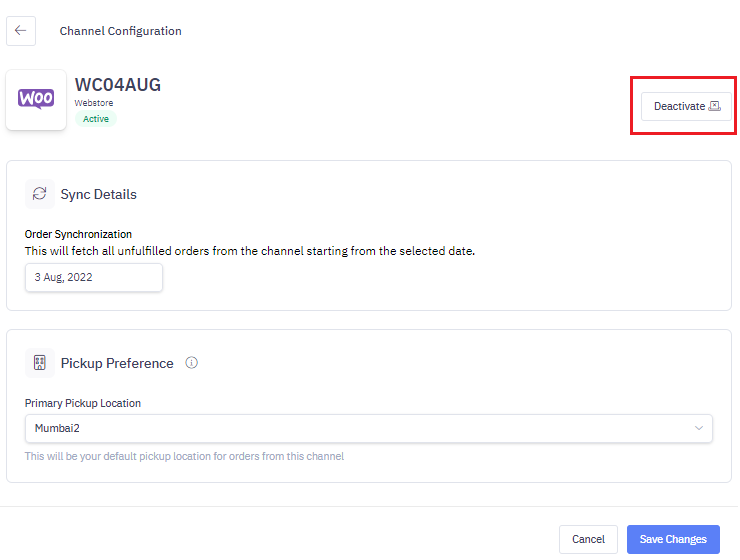
Deactivate Woocommerce Channel
To deactivate Woocommerce channel on the Client Portal –
Navigate Main Menu > Services > Configure Channels
On the Channel listing page, click Configure on the Channel you want to deactivate

Click Deactivate
FAQs
Which orders are fetched from Woocommerce?
Only ‘Pending’ & ‘Processing’ state Woocommerce orders are fetched. Completed orders are not fetched.
I connected my Woocommerce channel, but orders are not fetched.
Below are the possible reasons why order fetch fails
Order sync usually takes 5 minutes, post this they should reflect under Orders > Domestic Orders > Pending state in the Client Portal
There are no orders in Pending or Processing state on your Woocommerce store
Verify the order sync date. Suppose you have set the order sync date to 1st December 2022. Only Pending / Processing orders on your Woocommerce created from this date onwards will be fetched
Make sure to copy paste the Consumer Secret & Consumer Key correctly in the respective fields
While copy pasting the Store URL in the Client Portal make sure to remove the forward slash (/). Eg: if your store url is https.abc.com make sure you copy paste https.abc.com and not https.abc.com/
I tried connecting the Woocommerce channel but the portal shows an error ‘Channel name already exist’
This error shows when you have previously configured a channel with the same name. Every time you configure a new channel, the name needs to be unique.
What is order sync date in channel configuration?
Suppose you set order sync date to 1st December 2022. Only pending & processing state orders on your Woocommerce created from this date onwards will be fetched
Custom Channel
Overview
Manual sale orders can be created in this channel. These are the order taken via phone / e-mails or even Instagram / Facebook. Basically for sale channels that don’t have a direct integration with the client panel.
Orders can either be uploaded in bulk or created one by one.
Add Custom Channel
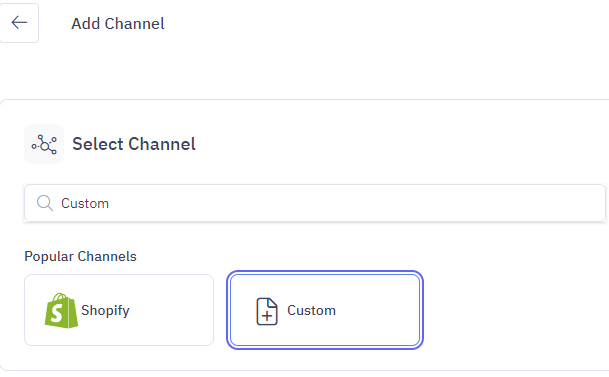
Steps to add Custom Channel:
- Navigate – Main menu > Channels > Add Channel
- On the Channels page, choose ‘Custom’ channel.
Provide the following information:
Basic Details
- Channel Name: Give a name to your Custom channel. * Pickup Preference: This will be your default pickup location for orders from this channel
- Click Add Channel
Custom Order Tags
Overview
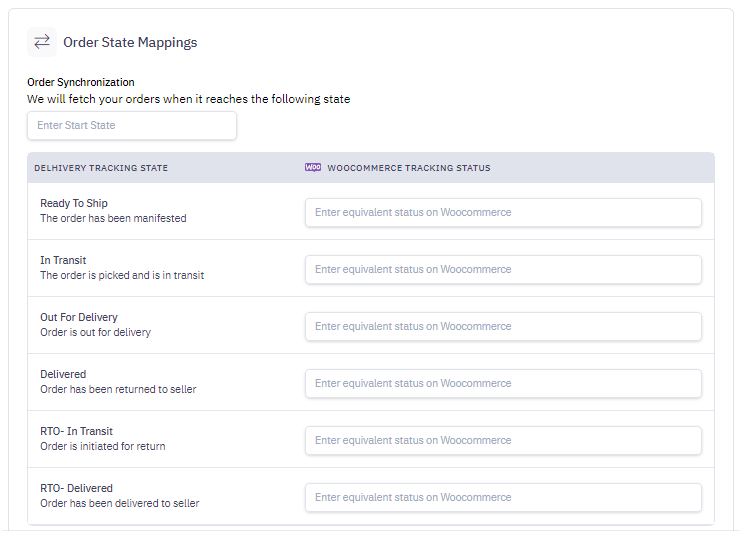
Logyxps Client Portal fetches open / unshipped orders from your online channels. Since the nomenclature of the status varies by channel, the table defines the order status we fetch for different online channels.
While configuring the online channel, you can update the order sync date. This will ensure Logyxps Client Portal fetches orders from the starting of this date.
The following table illustrates the different order/shipment statuses for different online channels –
| Online Channel | Channel field considered | Orders fetched for |
|---|
| Shopify | Fulfillment Status | Unfulfilled |
| Woocommerce | Order Status | Pending Payment, Processing |
To identify COD vs Prepaid orders, Logyxps Client Portal uses a default logic.
COD order tags = “cash_on_delivery”, “Cash on delivery”, “Cash on Delivery (COD)”, “Cash On Delivery – COD”)
Else the order is considered as Prepaid.
- You can update the Order Status in Shopify or Woocommerce that you want to use to fetch orders in Delhivery Client Portal
- You can also update the Order Status you want to update whenever a key shipment milestone is reached
- You can also update the COD and Prepaid Order tags to identify the Payment Mode of the fetched Orders
COD vs Prepaid Assignment
Overview
Logyxps Client Portal assigns a Payment Mode (COD or Prepaid) to your online orders that we fetch from Channels. This article defines the Payment Mode assignment since the nomenclature of the financial status varies by channel.
Shopify
- Shopify order has a Financial Status which has multiple statuses
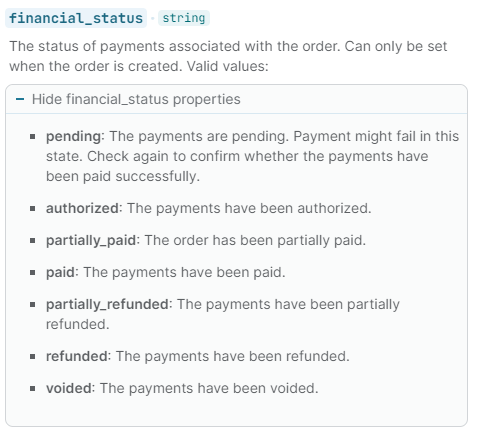
- Based on the Financial Status of the Shopify order, we identify the Payment Mode of the order in Logyxps Client Portal
| Shopify Financial Status | Logyxps Payment Mode |
|---|
| Paid | Prepaid |
| Pending | COD |
| Partially Paid | COD |
- If the Financial Status does not belong to the above statuses, the order will be created with blank Payment Mode and you will have to assign COD/Prepaid before shipping
- If the Financial Status of your order has been updated in Shopify, the change will reflect in Logyxps Client Portal within 5-10 minutes
Information Center (Rate Calculator)
Overview
You can fetch the Estimated Shipping Cost for Domestic and International orders from the Rate Calculator page.
In this article, you will learn about
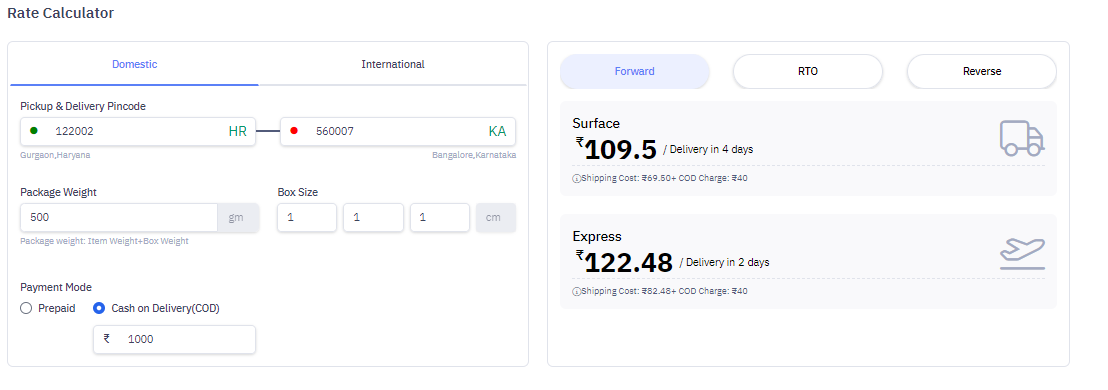
1. Domestic Rate Calculator
Navigate to Information Center > Rate Calculator > Domestic.
- You need to enter the Origin and Destination Pincode, package weight and dimensions, and the Payment mode and COD amount
- You can view the Surface and Express delivery options along with the TAT (in days) and the Estimated Shipping Cost
- You can also view RTO and Reverse (DTO) shipping costs as well
- If the pincodes are not serviceable for pickup or delivery, you will be displayed “Pincode is not serviceable” error
2. International Shipping Cost
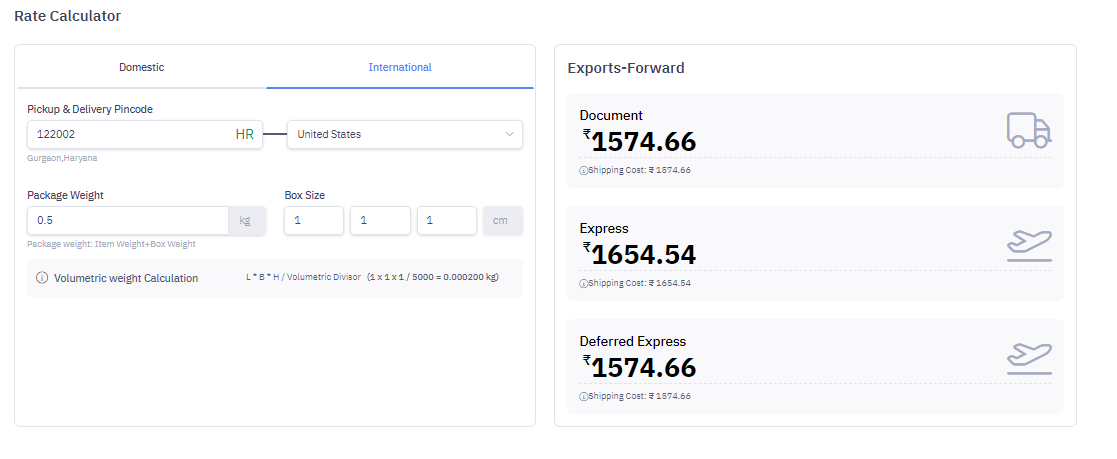
Navigate to Information Center > Rate Calculator > International.
- You need to enter the Origin Pincode (within India) and Destination Country, package weight and dimensions
- You can view the various shipping options available on this lane along with the Estimated Shipping Cost
- Please note that the final shipping cost may vary due to custom or exercise duties paid during delivery
Information Center (Rate Card)
Overview
You can view the Domestic shipping pricing table from the Rate Card page.
In this article, you will learn about
Key Terms and Definition
- Transport Mode
- Surface refers to movement of goods via Road
- Express refers to movement of goods via Air (wherever feasible).
- Shipment Type
- Forward (movement from Client Pickup Location to Consignee)
- RTO = Return to Origin, in the case that the customer is not available to receive the courier, it is returned back to the shipper.
- DTO = Deliver to Origin, in the case that the customer wants to return the product back to the shipper.
- Zone – Based on the Origin and Destination pincodes, your shipment is assigned a Zone.
- Zone A – Local within city pickup and delivery
- Zone B -Regional (Origin to destination within 500kms)
- Zone C – Metro to Metro
- Zone D – Rest of India
- Zone E – Special Zones (Jammu,HP, North East Excl. Manipur)
- Zone F – Special Zones (Kashmir, Manipur, Ladakh, Andman & Nicobar)
- Weight Slab – Based on the chargeable weight, your shipment is assigned a Weight slab.
- Chargeable Weight : Dead Weight or Volumetric, whichever is higher. For volumetric weight calculation, all sides are measured in cm.
- Please check your rate card to check the exact formula for calculating chargeable weight.
Pricing Table & Overhead Charges
- Navigate to Left Panel > Information Center > Rate Card to view your pricing table.
- Your pricing table gives the shipping cost for a shipment belonging to a specific weight slab, zone, a specific shipment type, and transport mode
- Pricing table also includes overhead charges.
- If you are shipping a COD shipment, you’ll be charged an additional cost for cash handling
- If you are opting for Quality Check RVP, you’ll be charged an additional cost for QC process
Information Center (Restricted Items)
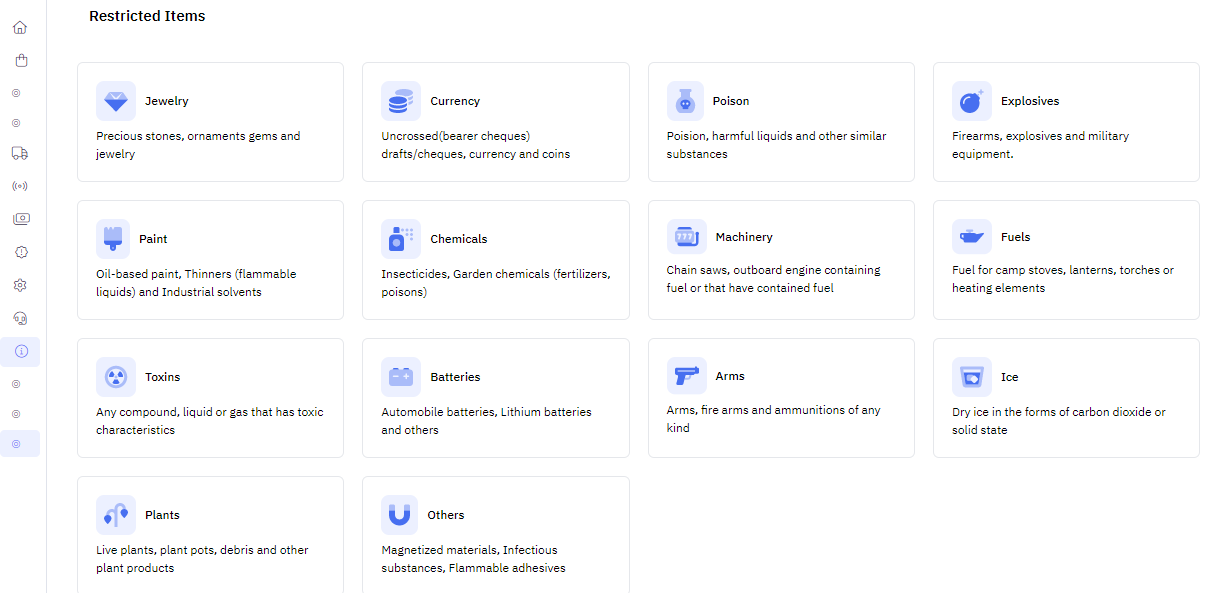
Overview
This article has a list of items that Delhivery restricts shipping. Please do not include the below items in your shipments. Delhivery seizes shipments with such items & the seller is penalized in these cases.
You can also view this list on the portal from –
Main Menu > Information Center > Restricted Items
Information Center (Reports)
Overview
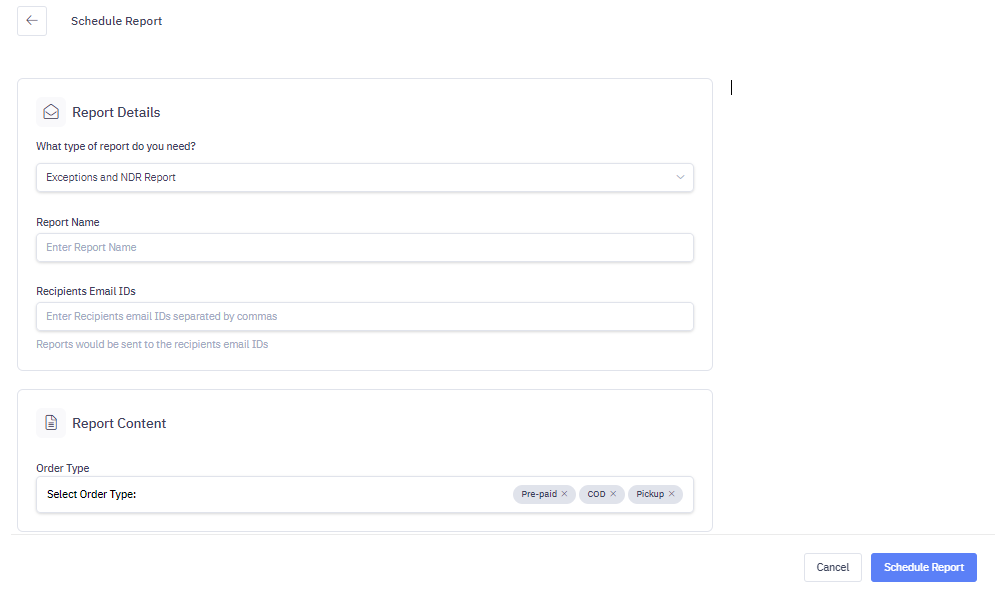
You can create & schedule reports based on various order status / type from Logyxps Client Portal.
Steps to create Reports
- Navigate to Dashboard > Main Menu > Reports > Schedule Report and select the Report type
- Order Report
- Exceptions and NDR Report
- NDR WhatsApp Verification Report

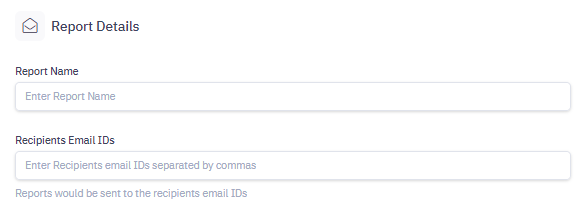
- Each Report can be given a unique name. Enter the Recipients Email IDs to whom you want to send these reports
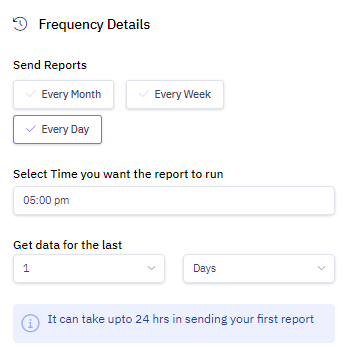
Schedule Order Reports
Under Frequency Details, schedule the day / time you want the reports. The first report will delivered upto 24 hours.
Select the Order Type – COD, Prepaid, Pickup
Select Order Status & Order Sub-Status. Click Schedule Report. You can refer to the below order status / order sub status for which reports can be scheduled.
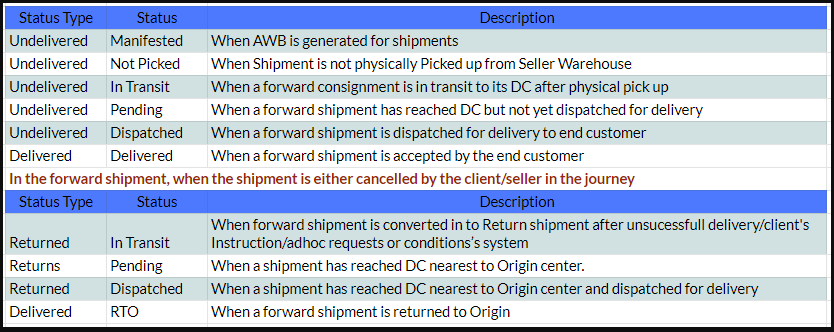
Schedule Exceptions & NDR Report
- You can select the shipment type you want in the report. Select COD and Prepaid for Forward Shipments and Pickup for Reverse Shipments (i.e. RVPs).
- This report will be delivered on a daily basis to the mentioned email IDs.
- Click on “Schedule Report” to complete.
Profile
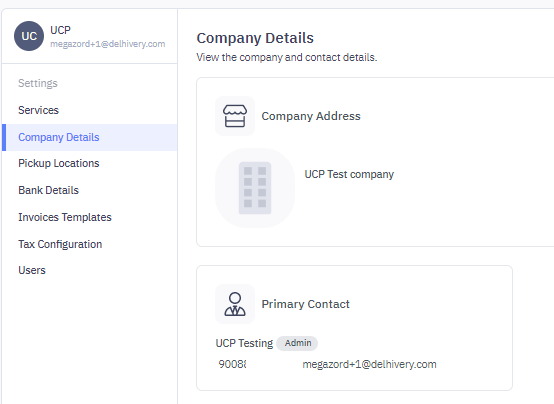
Company Details
View and Edit your company details like Company address, Company logo, Primary contact person.
Navigate to Main Menu > Settings> Company Details.
Bank Details
View and Edit your Bank details like Account Number, Beneficiary Code, IFSC Code and Bank Name. Navigate to Main Menu > Settings> Bank Details.
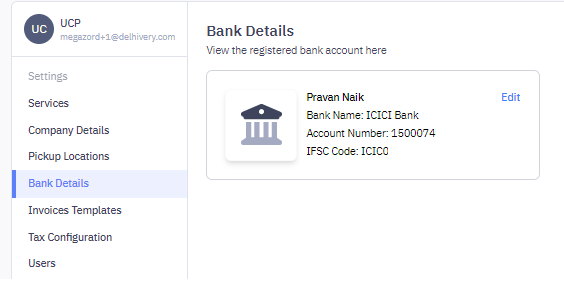
Notes: Editing Bank Details is not allowed between 6 PM IST to 9 AM IST:::
Sellers
Overview
Sellers is one of an important construct, if you have opted for Cross Border service on the client portal to ship internationally.
Steps to add Seller Profile
- Navigate to Settings > Sellers > New Seller
- Enter mandatory details like Full name, Mobile number, Email, Address, Pincode
- In KYC details, enter either aadhar card, voter id, passport or pancard number & upload respective document images.
- In case the seller sells commercial shipments, you need to enter mandatory details like Pan card, GST Number, Bank account number, Bank IFSC Code, Bank Authorized dealer code, IEC Code
- Click Add Seller
- You can now add this seller when you create international shipments.
Pickup Locations
Overview
Pickup locations are the physical locations that hold the inventory. Logyxps agents will pick up the shipments from these pickup locations. You can create two type of pickup locations –
- Domestic Pickup location
- International Pickup location
This portal maintains two separate entries for domestic and international pickup location. Suppose, for pickup location at XYZ address, both domestic and international shipments are shipped. In the client portal, two separate pickup locations will be created for the same address – one for domestic shipments, another for international shipments.
Steps to add a Pickup Location:
- Go to Main Menu -> Settings -> Pickup Locations -> Add New Pickup Location
- Fill out mandatory details like Location name, Mobile Number, E-mail, Address, Country, Pin code, State, City.
- The Mobile Number needs to be verified with an OTP. Ensure you add the detailed address for a hassle free pickup.
- Select if you will ship Domestic, International or, Both type of shipments from this location.
- In case you want a different return address for returned shipments for this location, mention the same under Return Details. Click Add Pickup Address
Notes:
1.You can deactivate a pickup location if it does not have assigned active orders.
2. Re-naming of pickup location name is not allowed.
Tax Configuration
Overview
This panel allows you to create flexible sales tax models using tax classes depending on your local tax laws.
Note:
UCP has two modes: Direct Manifestation & Order Management Mode. Tax configuration is available only on Order Management mode. Read this article.
Tax Classes define the rates in percentage and the name of the tax. It contains rates set on individual order items and invoice items. Various types of taxes are applicable, like IGST, CST, and GST.
Steps to configure Tax:
1. Navigate – Main Menu > Settings > Tax Configuration > Click New Tax on top right corner
2. Name the tax class. Usually, you can combine your tax class and tax rate to create a tax class name. For example, if your tax name is IGST and its rate is 18%, you can create a tax class name as ‘IGST 18%
3. Provide a Tax Code. It should be a unique code without any spaces or special characters. Ex: IGST18
4. Rate Type can be single, multiple, or compounded. Fill in the tax name (CGST, SGST, IGST) and its values.
5. Click Save Changes
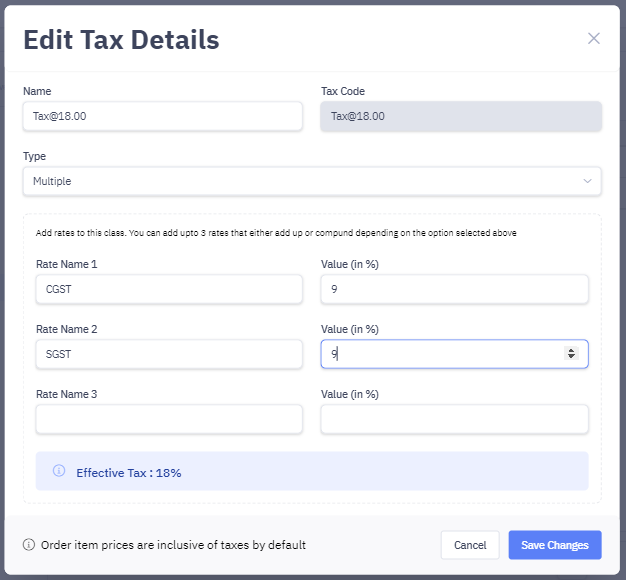
Note –
Order item prices are inclusive of taxes by default.
Invoice Templates
Overview
This section allows you to:
- Set invoice templates for specific channels
- Set Invoice Sequence Numbers correctly
Note: UCP has two modes: Direct Manifestation & Order Management Mode. Invoice configuration is available only on Order Management mode. Read this article.
1. Invoice Templates
Each channel can have its own invoice template. But a channel can have only one invoice template associated with it.
Navigation
- Main Menu > Settings > Invoice Templates > Click New Template on right top corner
- The Default template will apply to all channels, except when it is overridden by another template for a particular channel
- Name your invoice template and select the channel this template is applicable. Add all the configuration details to the template.
You can configure the following sections:
- Design – Basic header, footer, and logo, authorized signature
- Company – Company name, facility address, ‘Contact Us’ details, tax identification number, email address, and contact number.
- Customer – Choose the customer details that you wish to display.
- Data – The data that appears from the underlying invoice information.
5. Click Create New Template
2. Invoice Sequence Numbers
You can set different invoice sequence numbers for some or all of the channels, depending on your need.
To create a new sequence and assign it to any channel:
- Navigate to Main Menu > Settings > Invoice Templates > Click Add Sequence
- Set the Channel, Sequence Starting Number & Invoice Sequence Pattern.
For Example – If you set the sequence pattern to {seq}-{mm}-{dd}, with the starting sequence number as 1 and 17th December as the date of creation of the invoice, then the first invoice number will read as 00001-12-17. - Click Create New Sequence
NoteThe new Invoice sequence will apply only for Invoices generated after the sequence was set or updated. All Invoices created before that will have the Invoice number based on prior setting.
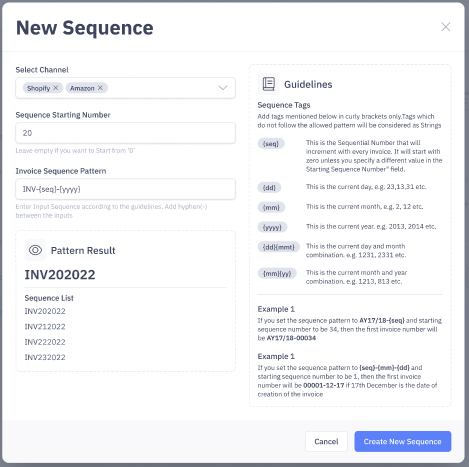
API Token Generation (API Setup)
Overview
Your API Integration with Delhivery works on an API Token that helps authenticate the client identity.
- Navigate to Left Panel > Settings > API Setup page.
- Users can view and copy the existing API Token
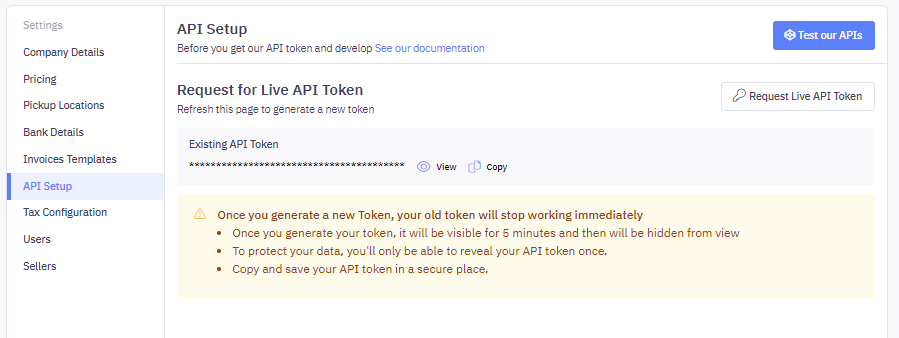
- Users can also click on “Request Live API Token” that refreshes the old token with a new token
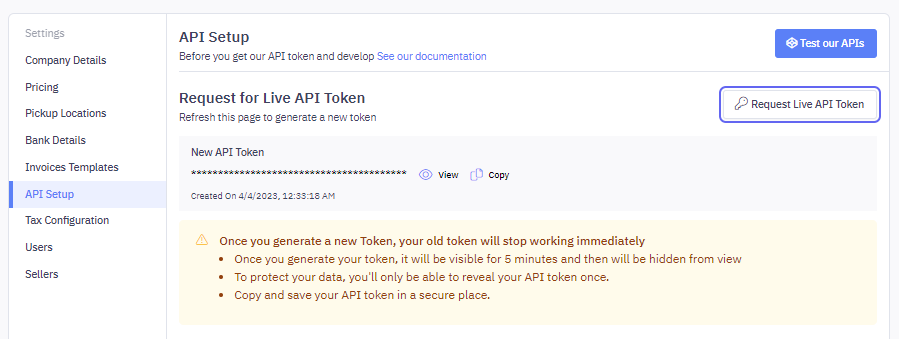
Once you generate a new Token, your old token will stop working immediately
- Once you generate your token, it will be visible for 5 minutes and then will be hidden from view
- To protect your data, you’ll only be able to reveal your API token once.
- Copy and save your API token in a secure place.
Client Developer Portal (API Setup)
Overview
Client developer portal is a self service portal for clients to test Logyxps APIs in a staging environment and ease the whole API integration process and avoid the back and forth of client queries on the APIs like getting authentication token , pickup location details etc.
In this section :
Read API Documentation
- Users can read our API documentation by logging in to Logyxps Logyxps Client Portal and visiting https://ucp.delhivery.com/developer-portal/documents
- Users can read our APIs and get the Testing and Production API URLs, request and response structure along with list of functional validations, if applicable.
- We currently offer the following APIs
- Pincode Serviceability
- Fetch Waybill
- Client Warehouse Creation
- Client Warehouse Updation
- Package Shipment Creation
- Package Shipment Updation
- Shipment Tracking
- Calculate Shipping Cost
- Generate Shipping Label
- Pickup Request Creation
- NDR Shipment Updation
Test our APIs
- Users can read our API documentation by logging in to Logyxps Client Portal and visiting https://ucp.delhivery.com/developer-portal/v1/execute
- Users can test any of our APIs by filling the input parameters, and check the response structure and also copy the CURL request
- For example : User can test our Pincode Serviceability API by entering a test pincode and check the response structure i.e. whether Logyxps services this pincode (Y/N) for the various services it offers like COD and Prepaid delivery, Reverse Pickup.
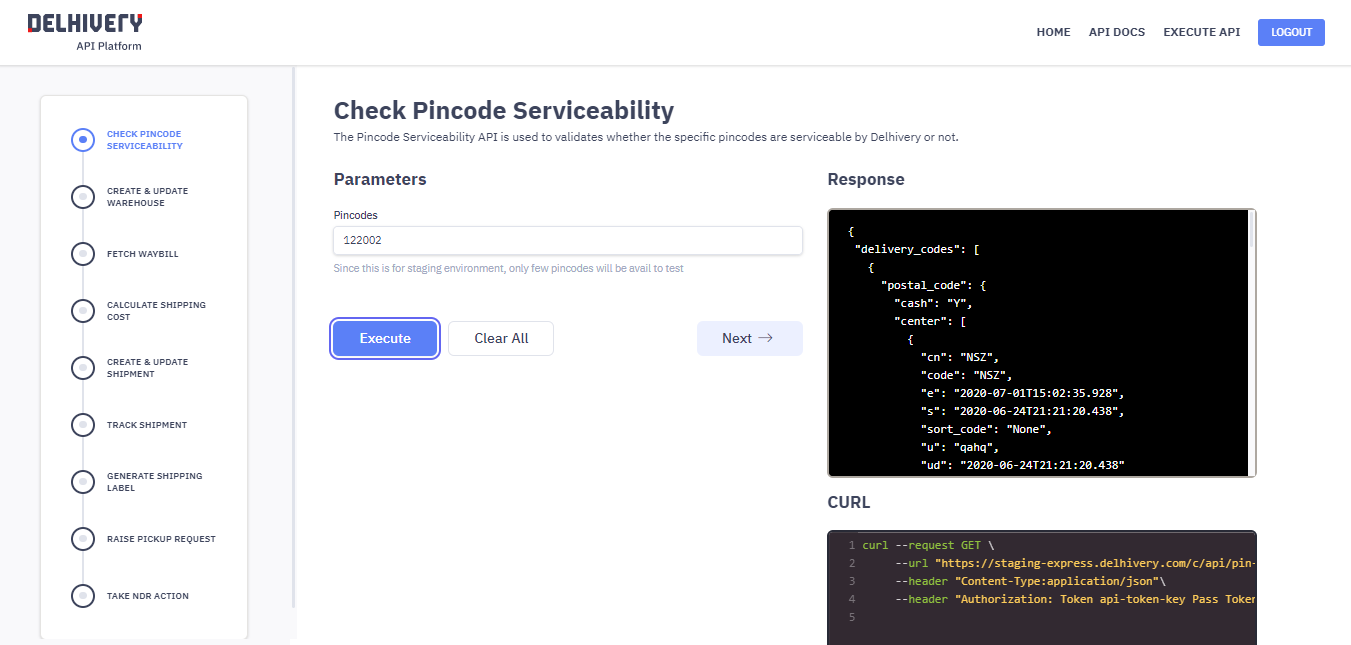
Users
Overview
Users can be given permissions based on the ‘roles’ they are assigned. ‘Owner’ is the user who created the account. An owner can add two role types ‘Admins’ & Non-Admin
Admins have access to all data in an account but cannot make themselves the owner
Steps to add user
- Navigate to Main Menu > Settings > Users > Click New User
- Enter details like Full name, Mobile Number, Email ID, select Role type. Click Invite User
- A password reset email is triggerd to the email ID, once the user reset’s the password, they can acess their account.
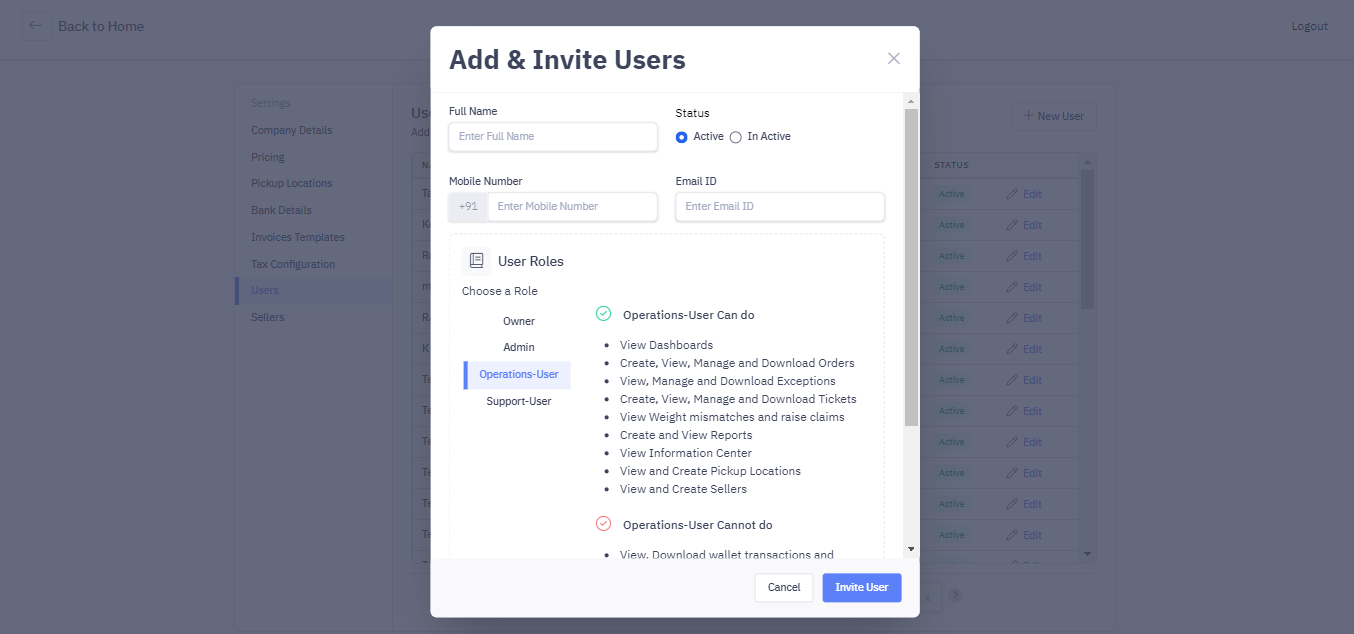
User Permissions
Below we have listed user permissions in detail as per the role type.
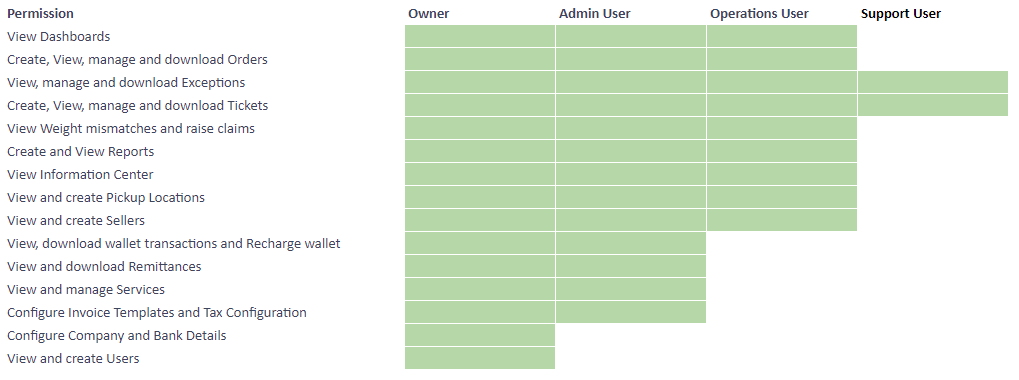
Release Notes (April , 2023)
April Product Updates
One-click Shopify Integration
- Users can now connect their Shopify webstore with Delhivery through one-click integration process
- Users can go to Shopify App Store – search for “Delhivery” – and Install the app
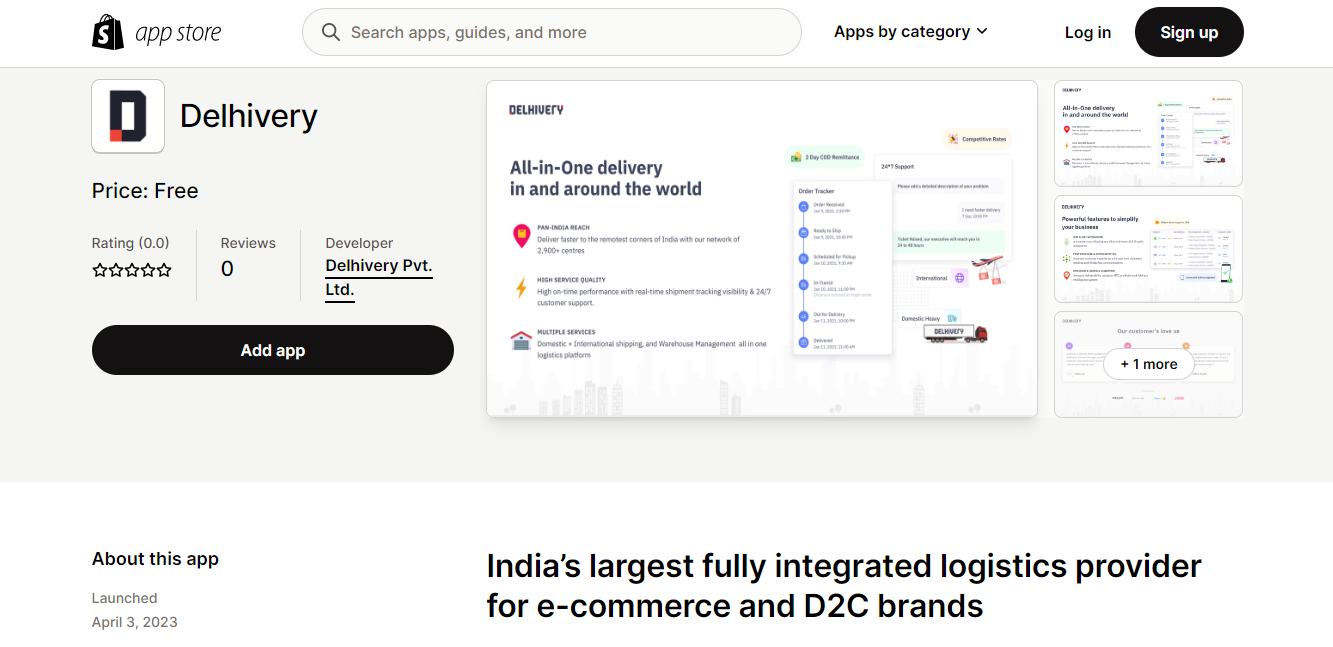
- When the user installs the app, user shall be redirected to Delhivery Client Portal where
- Existing users can connect their existing logged in Delhivery account, or
- Existing users can log in to another Delhivery account and connect, or
- New users can sign up on Delhivery and connect their shopify store
Refer to this article to learn more.
View Rate Card for Domestic Shipping
- Navigate to Left Panel > Information Center > Rate Card to view your pricing table.
- Your pricing table gives the shipping cost for a shipment belonging to a specific weight slab, zone, a specific shipment type, and transport mode
Release Notes (March, 2023)
March Product Updates
Client Developer Portal
- Users can read our API documentation or test Delhivery APIs in a staging environment by entering input parameter and get the response structure and CURL request in return
- This will ease the client API integration process and avoid the back and forth of client queries on the APIs like getting authentication token , pickup location details etc.
- Refer to this article to learn more
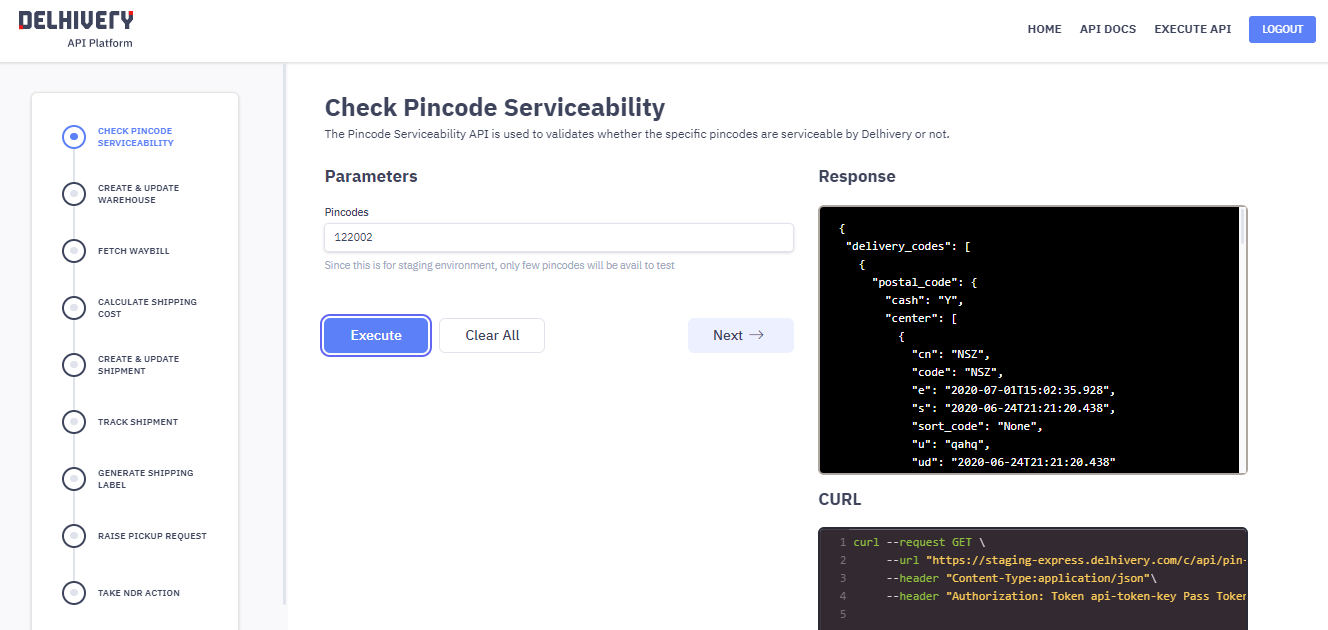
Bulk Update Orders
- Navigate to Orders > Forward Orders > Pending > Bulk Edit Orders
- Users can download the CSV template and fill the Pending Order numbers that they want to update
- Users can update the following attributes – LBH (in cms), Weight (in gms), Pickup Location Name, Transport Mode (Surface/Express), Payment Mode (COD/Prepaid), COD Amount for maximum 500 orders in a single request
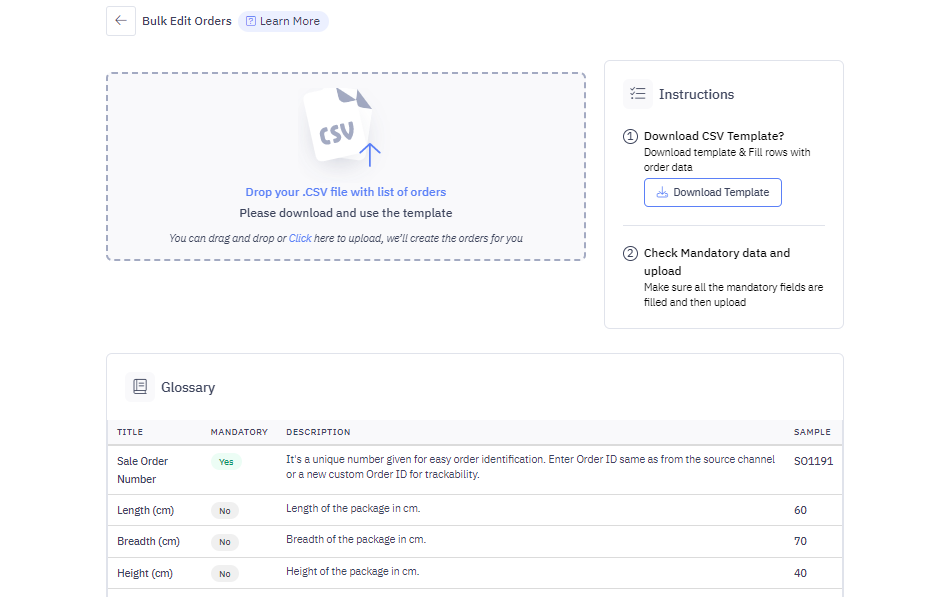
Release Notes (February, 2023)
February Product Updates
Bulk Actions on NDR Shipments
- Users can not download Open NDR shipments and take bulk actions by submitting the AWB numbers across one of the four buckets
- Forward Shipment : Re-attempt Delivery
- Forward Shipment : Return Shipment
- Reverse Shipment : Re-schedule Pickup
- Reverse Shipment : Cancel Pickup
- Navigate to NDR page to click on “Download” or “Create Bulk Actions”
- Refer to this article to learn more.
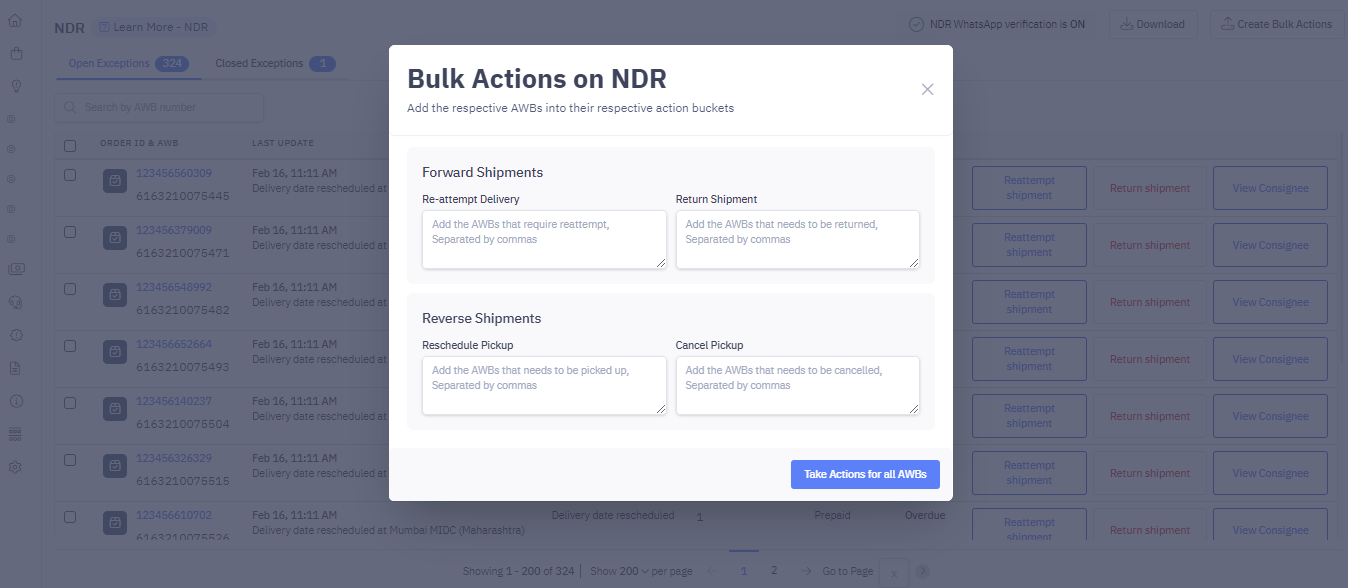
- Users can update the Order Status in Shopify or Woocommerce that you want to use to fetch orders in Delhivery Client Portal
- Users can also update the Order Status you want to update whenever a key shipment milestone is reached
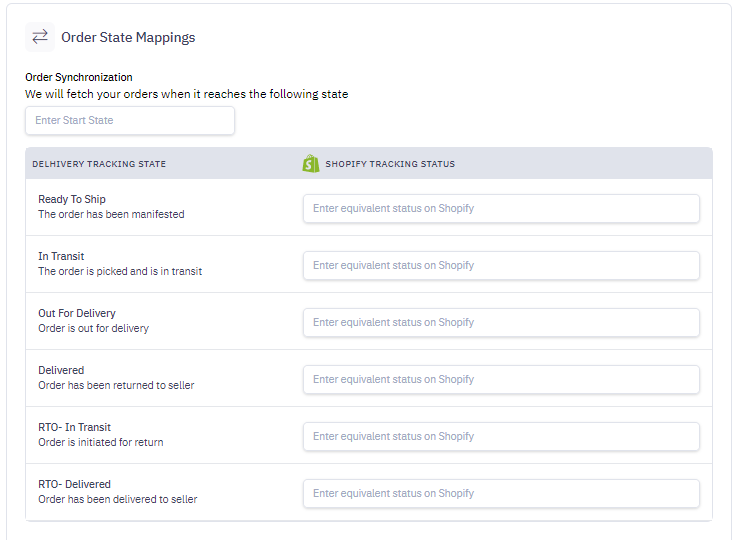
Rate Calculator for Cross Border Shipping
- Users can now track Cross Border Shipping rates from the Rate Calculator Page
- Navigate to Left Panel >> Information Center >> Rate Calculator >> International
- User can enter the Origin Pincode, Destination Country and Package Weight and Box Dimensions – and view the shipping options available with their Estimated Shipping Cost
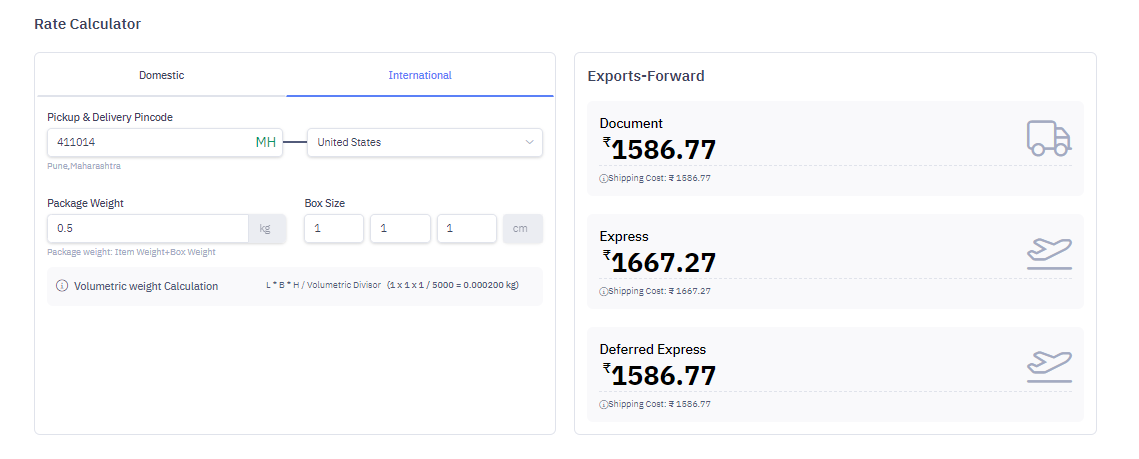
Release Notes (January, 2023)
January Product Updates
New User Roles & Permissions
- Logyxps Client Portal now has four different user types – Owner, Admin, Operations User, Support User
- Navigate to Left Panel >> Settings >> User >> Create New User
- A Company Owner can create a new user by entering the Name, Phone, and Email ID of the user and grant them one of the roles – Admin, Operations User, Support User – based on their needs. A Company Owner can also edit roles assigned to an existing user
- Refer to this article to learn more.
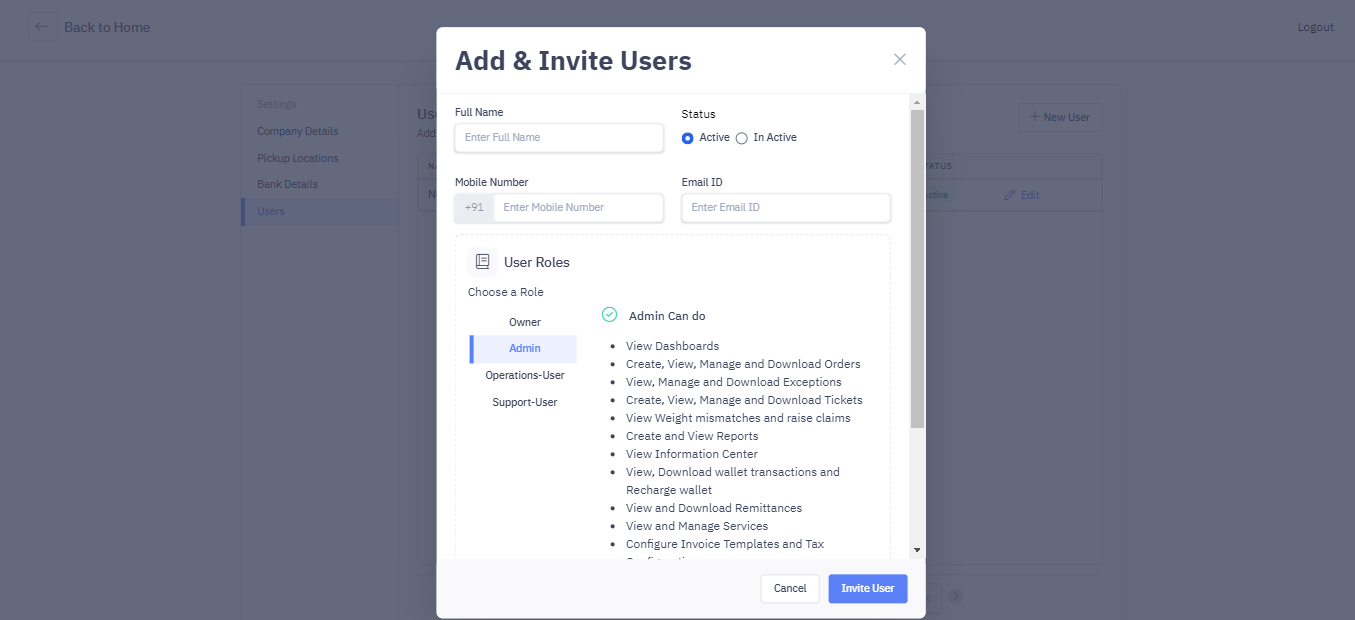
All Shipment Listing & Bulk AWB Search
- Users can now track All Shipment states in a single listing page under “All Shipments”
- Users can search up to max 100 AWB Numbers or Order Numbers on any listing page and download the filtered results
- For Multi Piece Shipments, the shipment listing page will show each box listed as a separate entry with a tag “Multi Pack” to highlight MPS. The box which is treated as the Master AWB will be highlighted as “Master Box”
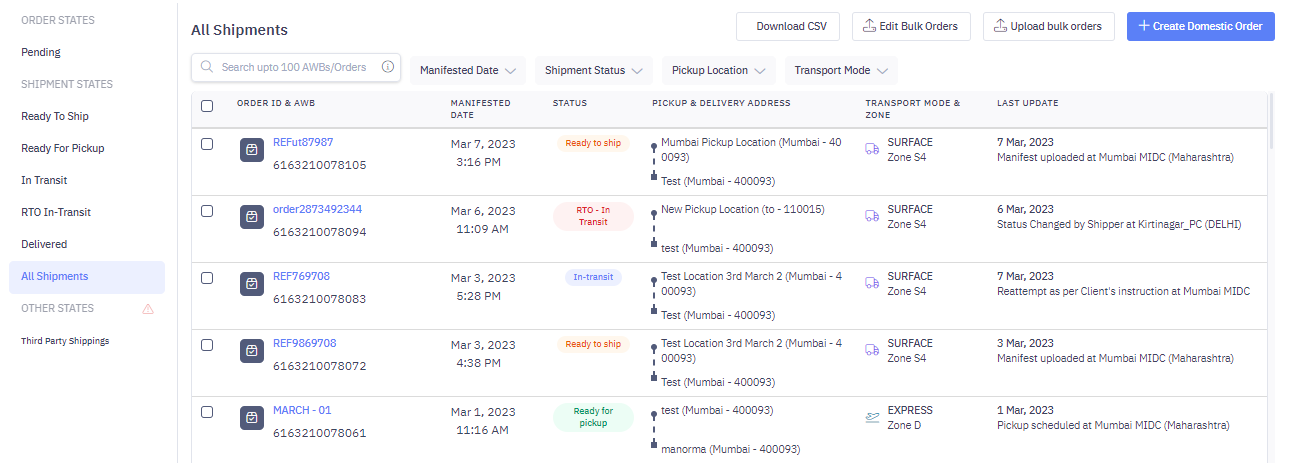
Release Notes (December, 2022)
December Product Updates
Cross Border Shipping
- Users can activate Cross Border Shipping from Logyxps Client Portal by submitting their IEC and TAN document
- Users can create International Export shipments, raise a Pickup request, and track the end-to-end lifecycle
- Navigate to Services Page > Cross Border > Click on “Activate” > Submit IEC and TAN Document > Sign Service Agreement > Start Shipping!
- Refer to this article to learn more.
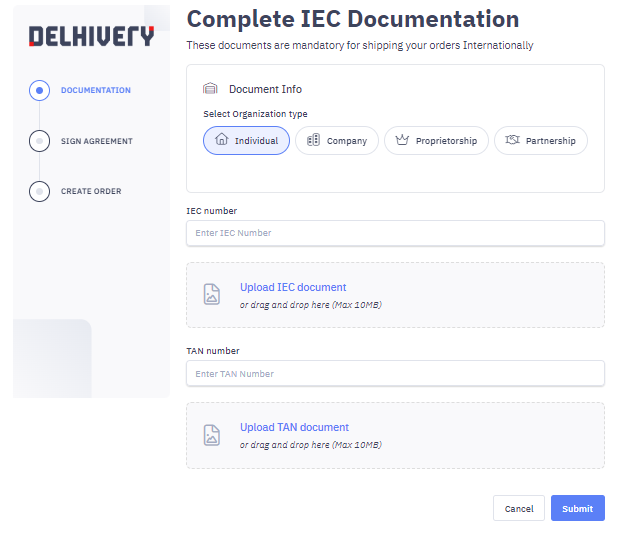
Bulk Actions on Support Tickets
- Users can not download Open/Resolved tickets and upload comments in bulk through CSV file
- Navigate to Support page to click on “Download Open Tickets” or “Bulk Upload Comments”
- To bulk upload comments, Download the CSV file of the selected type of tickets & Add comments. Please note that you can not upload comments for closed tickets.
- Refer to support-tickets to learn more.
Channel Improvements
- Payment status of COD order will be updated from Pending to Paid in Shopify when it is successfully delivered to consignee
- If shopify/woocommerce orders are not picked due to any operational reason or if user tries to cancel before pickup, the fulfillment will be cancelled and the order will move from Processed to Pending
Release Notes (November, 2022)
November Product Updates
New Features
WhatsApp Communications
- Users can send WhatsApp Communication to end consignee on Shipment milestones and NDR verification
- User can select out of the following communication events – Shipment Manifested, Picked Up, Out for Delivery, Delivered
- Users can preview the WhatsApp templates and add them to their plan and update from Services page
- Navigate to Left Panel > Services page > Communication > Select Communication Events > Click on “Update”
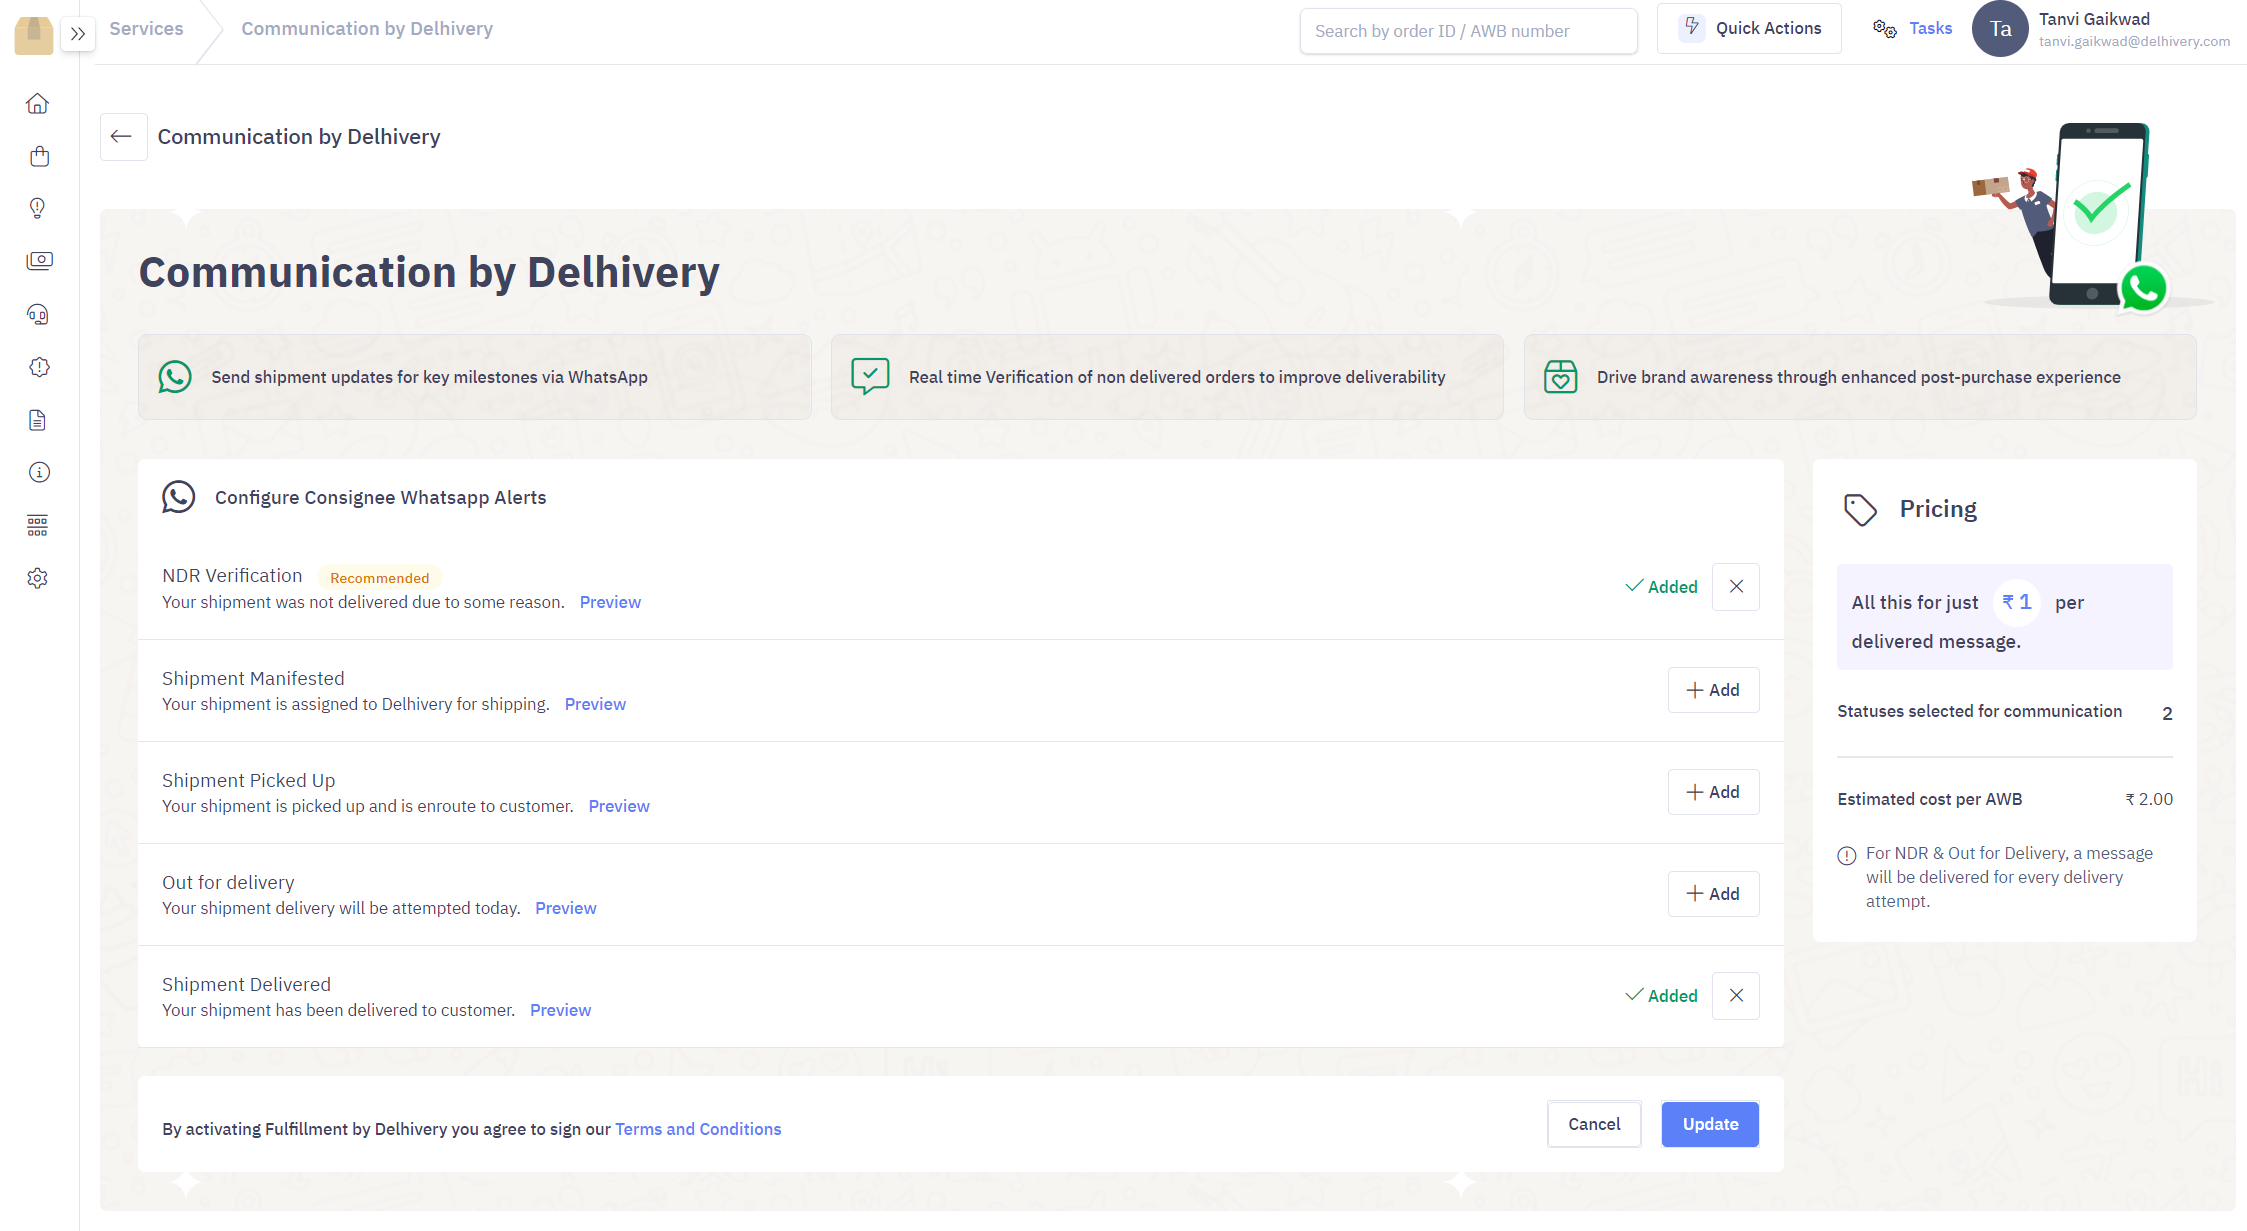
Improvements
Edit Shipment Details post manifestation
- Users can edit the following Shipment Details post manifestation
- Consignee – Phone Number and Address (within the same pincode)
- Payment Mode and COD Amount
- Product Details and Shipment Weight
- User can edit shipment post manifestation and before it is out for delivery.
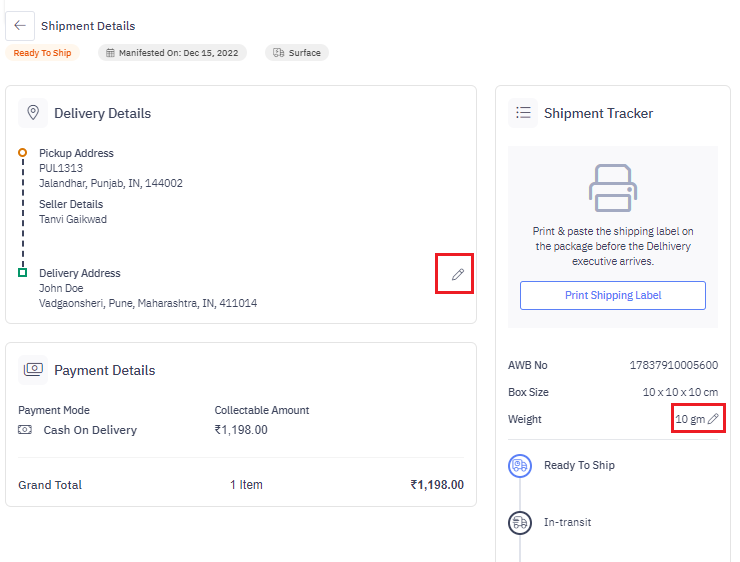
Release Notes (October, 2022)
October Product Updates
New Features
Order Management
- Delhivery Client Portal comes with two modes – Order Management and Direct Manifestation. You can choose the mode which suits your shipping requirements
- Under Order Management flow, you can create orders at a pending stage, use built-in integrations with Shopify and Woocommerce, generate sale Invoices and manage Tax configurations
- Users can activate or deactivate Order Management from Services > Value Added Service > Order Management. Read more

Improvements
Quick Actions
- Quick Actions allow user to create Domestic Order, Return Order, Pickup Request, Recharge Wallet, or Raise a Support Ticket from anywhere in the Delhivery Client Portal
- User can also check their Rate Calculator by entering shipment information and fetch the Estimated Shipping Cost
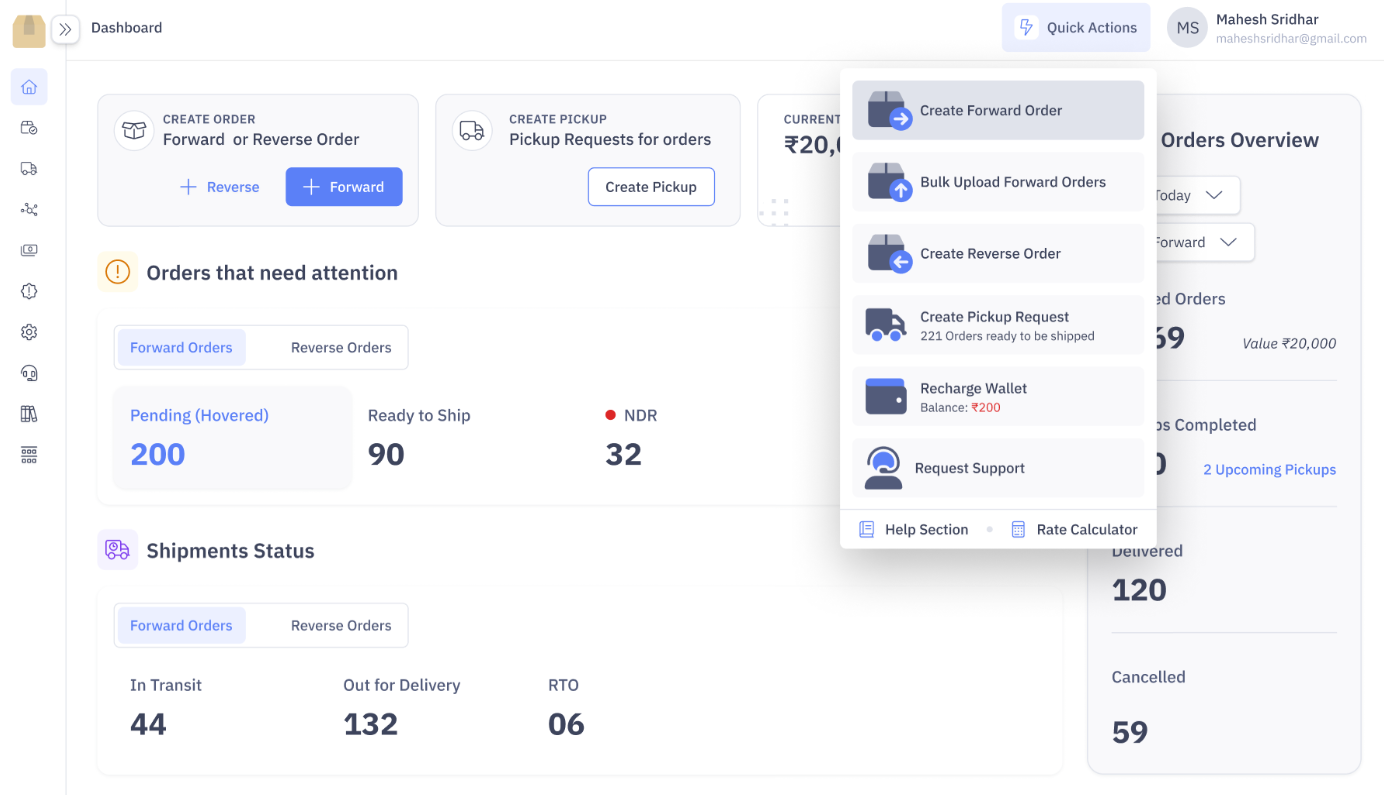
Release Notes (September, 2022)